第08篇_SpringCloud_Netflix
第01章_微服务入门
第一节 系统架构演变
1. 传统的单体架构
单体架构指将一个应用的全部功能都整合在一起,以减少部署节点和成本,对于小型应用来说非常适用。缺点是其不同模块间代码高度耦合,也无法进行水平扩展。

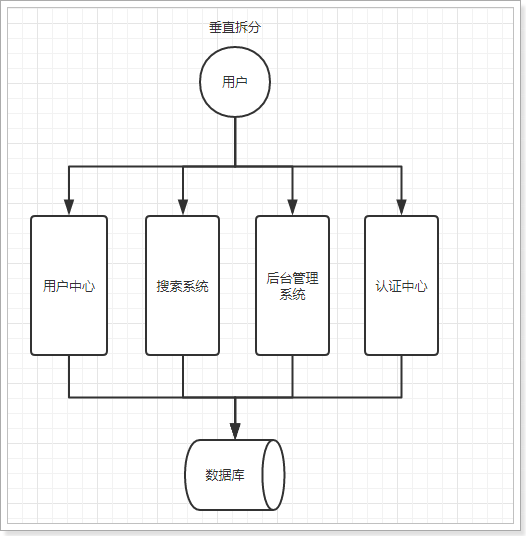
2. 垂直应用架构
当传统的单体架构无法满足日益增长的业务需求时,于是将应用按照不同的模块进行拆分,实现流量分担,并支持对不同的模块进行优化和水平扩展。缺点是系统间相互独立,会有很多的重复开发工作,影响开发效率。
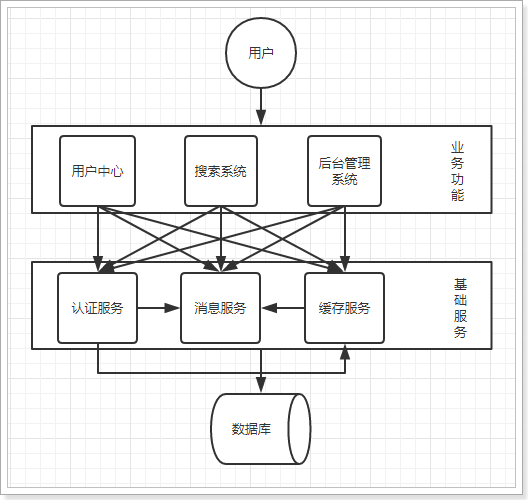
3. 分布式架构
当垂直应用越来越多,应用之间交互不可避免,将核心业务或基础业务抽取出来,作为独立的服务,逐渐形成稳定的服务中心,使应用能更快速的响应多变的市场需求。缺点是系统间耦合度变高,调用关系错综复杂,难以维护。
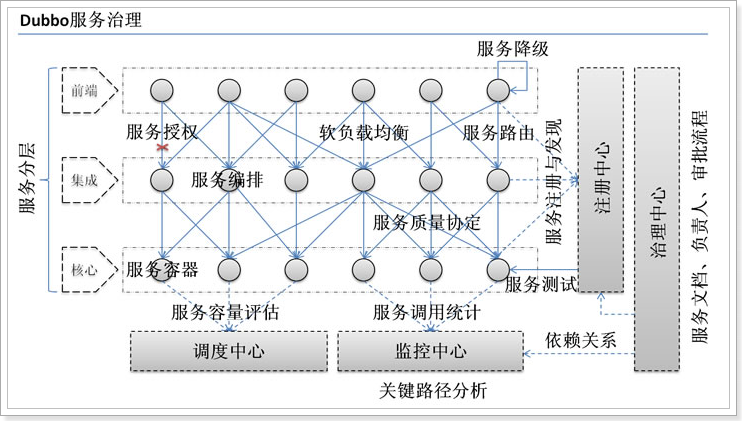
4. 面向服务的架构(SOA)
在分布式架构下,当部署的服务越来越多,需要增加一个统一的调度中心来对集群进行实时管理。此时,系统就会演变为面向服务的架构(SOA)。缺点是服务间关系复杂,相互依赖,一旦某个环节出错可能造成服务雪崩,而且运维、测试部署困难,不符合DevOps思想。
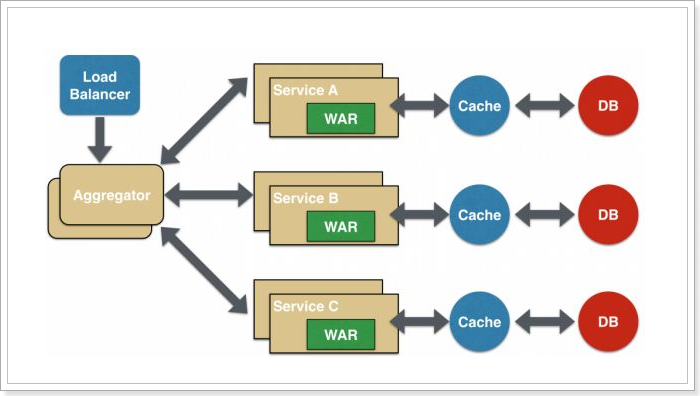
5. 微服务架构
微服务一词源于Martin Fowler的博文Microservices。简单地说,微服务是系统架构上的一种设计风格,它的主旨是将一个原本独立的系统拆分为多个小型服务,这些小型服务都在各自独立的进程中运行,服务之间通过基于HTTP的RESTful API进行通信协作。被拆分成的每一个小型服务都围绕着系统中的某一项或一些耦合度较高的业务功能进行构建,并且每个服务都维护着自身的数据存储、业务开发、自动化测试案例以及独立的部署机制。由于有了轻量级的通信协作基础,所以这些微服务可以使用不同的语言来编写。
第二节 微服务技术选型
1. SpringCloud简介
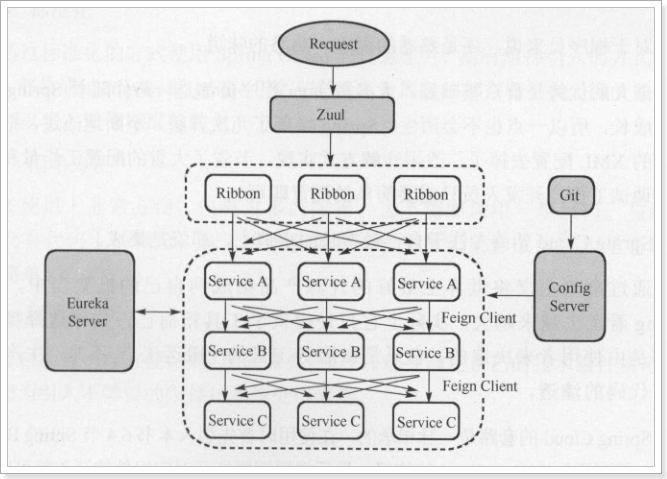
微服务是一种架构设计思想,需要具体的技术进行落地。SpringColud是一个分布式微服务架构的一站式解决方案,是多种微服务架构技术落地的集合体,俗称微服务全家桶。
Eureka:服务治理组件,包含服务注册与发现机制的实现。
Zuul:网关组件,提供智能路由,访问过滤等功能。
Ribbon:负载均衡组件,进行客户端负载均衡。
Feign:服务调用组件,进行服务间远程调用。
Hystrix:容错管理组件,实现断路器模式,在服务出现故障时进行熔断或降级。
2. 新的微服务组件
随着技术的不断迭代,出现了一些更优秀的微服务组件,将会在后续的章节中进行介绍。

3. 版本选择
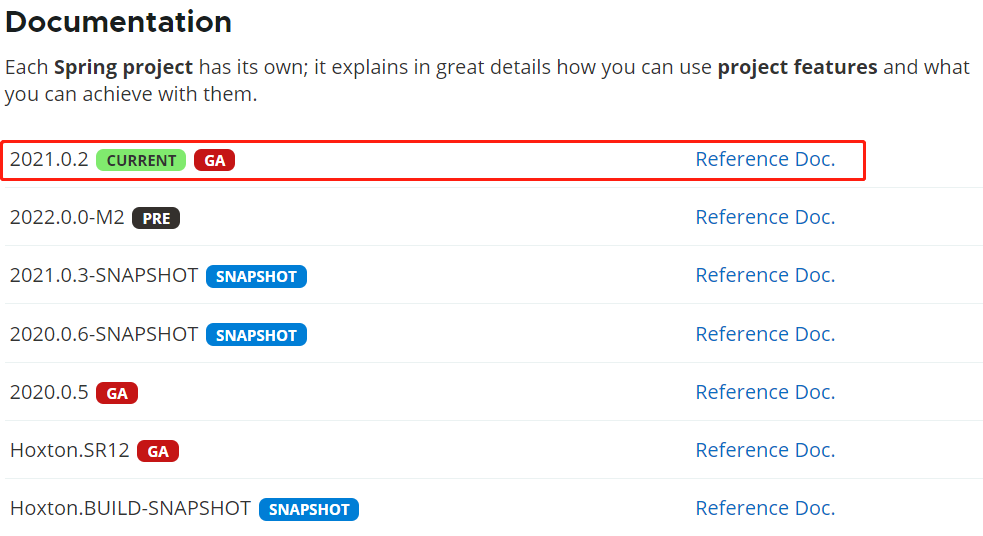
打开SpringCloud官方文档,选择最新的一个稳定版本。
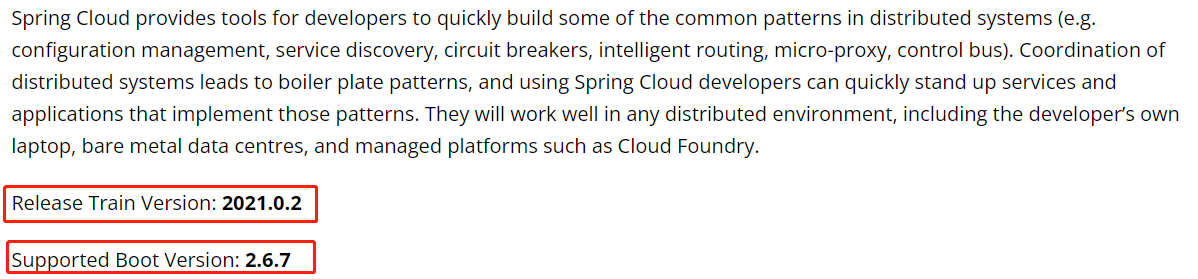
然后点击Reference Doc,查看推荐的SpringBoot版本。
第三节 微服务父工程搭建(聚合工程)
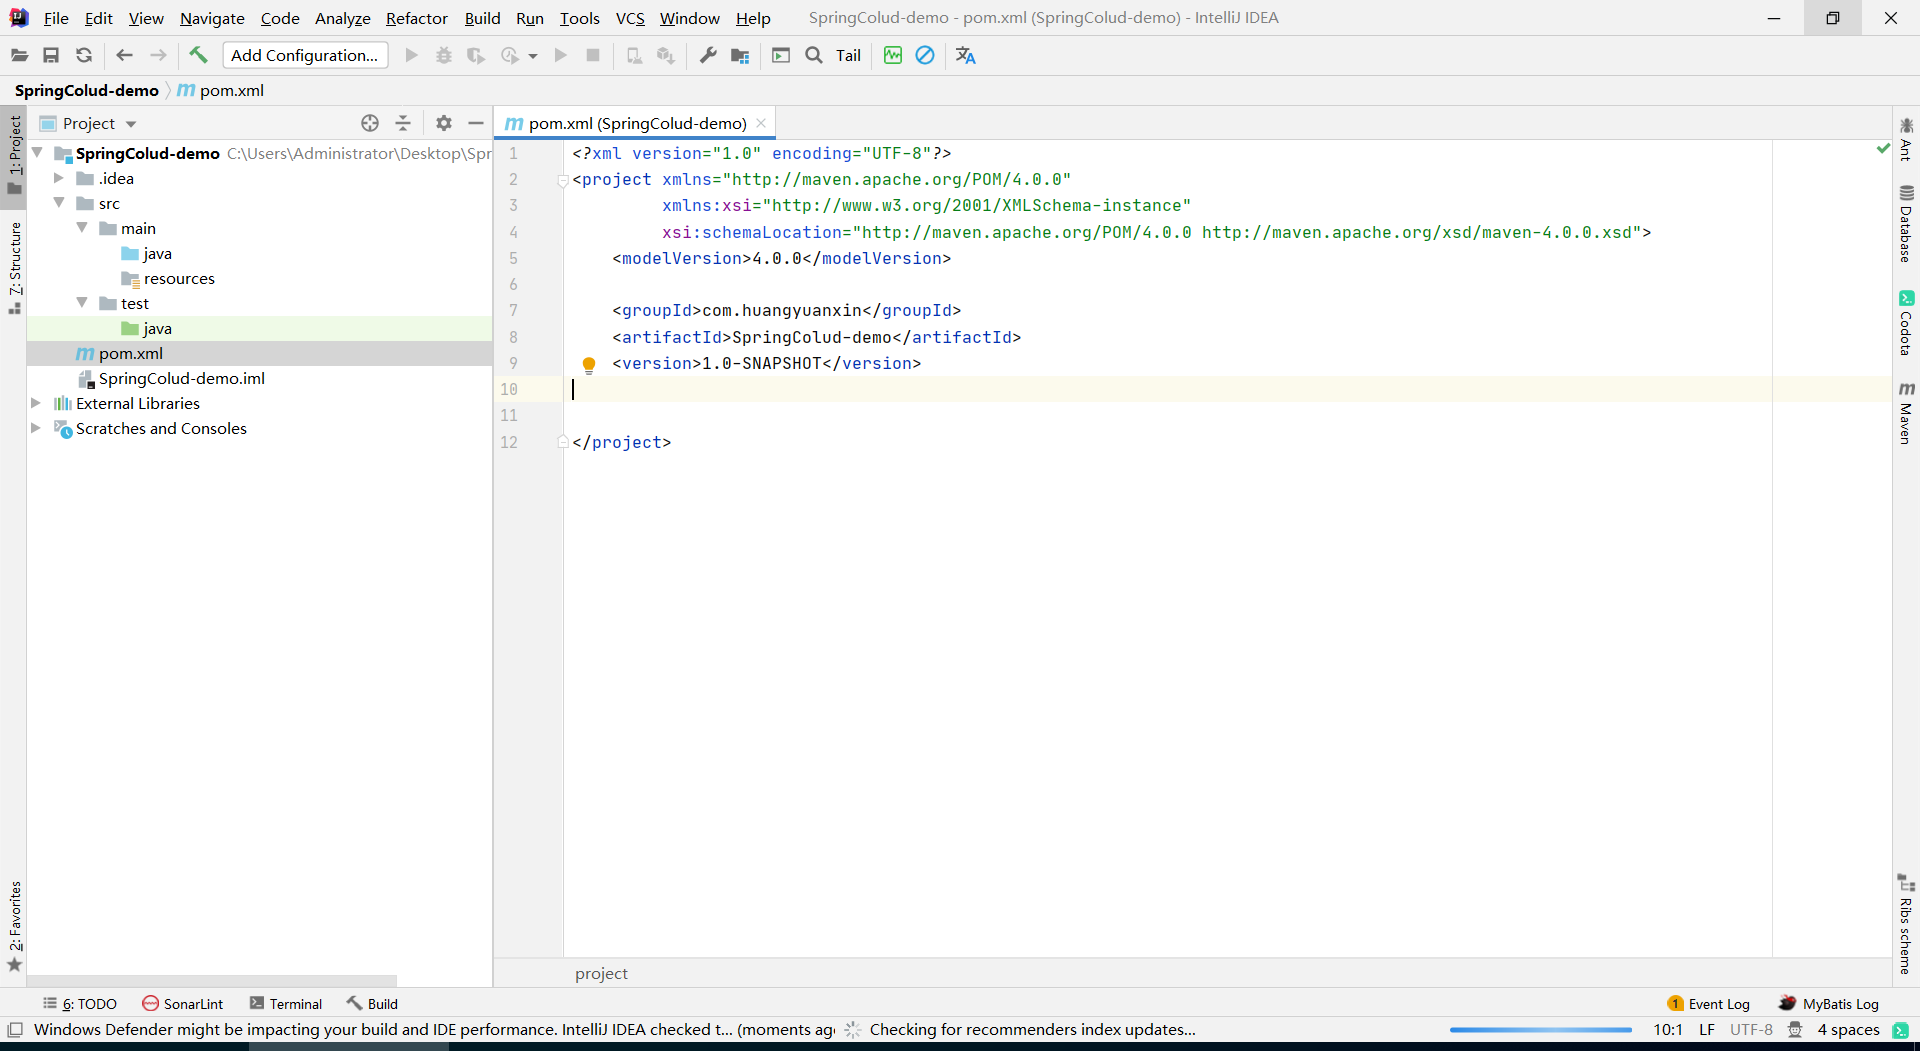
1. 创建Maven工程


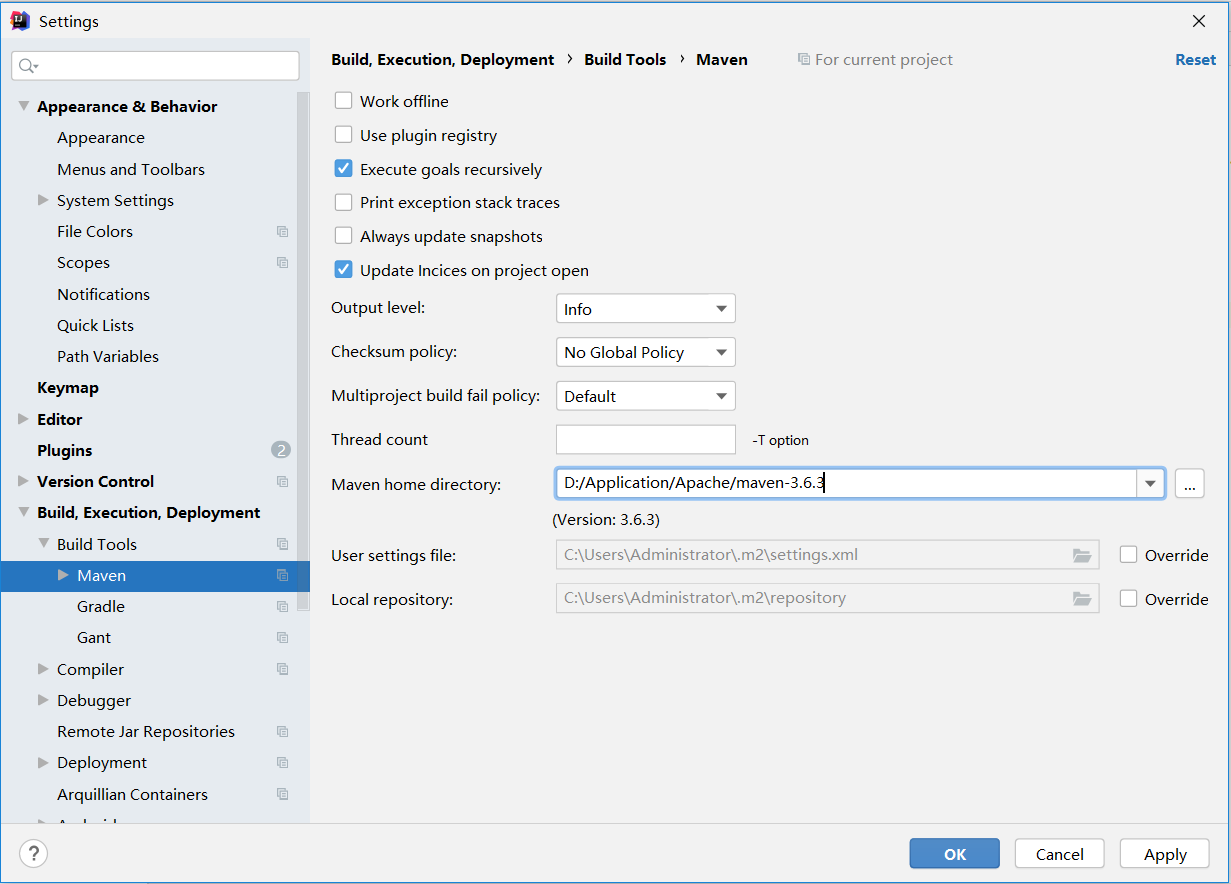
2. 选择Maven版本
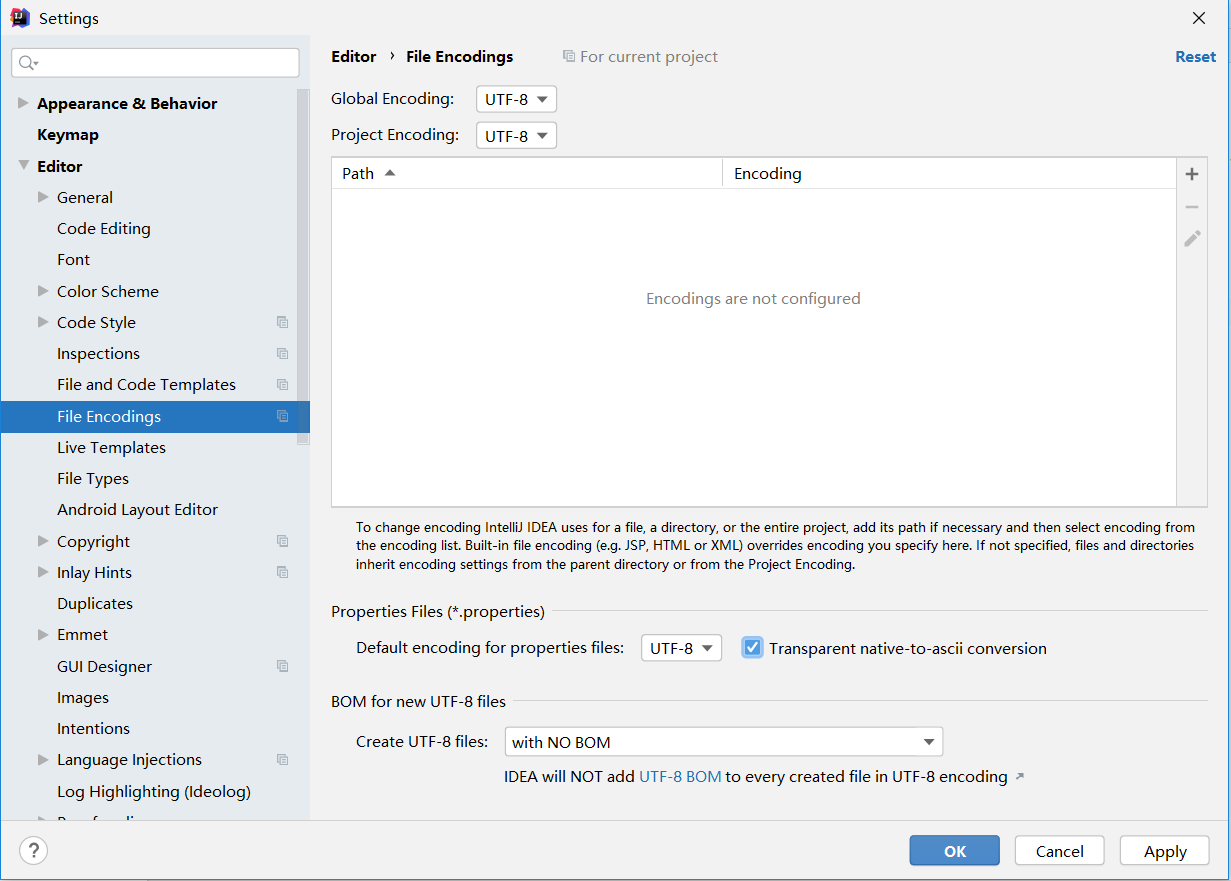
3. 设置字符编码
4. 开启注解处理器

5. 选择编译版本

6. POM文件配置
991 2<project xmlns="http://maven.apache.org/POM/4.0.0"3 xmlns:xsi="http://www.w3.org/2001/XMLSchema-instance"4 xsi:schemaLocation="http://maven.apache.org/POM/4.0.0 http://maven.apache.org/xsd/maven-4.0.0.xsd">5 <modelVersion>4.0.0</modelVersion>6
7 <!-- GAV坐标 -->8 <groupId>com.huangyuanxin.SpringCloud</groupId>9 <artifactId>SpringCloud-demo</artifactId>10 <version>1.0-SNAPSHOT</version>11 <!-- 父工程(聚合工程)的打包方式一般为POM -->12 <packaging>pom</packaging>13
14 <!-- 定义一些属性 -->15 <properties>16 <project.build.sourceEncoding>UTF-8</project.build.sourceEncoding>17 <maven.compiler.source>1.8</maven.compiler.source>18 <maven.compiler.target>1.8</maven.compiler.target>19 <junit.version>4.12</junit.version>20 <log4j.version>1.2.17</log4j.version>21 <lombok.version>1.16.18</lombok.version>22 <mysql.version>5.1.47</mysql.version>23 <druid.version>1.1.16</druid.version>24 <mybatis.spring.boot.version>1.3.0</mybatis.spring.boot.version>25 </properties>26
27 <!-- 依赖版本管理 -->28 <dependencyManagement>29 <dependencies>30 <dependency>31 <groupId>org.springframework.boot</groupId>32 <artifactId>spring-boot-dependencies</artifactId>33 <version>2.2.2.RELEASE</version>34 <type>pom</type>35 <scope>import</scope>36 </dependency>37 <dependency>38 <groupId>org.springframework.cloud</groupId>39 <artifactId>spring-cloud-dependencies</artifactId>40 <version>Hoxton.SR1</version>41 <type>pom</type>42 <scope>import</scope>43 </dependency>44 <dependency>45 <groupId>com.alibaba.cloud</groupId>46 <artifactId>spring-cloud-alibaba-dependencies</artifactId>47 <version>2.1.0.RELEASE</version>48 <type>pom</type>49 <scope>import</scope>50 </dependency>51 <dependency>52 <groupId>mysql</groupId>53 <artifactId>mysql-connector-java</artifactId>54 <version>${mysql.version}</version>55 </dependency>56 <dependency>57 <groupId>com.alibaba</groupId>58 <artifactId>druid</artifactId>59 <version>${druid.version}</version>60 </dependency>61 <dependency>62 <groupId>org.mybatis.spring.boot</groupId>63 <artifactId>mybatis-spring-boot-starter</artifactId>64 <version>${mybatis.spring.boot.version}</version>65 </dependency>66 <dependency>67 <groupId>junit</groupId>68 <artifactId>junit</artifactId>69 <version>${junit.version}</version>70 </dependency>71 <dependency>72 <groupId>log4j</groupId>73 <artifactId>log4j</artifactId>74 <version>${log4j.version}</version>75 </dependency>76 <dependency>77 <groupId>org.projectlombok</groupId>78 <artifactId>lombok</artifactId>79 <version>${lombok.version}</version>80 <optional>true</optional>81 </dependency>82 </dependencies>83 </dependencyManagement>84
85 <!-- 编译插件 -->86 <build>87 <plugins>88 <plugin>89 <groupId>org.springframework.boot</groupId>90 <artifactId>spring-boot-maven-plugin</artifactId>91 <configuration>92 <fork>true</fork>93 <addResources>true</addResources>94 </configuration>95 </plugin>96 </plugins>97 </build>98
99</project>
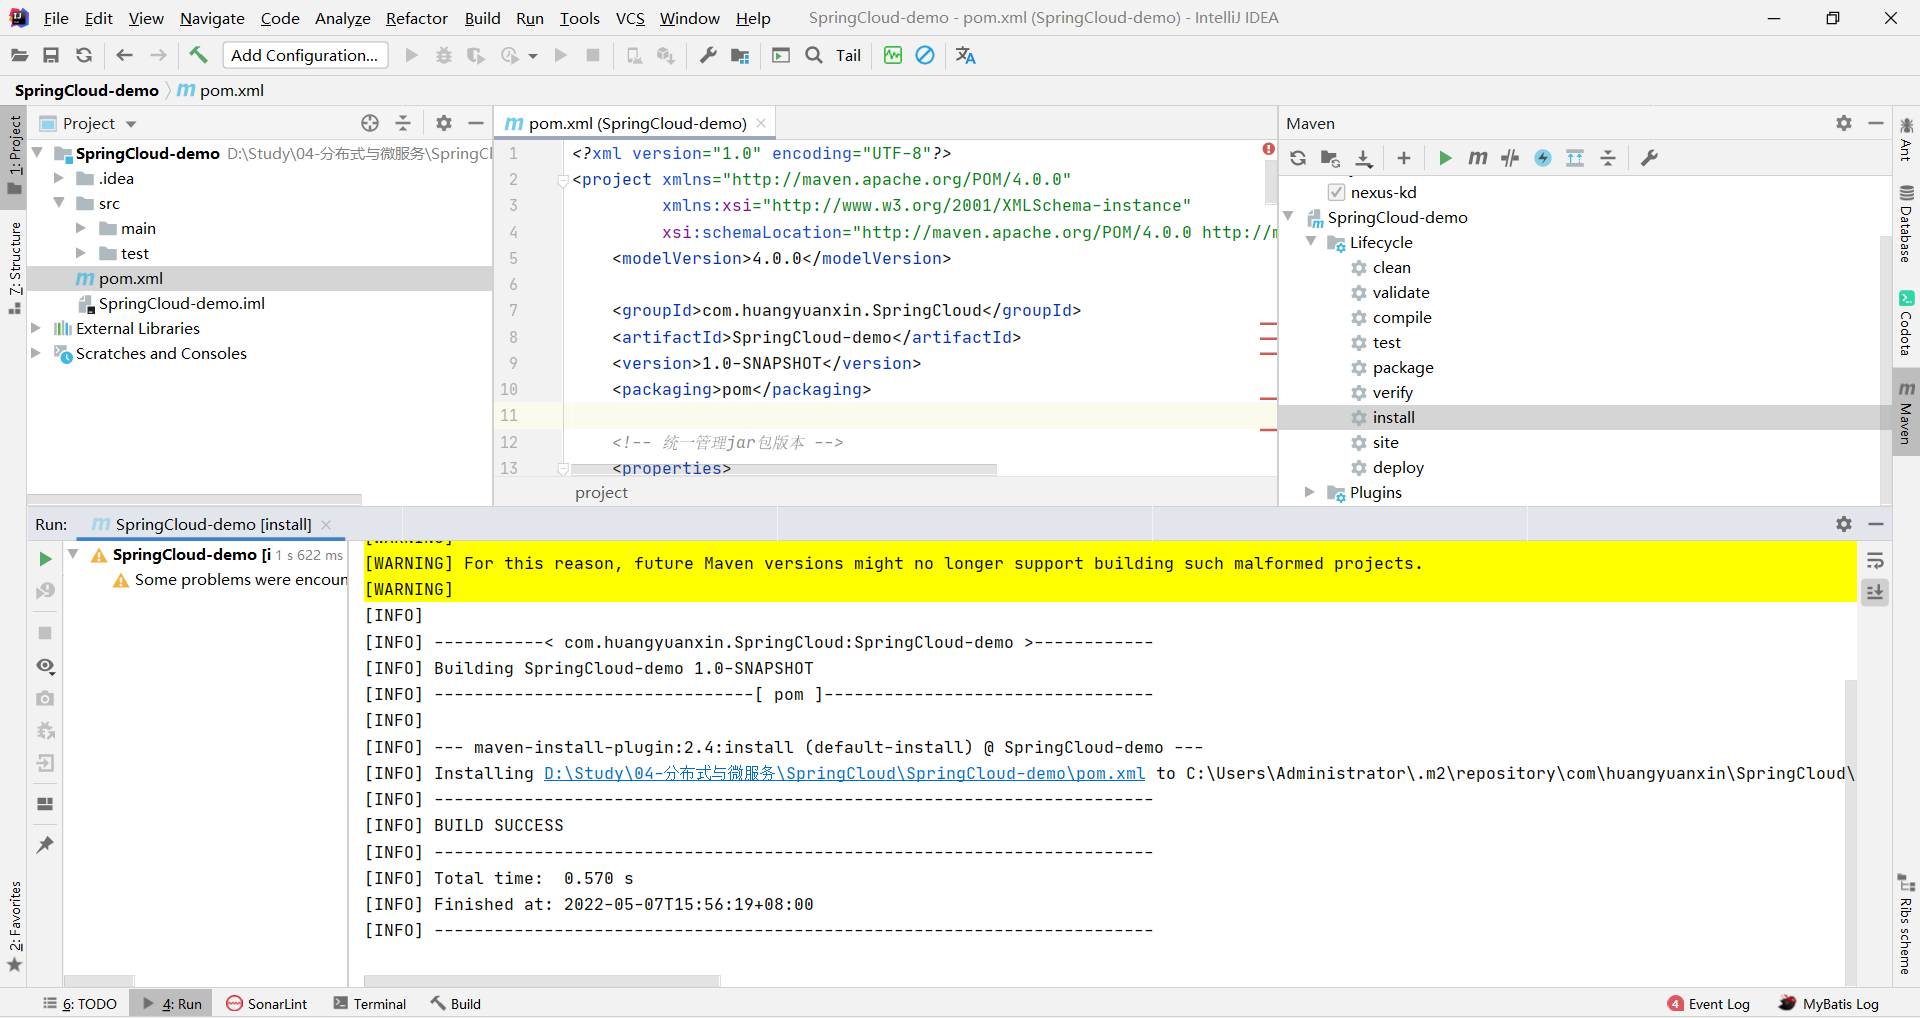
7. 安装到本地仓库
8. 注意事项
如果依赖无法下载或下载缓慢,请修改Maven的setting.xml文件,添加阿里云的镜像。
241<!--添加阿里云的镜像-->2<profiles>3<profile>4<id>aliyun</id>5<repositories>6<repository>7<id>aliyun</id>8<url>http://maven.aliyun.com/nexus/content/repositories/central/</url>9<releases>10<enabled>true</enabled>11</releases>12<snapshots>13<enabled>true</enabled>14<updatePolicy>always</updatePolicy>15</snapshots>16</repository>17</repositories>18</profile>19</profiles>2021<!--进行激活-->22<activeProfiles>23<activeProfile>aliyun</activeProfile>24</activeProfiles>如果出现Command line is too long. Shorten command line for xxx or also for Application default configuration错误,请修改.idea/workspace.xml文件,添加如下属性。
41<component name="PropertiesComponent">2<property name="dynamic.classpath" value="true" />3</component>4
第四节 业务工程搭建
1. 通用模块搭建
通用模块提供多个微服务共用的实体、工具和一些基础功能等。
1) 新建SpringCloud-common模块
打开左侧Project窗口(默认打开)。
右击父工程名称->New->Module,进入New Module窗口。
选择合适的Module SDK->Next。
检查Parent是否为预期的父工程名称。
配置name为SpringCloud-common。
检查Location、GAV等是否正确。
2) 修改pom.xml文件
331 2<project xmlns="http://maven.apache.org/POM/4.0.0"3 xmlns:xsi="http://www.w3.org/2001/XMLSchema-instance"4 xsi:schemaLocation="http://maven.apache.org/POM/4.0.0 http://maven.apache.org/xsd/maven-4.0.0.xsd">5 <parent>6 <artifactId>SpringCloud-demo</artifactId>7 <groupId>com.huangyuanxin.SpringCloud</groupId>8 <version>1.0-SNAPSHOT</version>9 </parent>10 <modelVersion>4.0.0</modelVersion>11
12 <artifactId>SpringCloud-common</artifactId>13
14 <dependencies>15 <dependency>16 <groupId>org.springframework.boot</groupId>17 <artifactId>spring-boot-devtools</artifactId>18 <scope>runtime</scope>19 <optional>true</optional>20 </dependency>21 <dependency>22 <groupId>org.projectlombok</groupId>23 <artifactId>lombok</artifactId>24 <optional>true</optional>25 </dependency>26 <dependency>27 <groupId>cn.hutool</groupId>28 <artifactId>hutool-all</artifactId>29 <version>5.1.0</version>30 </dependency>31 </dependencies>32
33</project>
3) 编写实体类
DAO层Payment实体
221package com.huangyuanxin.springcloud.common.model;2
3import lombok.AllArgsConstructor;4import lombok.Data;5import lombok.NoArgsConstructor;6import lombok.ToString;7
8import java.io.Serializable;9
10/**11 * @Author: huangyuanxin12 * @Date: 2022/5/913 */14public class Payment implements Serializable {19 private Long id;20 private String serial;21}22
Controller层CommonResult实体
251package com.huangyuanxin.springcloud.common.model;2
3import lombok.AllArgsConstructor;4import lombok.Data;5import lombok.NoArgsConstructor;6import lombok.ToString;7
8/**9 * @Author: huangyuanxin10 * @Date: 2022/5/911 */12public class CommonResult<T> {17 private Integer code;18 private String message;19 private T data;20
21 public CommonResult(Integer code, String message) {22 this(code, message, null);23 }24}25
4) 安装到本地仓库
打开右侧Maven窗口。
展开SpringCloud-common工程。
点击Lifecycle下的install进行安装。
等待片刻,当run窗口打印出"BUILD SUCCESS"字样即表示安装成功。
5) SQL脚本
91CREATE TABLE `payment`2(3 `id` bigint(20) NOT NULL AUTO_INCREMENT COMMENT 'ID',4 `serial` varchar(200) DEFAULT '',5 PRIMARY KEY (`id`)6) ENGINE = InnoDB7 AUTO_INCREMENT = 18 DEFAULT CHARSET = utf89
2. 服务提供者-支付服务搭建
1) 新建SpringCloud-service-pay模块
打开左侧Project窗口(默认打开)。
右击父工程名称->New->Module,进入New Module窗口。
选择合适的Module SDK->Next。
检查Parent是否为预期的父工程名称。
配置name为SpringCloud-service-pay。
检查Location、GAV等是否正确。
2) 修改pom.xml文件
651 2<project xmlns="http://maven.apache.org/POM/4.0.0"3 xmlns:xsi="http://www.w3.org/2001/XMLSchema-instance"4 xsi:schemaLocation="http://maven.apache.org/POM/4.0.0 http://maven.apache.org/xsd/maven-4.0.0.xsd">5 <parent>6 <artifactId>SpringCloud-demo</artifactId>7 <groupId>com.huangyuanxin.SpringCloud</groupId>8 <version>1.0-SNAPSHOT</version>9 </parent>10 <modelVersion>4.0.0</modelVersion>11
12 <artifactId>SpringCloud-service-pay</artifactId>13
14 <dependencies>15 <!-- 引入通用模块 -->16 <dependency>17 <groupId>com.huangyuanxin.SpringCloud</groupId>18 <artifactId>SpringCloud-common</artifactId>19 <version>1.0-SNAPSHOT</version>20 </dependency>21 <dependency>22 <groupId>org.springframework.boot</groupId>23 <artifactId>spring-boot-starter-web</artifactId>24 </dependency>25 <dependency>26 <groupId>org.springframework.boot</groupId>27 <artifactId>spring-boot-starter-actuator</artifactId>28 </dependency>29 <dependency>30 <groupId>org.mybatis.spring.boot</groupId>31 <artifactId>mybatis-spring-boot-starter</artifactId>32 </dependency>33 <dependency>34 <groupId>com.alibaba</groupId>35 <artifactId>druid-spring-boot-starter</artifactId>36 <version>1.1.10</version>37 </dependency>38 <dependency>39 <groupId>mysql</groupId>40 <artifactId>mysql-connector-java</artifactId>41 </dependency>42 <dependency>43 <groupId>org.springframework.boot</groupId>44 <artifactId>spring-boot-starter-jdbc</artifactId>45 </dependency>46 <dependency>47 <groupId>org.springframework.boot</groupId>48 <artifactId>spring-boot-devtools</artifactId>49 <scope>runtime</scope>50 <optional>true</optional>51 </dependency>52 <dependency>53 <groupId>org.projectlombok</groupId>54 <artifactId>lombok</artifactId>55 <optional>true</optional>56 </dependency>57 <dependency>58 <groupId>org.springframework.boot</groupId>59 <artifactId>spring-boot-starter-test</artifactId>60 <scope>test</scope>61 </dependency>62 </dependencies>63
64</project>65
3) 配置application.yml
181# 支付服务单机版端口为8100,集群版依次为8101、8102、8103...2server3 port81004
5spring6 application7 namecloud-payment-service8 datasource9 typecom.alibaba.druid.pool.DruidDataSource10 driver-class-nameorg.gjt.mm.mysql.Driver11 urljdbcmysql//106.53.120.2303306/atguigu?useUnicode=true&characterEncoding=utf-8&useSSL=false12 usernameroot13 passwordHyx14774114
15mybatis16 mapperLocationsclasspathmapper/*.xml17 type-aliases-packagecom.huangyuanxin.springcloud.pay.model,com.huangyuanxin.springcloud.common.model18
4) 编写启动类PayApplication
121package com.huangyuanxin.springcloud.pay;2
3import org.springframework.boot.SpringApplication;4import org.springframework.boot.autoconfigure.SpringBootApplication;5
6public class PayApplication {8 public static void main(String[] args) {9 SpringApplication.run(PayApplication.class, args);10 }11}12
5) DAO层
131package com.huangyuanxin.springcloud.pay.dao;2
3import com.huangyuanxin.springcloud.common.model.Payment;4import org.apache.ibatis.annotations.Mapper;5import org.apache.ibatis.annotations.Param;6
7public interface PaymentDao {9 int create(Payment payment);10
11 Payment getPaymentById(("id") Long id);12}13
6) Mapper文件
141 2
4<mapper namespace="com.huangyuanxin.springcloud.pay.dao.PaymentDao">5 <insert id="create" useGeneratedKeys="true" keyProperty="id">6 INSERT INTO payment(SERIAL) VALUES(#{serial});7 </insert>8
9 <select id="getPaymentById" resultType="Payment">10 SELECT * FROM payment WHERE id=#{id};11 </select>12
13</mapper>14
注意:Mapper文件必须放在
mybatis.mapperLocations属性配置的路径下,默认值为Mapper接口的同级目录。
8) Service层
接口
101package com.huangyuanxin.springcloud.pay.service;2
3import com.huangyuanxin.springcloud.common.model.Payment;4
5public interface PaymentService {6    int create(Payment payment);7
8    Payment getPaymentById(Long id);9}10
实现
261package com.huangyuanxin.springcloud.pay.service.impl;2
3import com.huangyuanxin.springcloud.common.model.Payment;4import com.huangyuanxin.springcloud.pay.dao.PaymentDao;5import com.huangyuanxin.springcloud.pay.service.PaymentService;6import org.springframework.stereotype.Service;7
8import javax.annotation.Resource;9
10public class PaymentServiceImpl implements PaymentService {12 13 private PaymentDao paymentDao;14
15
16 17 public int create(Payment payment) {18 return paymentDao.create(payment);19 }20
21 22 public Payment getPaymentById(Long id) {23 return paymentDao.getPaymentById(id);24 }25}26
9) Controller层
411package com.huangyuanxin.springcloud.pay.controller;2
3import com.huangyuanxin.springcloud.common.model.CommonResult;4import com.huangyuanxin.springcloud.common.model.Payment;5import com.huangyuanxin.springcloud.pay.service.PaymentService;6import lombok.extern.slf4j.Slf4j;7import org.springframework.beans.factory.annotation.Value;8import org.springframework.web.bind.annotation.*;9
10import javax.annotation.Resource;11
12public class PaymentController {15 16 private PaymentService paymentService;17
18 ("${server.port}")19 private String serverPort;20
21 (value = "/payment/create")22 public CommonResult create( Payment payment) {23 int result = paymentService.create(payment);24 if (result > 0) {25 return new CommonResult(200, "端口[" + serverPort + "]插入数据库成功", result);26 } else {27 return new CommonResult(444, "端口[" + serverPort + "]插入数据库失败", null);28 }29 }30
31 (value = "/payment/get/{id}")32 public CommonResult<Payment> getPaymentById(("id") Long id) {33 Payment payment = paymentService.getPaymentById(id);34 if (payment != null) {35 return new CommonResult(200, "端口[" + serverPort + "]查询成功", payment);36 } else {37 return new CommonResult(444, "端口[" + serverPort + "]没有对应记录,查询ID: " + id, null);38 }39 }40}41
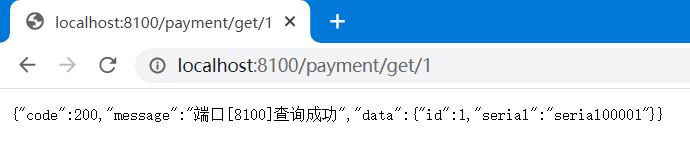
10) 测试支付服务
启动支付微服务,点击http://localhost:8100/payment/get/1进行测试!
3. 服务消费者-订单服务搭建
1) 新建SpringCloud-service-order模块
打开左侧Project窗口(默认打开)。
右击父工程名称->New->Module,进入New Module窗口。
选择合适的Module SDK->Next。
检查Parent是否为预期的父工程名称。
配置name为SpringCloud-service-order。
检查Location、GAV等是否正确。
2) 修改pom.xml文件
481 2<project xmlns="http://maven.apache.org/POM/4.0.0"3 xmlns:xsi="http://www.w3.org/2001/XMLSchema-instance"4 xsi:schemaLocation="http://maven.apache.org/POM/4.0.0 http://maven.apache.org/xsd/maven-4.0.0.xsd">5 <parent>6 <artifactId>SpringCloud-demo</artifactId>7 <groupId>com.huangyuanxin.SpringCloud</groupId>8 <version>1.0-SNAPSHOT</version>9 </parent>10 <modelVersion>4.0.0</modelVersion>11
12 <artifactId>SpringCloud-service-order</artifactId>13
14 <dependencies>15 <!--引入通用模块-->16 <dependency>17 <groupId>com.huangyuanxin.SpringCloud</groupId>18 <artifactId>SpringCloud-common</artifactId>19 <version>1.0-SNAPSHOT</version>20 </dependency>21 <dependency>22 <groupId>org.springframework.boot</groupId>23 <artifactId>spring-boot-starter-web</artifactId>24 </dependency>25 <dependency>26 <groupId>org.springframework.boot</groupId>27 <artifactId>spring-boot-starter-actuator</artifactId>28 </dependency>29 <dependency>30 <groupId>org.springframework.boot</groupId>31 <artifactId>spring-boot-devtools</artifactId>32 <scope>runtime</scope>33 <optional>true</optional>34 </dependency>35 <dependency>36 <groupId>org.projectlombok</groupId>37 <artifactId>lombok</artifactId>38 <optional>true</optional>39 </dependency>40 <dependency>41 <groupId>org.springframework.boot</groupId>42 <artifactId>spring-boot-starter-test</artifactId>43 <scope>test</scope>44 </dependency>45 </dependencies>46
47</project>48
3) 配置application.yml
121# 订单服务单机版端口为8200,集群版依次为8201、8202、8203...2server3 port82004
5spring6 application7 namecloud-order-service8
9order10 # 订单服务地址和端口11 PaymentSrv_URL"http://127.0.0.1:8100"12
4) 编写启动类OrderApplication
121package com.huangyuanxin.springcloud.order;2
3import org.springframework.boot.SpringApplication;4import org.springframework.boot.autoconfigure.SpringBootApplication;5
6public class OrderApplication {8 public static void main(String[] args) {9 SpringApplication.run(OrderApplication.class, args);10 }11}12
5) 配置RestTemplate
161package com.huangyuanxin.springcloud.order.config;2
3import org.springframework.cloud.client.loadbalancer.LoadBalanced;4import org.springframework.context.annotation.Bean;5import org.springframework.context.annotation.Configuration;6import org.springframework.web.client.RestTemplate;7
8public class ApplicationContextConfig {10 11 12 public RestTemplate restTemplate() {13 return new RestTemplate();14 }15}16
6) Controller层调支付
311package com.huangyuanxin.springcloud.order.controller;2
3import com.huangyuanxin.springcloud.common.model.CommonResult;4import com.huangyuanxin.springcloud.common.model.Payment;5import org.springframework.beans.factory.annotation.Autowired;6import org.springframework.beans.factory.annotation.Value;7import org.springframework.web.bind.annotation.GetMapping;8import org.springframework.web.bind.annotation.PathVariable;9import org.springframework.web.bind.annotation.RestController;10import org.springframework.web.client.RestTemplate;11
12public class OrderController {14 ("${order.PaymentSrv_URL}")15 private String PaymentSrv_URL;16
17 18 private RestTemplate restTemplate;19
20 ("/consumer/payment/create") //客户端用浏览器是get请求,但是底层实质发送post调用服务端800121 public CommonResult create(Payment payment) {22 return restTemplate.postForObject(PaymentSrv_URL + "/payment/create", payment, CommonResult.class);23 }24
25
26 ("/consumer/payment/get/{id}")27 public CommonResult getPayment( Long id) {28 return restTemplate.getForObject(PaymentSrv_URL + "/payment/get/" + id, CommonResult.class, id);29 }30}31
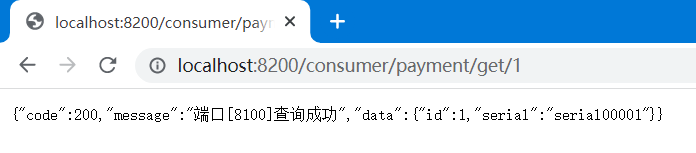
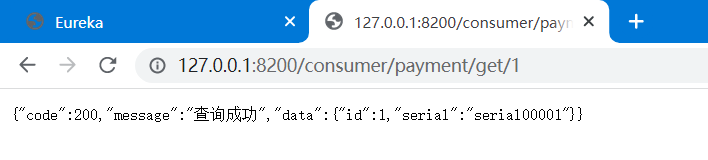
7) 测试订单调支付
启动支付和订单微服务,访问http://127.0.0.1:8200进行测试!
4. 补充说明
1) 开启Run DashBoard
默认情况下,IDEA会在你启动多个微服务时自动打开Run DashBoard面板,也可以修改.idea/workspace.xml手动打开。
71<component name="RunDashboard">2 <option name="configurationTypes">3 <set>4 <option value="SpringBootApplicationConfigurationType" />5 </set>6 </option>7</component>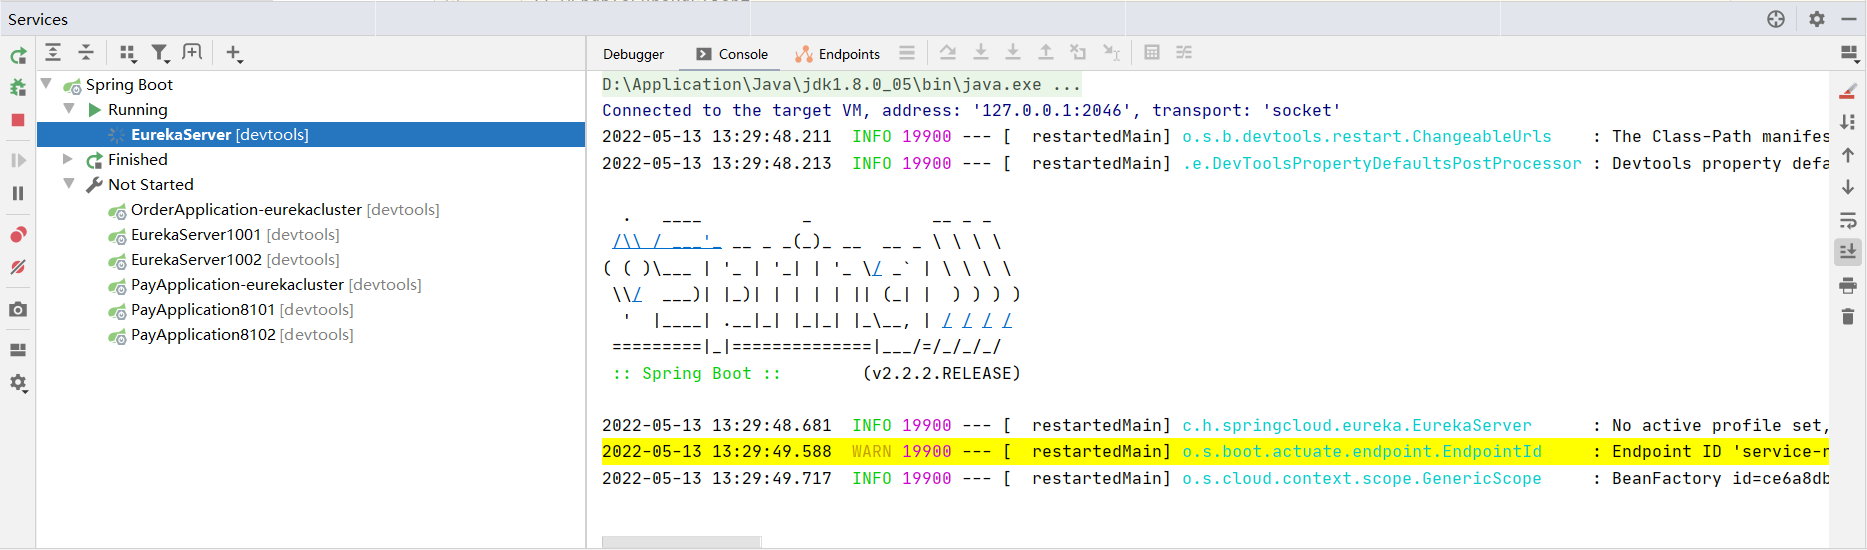
2) 开启热部署
修改pom.xml文件,添加依赖和插件
231<!--SpringBoot开发工具-->2<dependency>3    <groupId>org.springframework.boot</groupId>4    <artifactId>spring-boot-devtools</artifactId>5    <scope>runtime</scope>6    <optional>true</optional>7</dependency>8
9<!--Maven编译插件-->10<build>11    <finalName>工程名字</finalName>12    <plugins>13        <plugin>14            <groupId>org.springframework.boot</groupId>15            <artifactId>spring-boot-maven-plugin</artifactId>16            <configuration>17                <fork>true</fork>18                <addResources>true</addResources>19            </configuration>20        </plugin>21    </plugins>22</build>23
修改工程配置
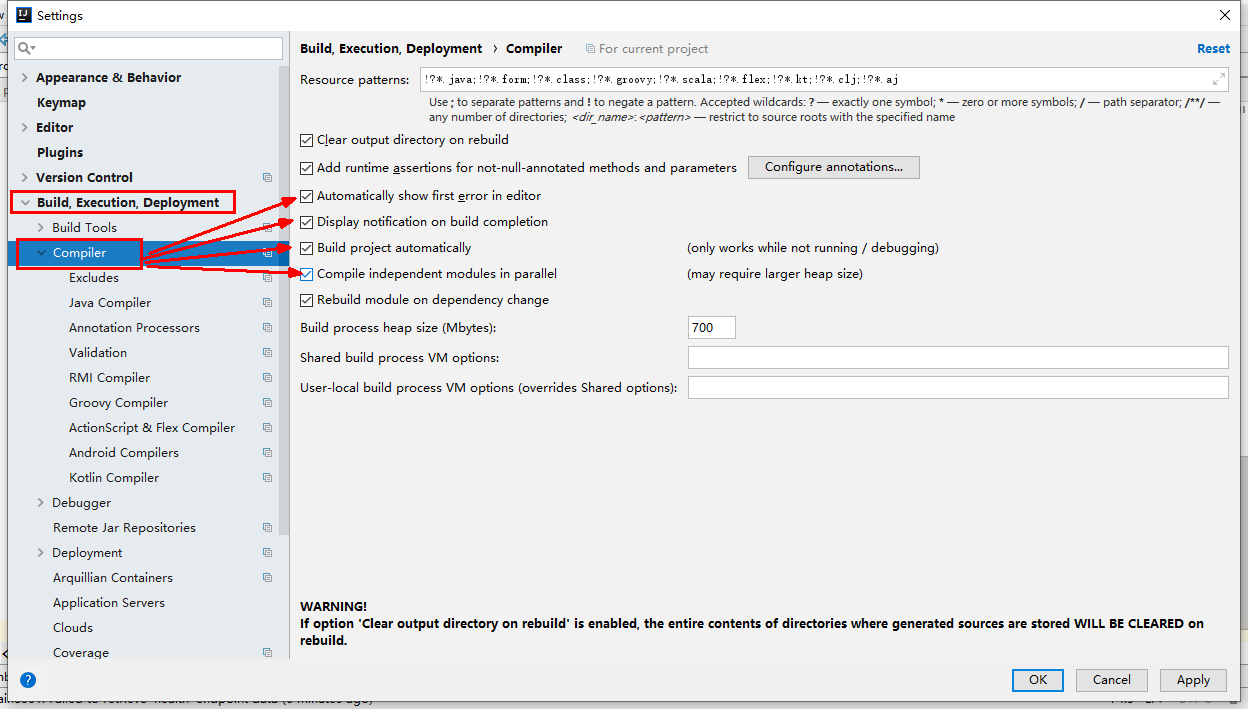
修改IDEA配置

3) mysql驱动说明
com.mysql.jdbc.Driver:在mysql-connector-java 5及以前版本驱动使用,也可以使用org.gjt.mm.mysql.Driver替代。
com.mysql.cj.jdbc.Driver:在mysql-connector-java 6及以后版本驱动使用,相比上述驱动多了一个时区连接属性:
serverTimezone=Asia/Shanghai。
第02章_服务注册发现
服务治理指的对服务生命周期中一系列操作进行统筹管理,包括服务注册、服务发现、服务监测、服务下线及`服务之间的调用与负载均衡等,是一种分布式架构的解决方案。
第一节 Eureka
1. Eureka简介
Eureka是SpringCloud封装的一款服务治理组件,其采用了CS的设计架构,分为服务端(Eureka Server)和客户端(Eureka Client),系统架构图如下:
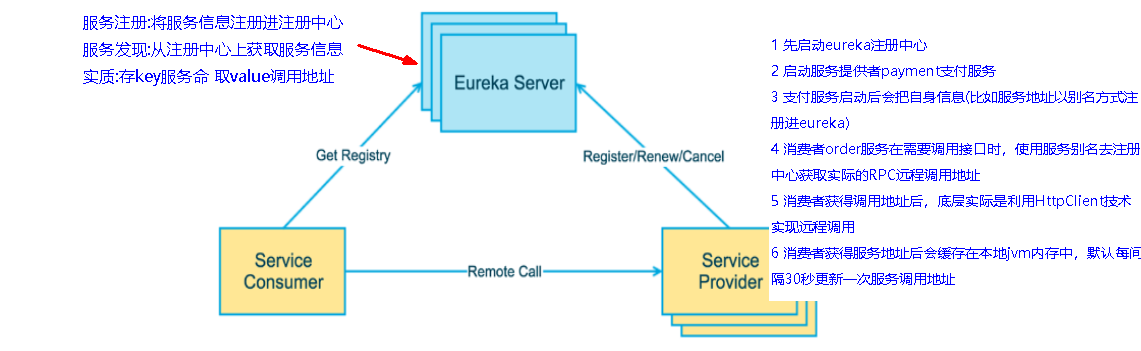
图中Eureka Server是服务治理中心,集中管理所有的微服务。服务提供者使用Eureka Client向Eureka Server注册服务并维持心跳,而服务消费者使用Eureka Client向Eureka Server拉取服务地址,随后进行远程调用。
2. 搭建Eureka Server
1) 新建SpringCloud-eureka-server模块
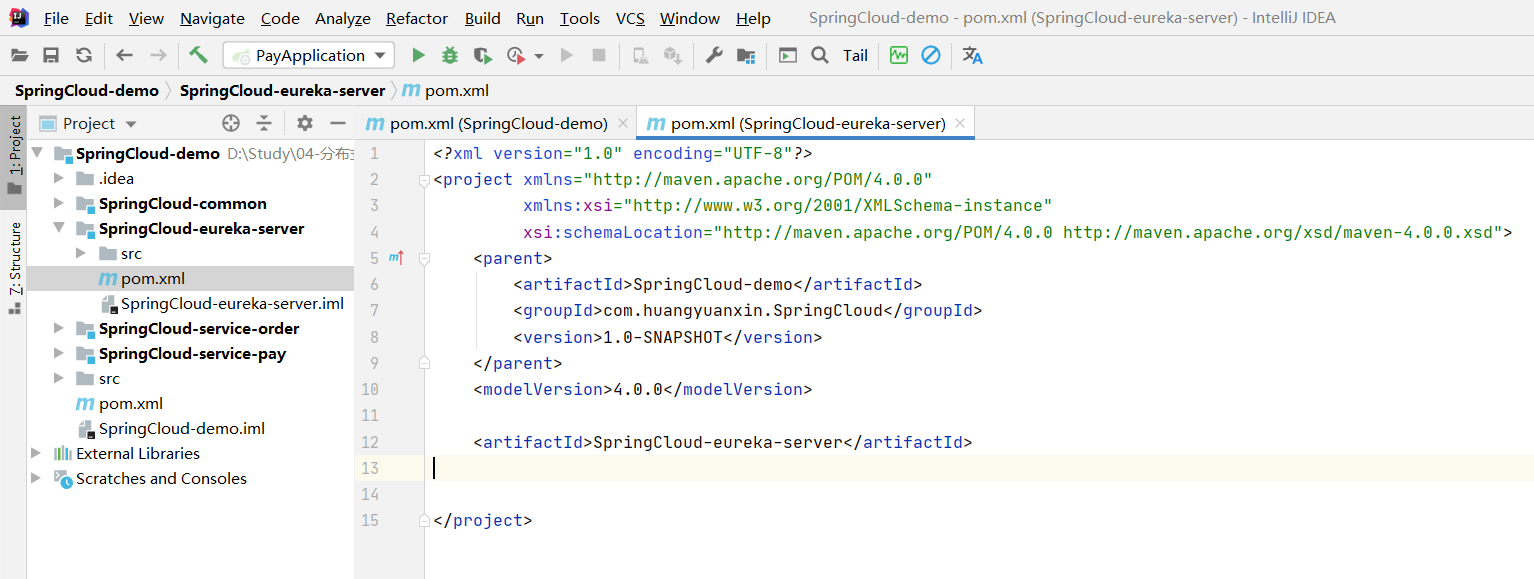
2) 引入Eureka-Server启动器及其它依赖
511 2<project xmlns="http://maven.apache.org/POM/4.0.0"3 xmlns:xsi="http://www.w3.org/2001/XMLSchema-instance"4 xsi:schemaLocation="http://maven.apache.org/POM/4.0.0 http://maven.apache.org/xsd/maven-4.0.0.xsd">5 <parent>6 <artifactId>SpringCloud-demo</artifactId>7 <groupId>com.huangyuanxin.SpringCloud</groupId>8 <version>1.0-SNAPSHOT</version>9 </parent>10 <modelVersion>4.0.0</modelVersion>11
12 <artifactId>SpringCloud-eureka-server</artifactId>13
14 <dependencies>15 <!-- eureka-server -->16 <dependency>17 <groupId>org.springframework.cloud</groupId>18 <artifactId>spring-cloud-starter-netflix-eureka-server</artifactId>19 </dependency>20 <!--boot web actuator-->21 <dependency>22 <groupId>org.springframework.boot</groupId>23 <artifactId>spring-boot-starter-web</artifactId>24 </dependency>25 <dependency>26 <groupId>org.springframework.boot</groupId>27 <artifactId>spring-boot-starter-actuator</artifactId>28 </dependency>29 <!--一般通用配置-->30 <dependency>31 <groupId>org.springframework.boot</groupId>32 <artifactId>spring-boot-devtools</artifactId>33 <scope>runtime</scope>34 <optional>true</optional>35 </dependency>36 <dependency>37 <groupId>org.projectlombok</groupId>38 <artifactId>lombok</artifactId>39 </dependency>40 <dependency>41 <groupId>org.springframework.boot</groupId>42 <artifactId>spring-boot-starter-test</artifactId>43 <scope>test</scope>44 </dependency>45 <dependency>46 <groupId>junit</groupId>47 <artifactId>junit</artifactId>48 </dependency>49 </dependencies>50
51</project>注意:老版本Eureka服务端和客户端使用同一个启动器,如下。
41<dependency>2<groupId>org.springframework.cloud</groupId>3<artifactId>spring-cloud-starter-eureka</artifactId>4</dependency>
3) 配置application.yml
151server2 port10003
4eureka5 instance6 hostnameeureka-server #eureka服务端的实例名称7 client8 #false表示不向注册中心注册自己。9 register-with-eurekafalse10 #false表示自己端就是注册中心,我的职责就是维护服务实例,并不需要去检索服务11 fetch-registryfalse12 service-url13 #设置与Eureka Server交互的地址查询服务和注册服务都需要依赖这个地址。14 defaultZonehttp//127.0.0.11000/eureka/15
4) 编写启动程序EurekaServer.java
141package com.huangyuanxin.springcloud.eureka;2
3import org.springframework.boot.SpringApplication;4import org.springframework.boot.autoconfigure.SpringBootApplication;5import org.springframework.cloud.netflix.eureka.server.EnableEurekaServer;6
7public class EurekaServer {10 public static void main(String[] args) {11 SpringApplication.run(EurekaServer.class, args);12 }13}14
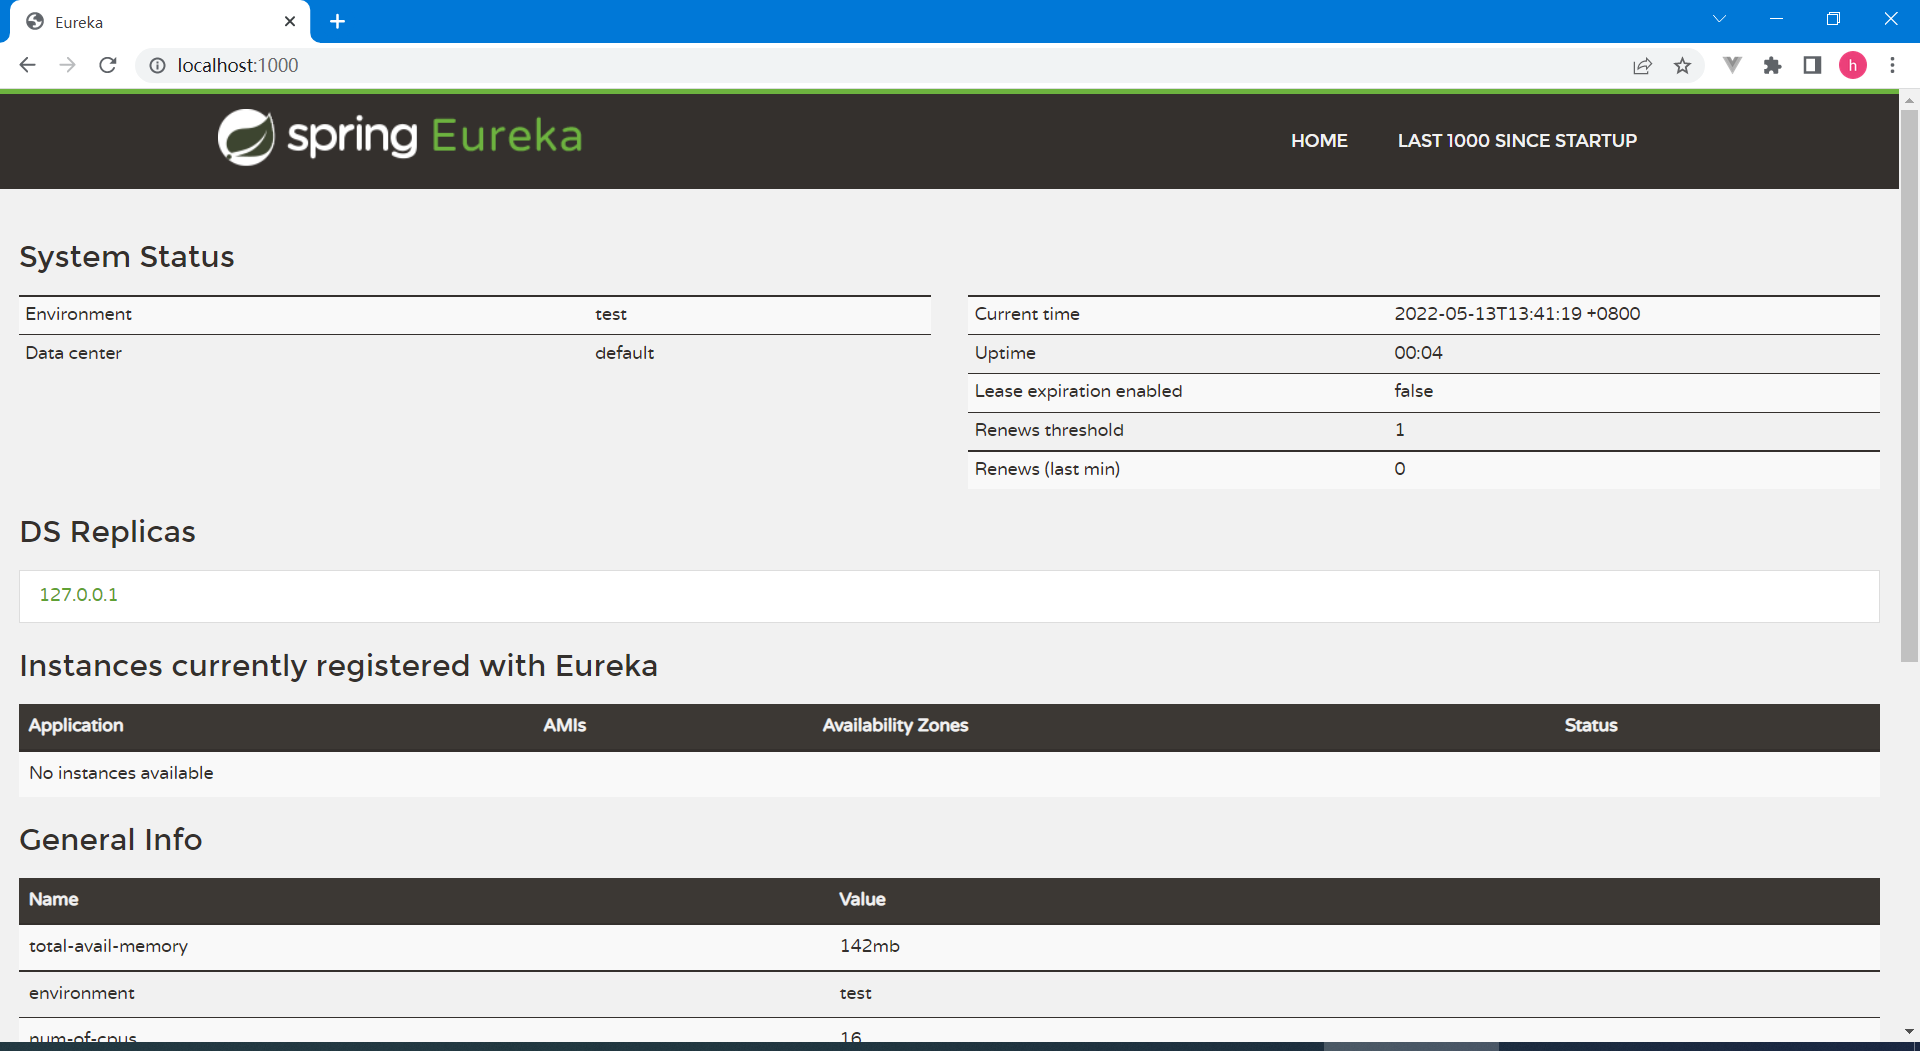
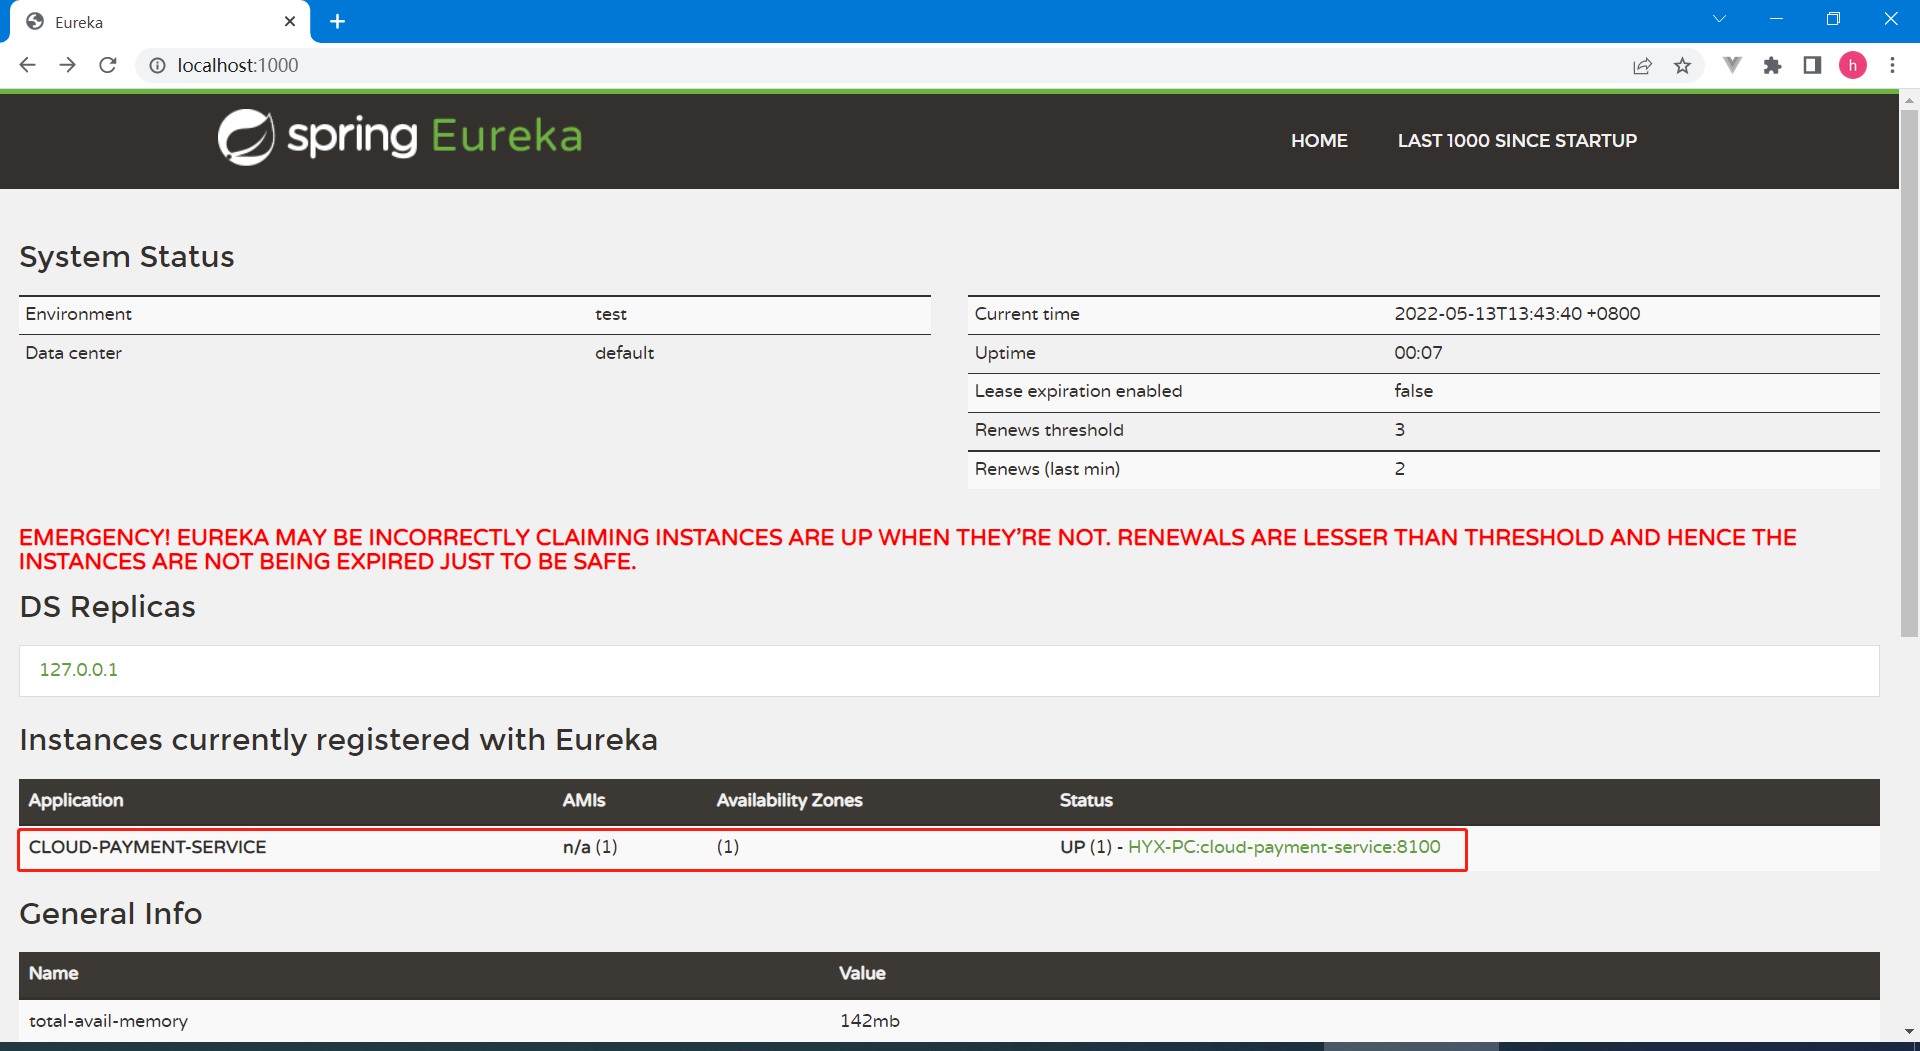
5) 访问http://localhost:1000进行测试
3. 使用Eureka Client注册微服务
1) 改造支付服务,添加Eureka Client启动器
61<!--eureka-client-->2<dependency>3 <groupId>org.springframework.cloud</groupId>4 <artifactId>spring-cloud-starter-netflix-eureka-client</artifactId>5</dependency>6 注意:老版本Eureka服务端和客户端使用同一个启动器,如下。
41<dependency>2<groupId>org.springframework.cloud</groupId>3<artifactId>spring-cloud-starter-eureka</artifactId>4</dependency>
2) 修改application.yml,添加Eureka Cilent相关配置
81eureka2 client3 #表示是否将自己注册进EurekaServer默认为true。4 register-with-eurekatrue5 #是否从EurekaServer抓取已有的注册信息,默认为true。单节点无所谓,集群必须设置为true才能配合ribbon使用负载均衡6 fetchRegistrytrue7 service-url8 defaultZonehttp//127.0.0.11000/eureka
3) 修改启动类添加@EnableEurekaClient注解
81public class PayApplication {4 public static void main(String[] args) {5 SpringApplication.run(PayApplication.class, args);6 }7}8
4) 依次启动EurekaServer、支付服务进行测试
4. 使用Eureka Client拉取微服务
1) 改造订单服务,添加Eureka Client启动器
61<!--eureka-client-->2<dependency>3 <groupId>org.springframework.cloud</groupId>4 <artifactId>spring-cloud-starter-netflix-eureka-client</artifactId>5</dependency>6
2) 修改application.yml,添加Eureka Cilent相关配置
91eureka2 client3 #表示是否将自己注册进EurekaServer默认为true。4 register-with-eurekatrue5 #是否从EurekaServer抓取已有的注册信息,默认为true。单节点无所谓,集群必须设置为true才能配合ribbon使用负载均衡6 fetchRegistrytrue7 service-url8 defaultZonehttp//127.0.0.11000/eureka9
3) 修改启动类添加@EnableEurekaClient注解
81public class OrderApplication {4 public static void main(String[] args) {5 SpringApplication.run(OrderApplication.class, args);6 }7}8
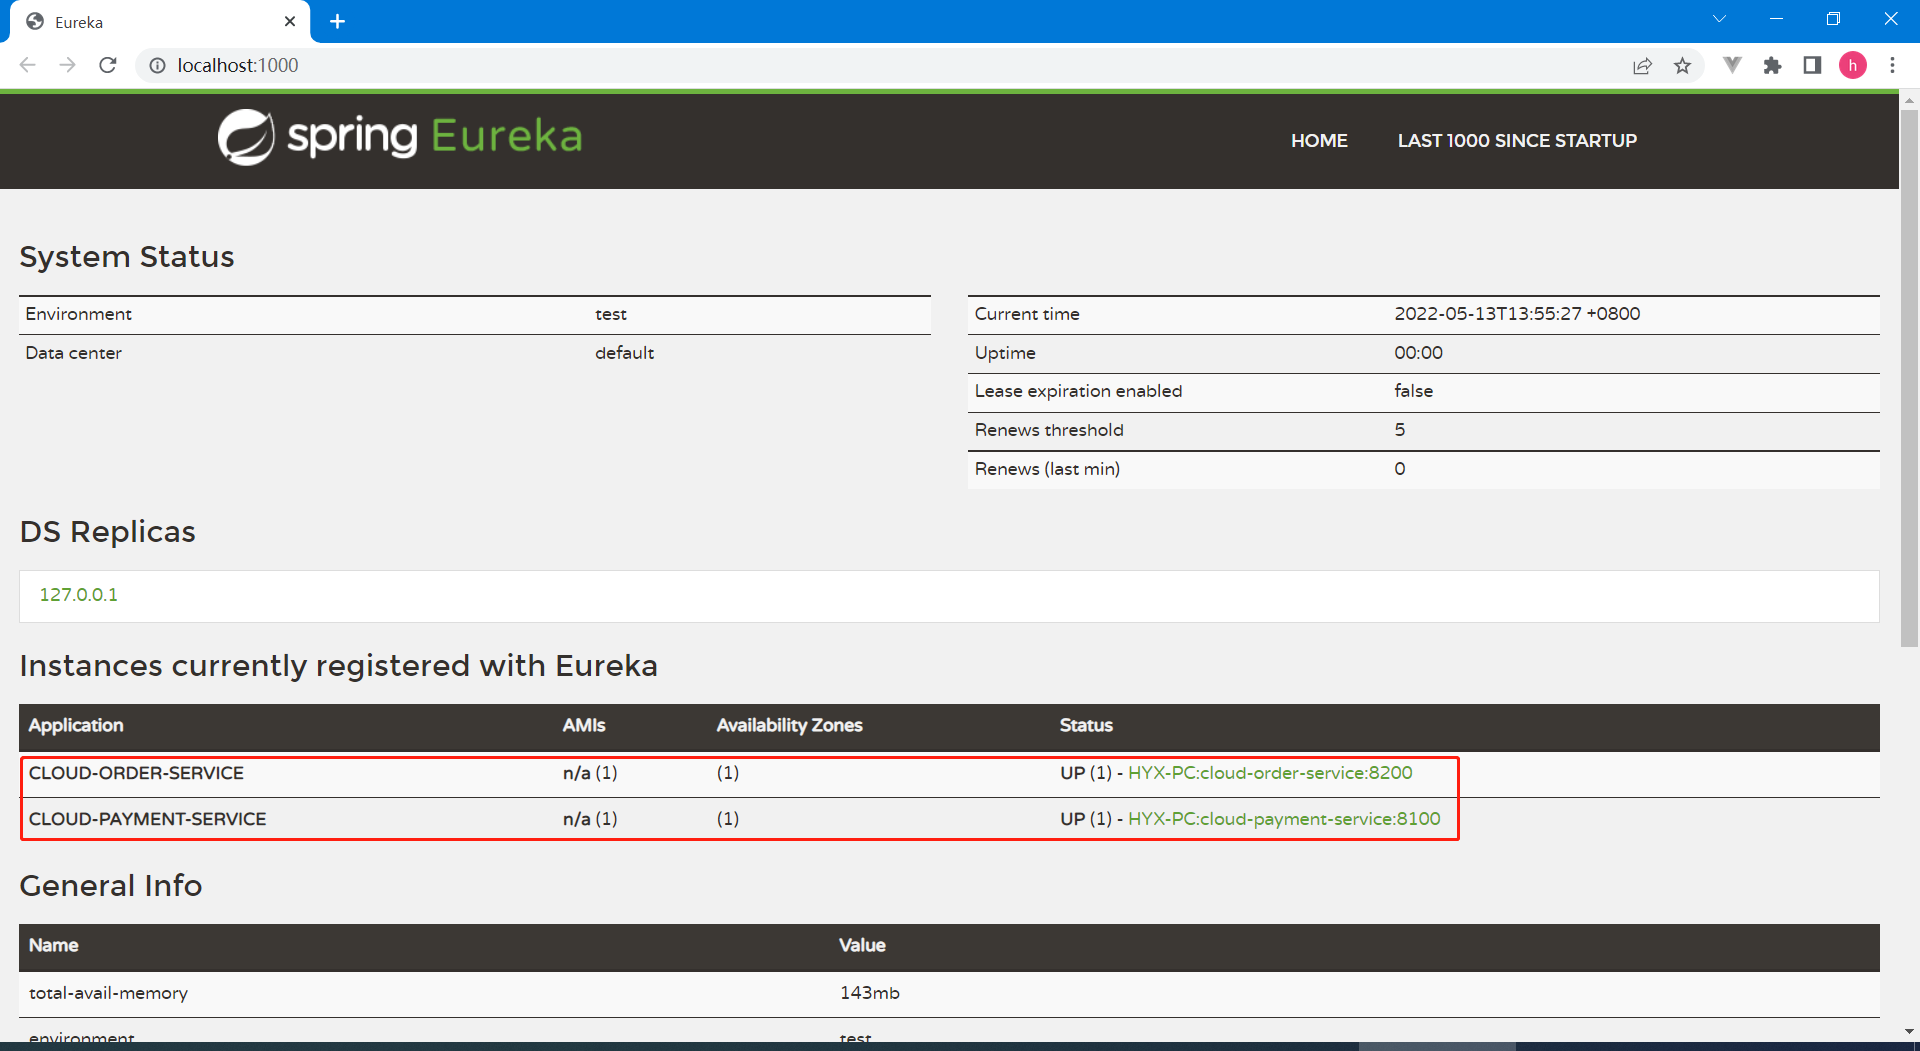
4) 依次启动EurekaServer、支付、订单服务进行测试
Eureka Server:http://localhost:1000/
5. Eureka集群
为了防止Eureka产生单点故障,故将Eureka部署为集群,互相注册,相互守望,具备可用性。
1) 配置多个Eureka Server形成集群
复制2份单机版Eureka Server的application.yml配置文件,分别命名为application-cluster01.yml和application-cluster02.yml。修改server.port为特定的端口,instance.hostname为特定实例名称,client.service-url.defaultZone指向其它实例列表,以逗号分隔。
application-cluster01.yml:1001端口
151server2 port10013
4eureka5 instance6 hostnameeureka-server1001 #eureka服务端的实例名称7 client8 #false表示不向注册中心注册自己。9 register-with-eurekafalse10 #false表示自己端就是注册中心,我的职责就是维护服务实例,并不需要去检索服务11 fetch-registryfalse12 service-url13 #设置与Eureka Server交互的地址查询服务和注册服务都需要依赖这个地址。14 defaultZonehttp//127.0.0.11002/eureka/15
application-cluster02.yml:1002端口
151server2 port10023
4eureka5 instance6 hostnameeureka-server1002 #eureka服务端的实例名称7 client8 #false表示不向注册中心注册自己。9 register-with-eurekafalse10 #false表示自己端就是注册中心,我的职责就是维护服务实例,并不需要去检索服务11 fetch-registryfalse12 service-url13 #设置与Eureka Server交互的地址查询服务和注册服务都需要依赖这个地址。14 defaultZonehttp//127.0.0.11001/eureka/15
2) 注册业务服务到Eureka集群
分别复制一份支付和订单的application.yml配置文件,命名为application-eurekacluster.yml。修改client.service-url.defaultZone指向集群中的所有Eureka Server,以逗号分隔。
支付服务application-eurekacluster.yml
261server2 port81003
4spring5 application6 namecloud-payment-service7 datasource8 typecom.alibaba.druid.pool.DruidDataSource9 driver-class-nameorg.gjt.mm.mysql.Driver10 urljdbcmysql//106.53.120.2303306/atguigu?useUnicode=true&characterEncoding=utf-8&useSSL=false11 usernameroot12 passwordHyx14774113
14eureka15 client16 #表示是否将自己注册进EurekaServer默认为true。17 register-with-eurekatrue18 #是否从EurekaServer抓取已有的注册信息,默认为true。单节点无所谓,集群必须设置为true才能配合ribbon使用负载均衡19 fetchRegistrytrue20 service-url21 defaultZonehttp//127.0.0.11001/eureka,http//127.0.0.11002/eureka22
23mybatis24 mapperLocationsclasspathmapper/*.xml25 type-aliases-packagecom.huangyuanxin.springcloud.common.model,com.huangyuanxin.springcloud.pay.model26
订单服务application-eurekacluster.yml
191server2 port82003
4spring5 application6 namecloud-order-service7
8eureka9 client10 #表示是否将自己注册进EurekaServer默认为true。11 register-with-eurekatrue12 #是否从EurekaServer抓取已有的注册信息,默认为true。单节点无所谓,集群必须设置为true才能配合ribbon使用负载均衡13 fetchRegistrytrue14 service-url15 defaultZonehttp//127.0.0.11001/eureka,http//127.0.0.11002/eureka16
17order18 PaymentSrv_URL"http://127.0.0.1:8100"19
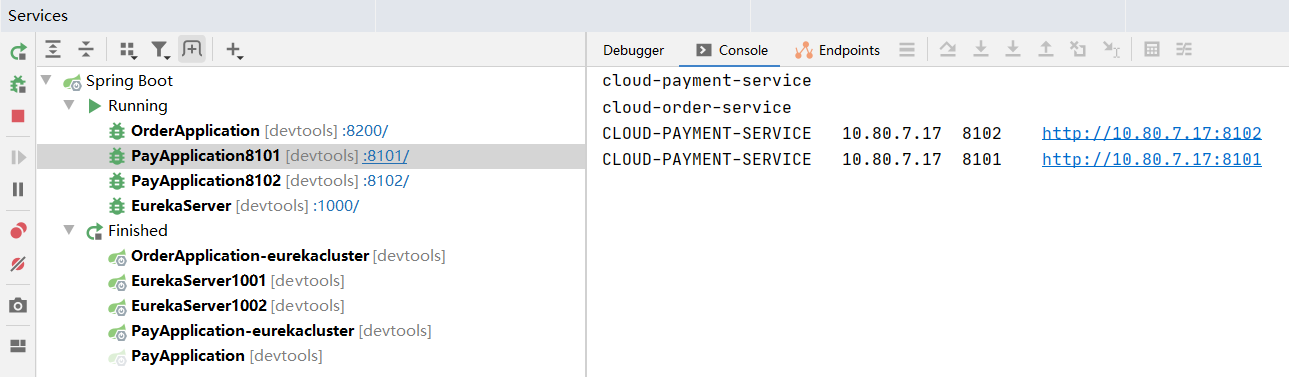
3) 依次启动Eureka Server集群、支付、订单服务进行测试
复制单机版的启动配置,修改Program arguments,添加--spring.profiles.include=Xxxx激活对应的配置进行启动。如启动1001端口的Eureka Server,复制启动配置如下:
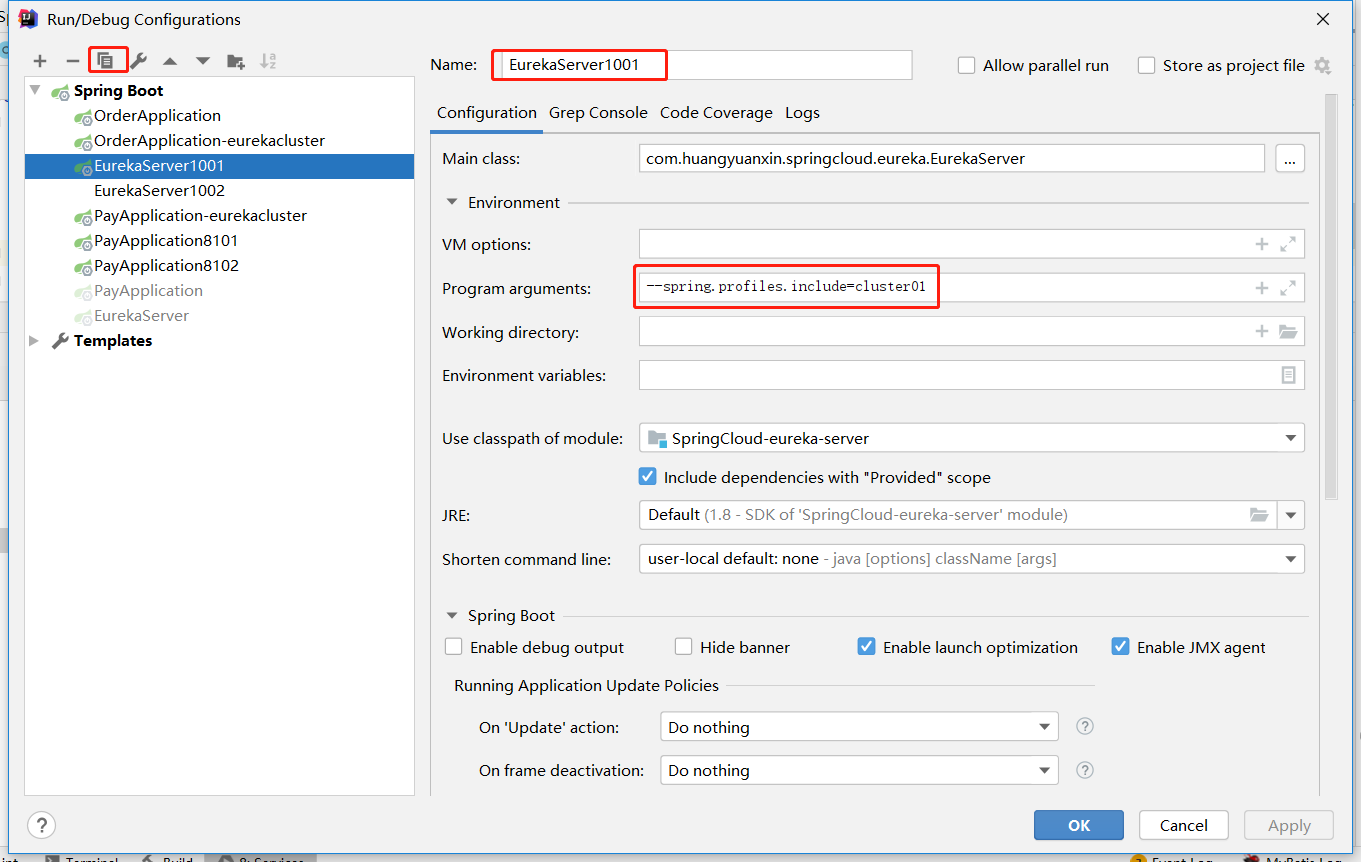
Eureka Server1001:http://localhost:1001/
Eureka Server1002:http://localhost:1002/
6. 服务提供者-支付服务集群
同样的,为了解决服务提供者的单点故障问题,也需要部署集群。
1) 配置多个支付服务形成集群
复制2份单机版支付服务的application.yml文件,分别命名为application-cluster01.yml、application-cluster02.yml。修改server.port为特定的端口,添加eureka.instance.instance-id指定实例名称,配置eureka.instance.prefer-ip-address为true访问IP地址。
application.yml-cluster01:8101端口
311server2 port81013
4spring5 application6 namecloud-payment-service7 datasource8 typecom.alibaba.druid.pool.DruidDataSource9 driver-class-nameorg.gjt.mm.mysql.Driver10 urljdbcmysql//106.53.120.2303306/atguigu?useUnicode=true&characterEncoding=utf-8&useSSL=false11 usernameroot12 passwordHyx14774113
14eureka15 client16 #表示是否将自己注册进EurekaServer默认为true。17 register-with-eurekatrue18 #是否从EurekaServer抓取已有的注册信息,默认为true。单节点无所谓,集群必须设置为true才能配合ribbon使用负载均衡19 fetchRegistrytrue20 service-url21 defaultZonehttp//127.0.0.11000/eureka22 instance23 # 实例名称24 instance-idcloud-payment-service810125 # 为true访问IP地址而非主机名26 prefer-ip-addresstrue27
28mybatis29 mapperLocationsclasspathmapper/*.xml30 type-aliases-packagecom.huangyuanxin.springcloud.common.model,com.huangyuanxin.springcloud.pay.model31
application.yml-cluster02:8102端口
311server2 port81023
4spring5 application6 namecloud-payment-service7 datasource8 typecom.alibaba.druid.pool.DruidDataSource9 driver-class-nameorg.gjt.mm.mysql.Driver10 urljdbcmysql//106.53.120.2303306/atguigu?useUnicode=true&characterEncoding=utf-8&useSSL=false11 usernameroot12 passwordHyx14774113
14eureka15 client16 #表示是否将自己注册进EurekaServer默认为true。17 register-with-eurekatrue18 #是否从EurekaServer抓取已有的注册信息,默认为true。单节点无所谓,集群必须设置为true才能配合ribbon使用负载均衡19 fetchRegistrytrue20 service-url21 defaultZonehttp//127.0.0.11000/eureka22 instance23 # 实例名称24 instance-idcloud-payment-service810225 # 为true访问IP地址而非主机名26 prefer-ip-addresstrue27 28mybatis29 mapperLocationsclasspathmapper/*.xml30 type-aliases-packagecom.huangyuanxin.springcloud.common.model,com.huangyuanxin.springcloud.pay.model31
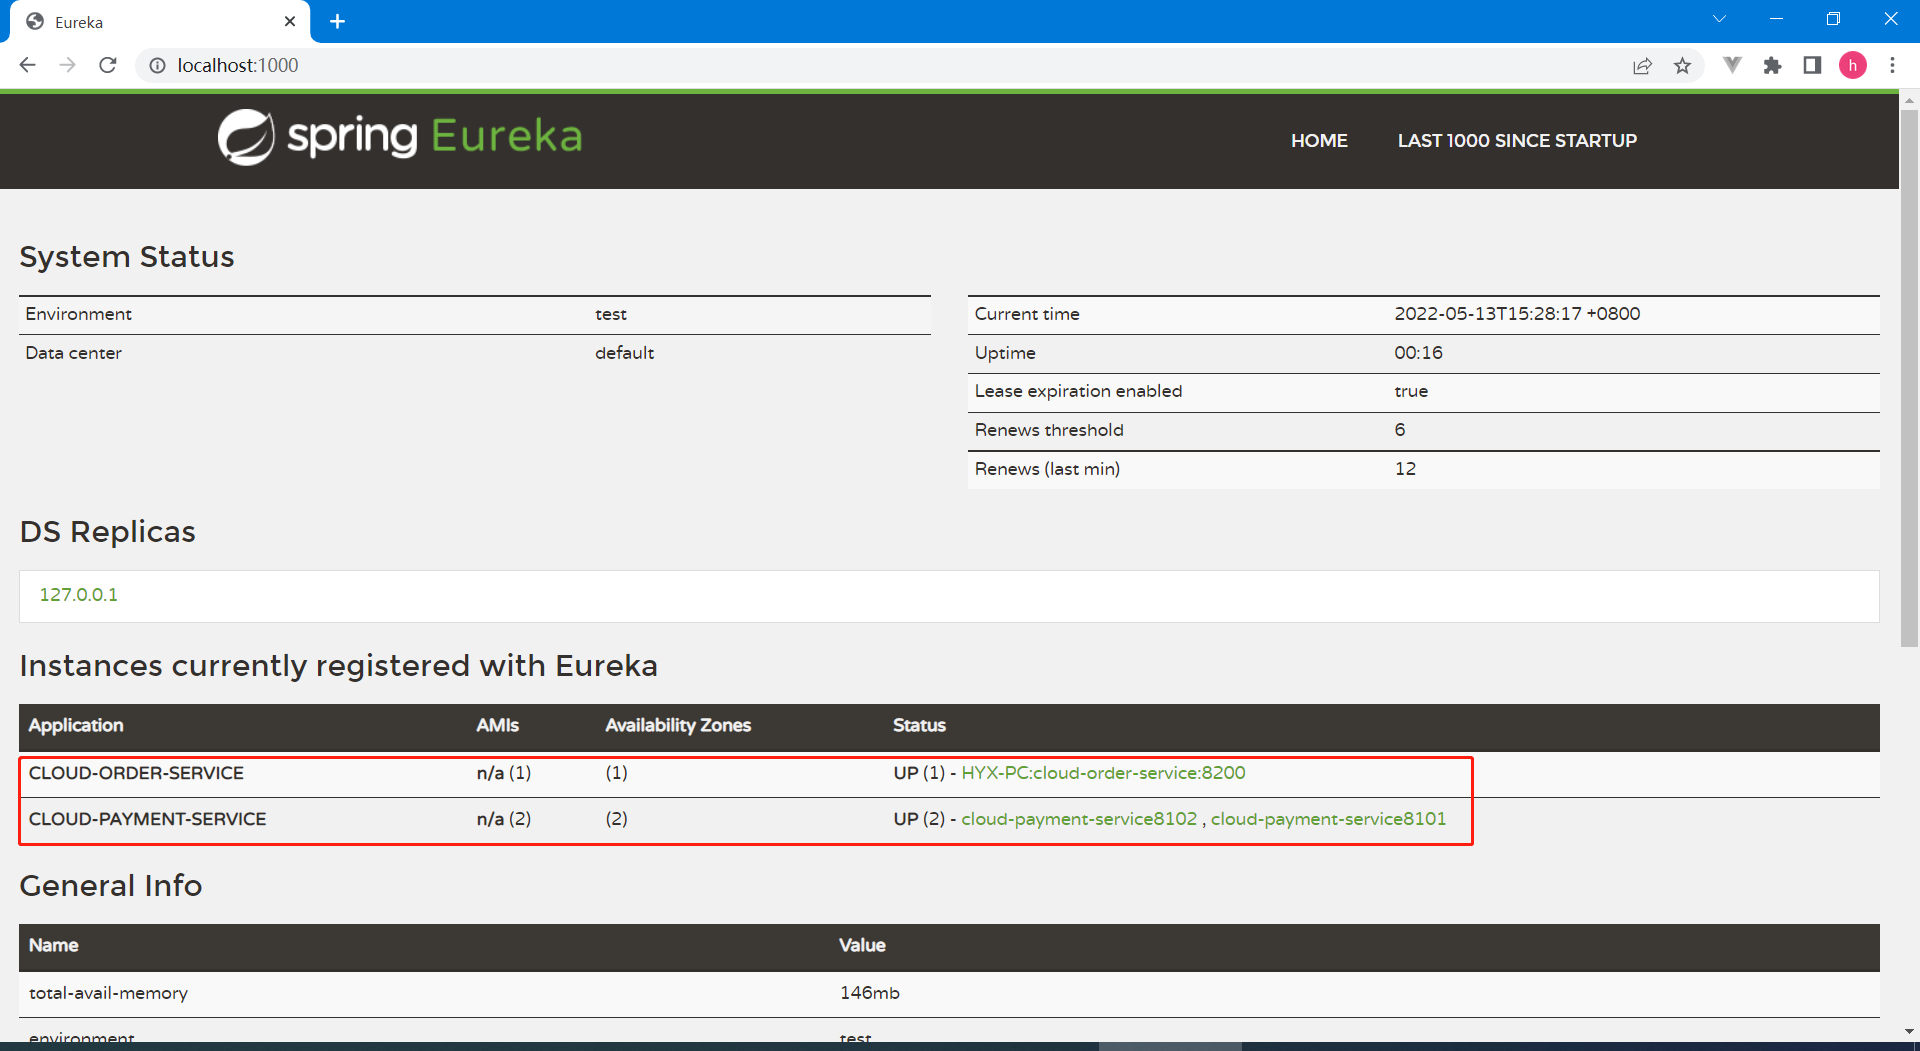
2) 订单通过支付服务名调用集群
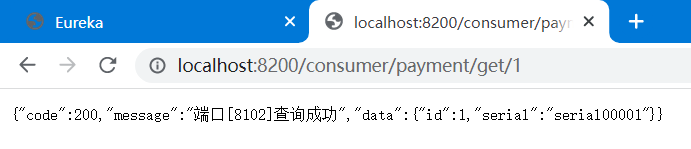
之前订单调支付的PaymentSrv_URL是写死为http://127.0.0.1:8100的,如果8100端口宕机,则会造成单点故障。现在支付服务在8101和8102端口部署了集群,应使用服务名称来进行调用,并且进行负载均衡(默认为轮询)。
修改订单服务的application.yml
41order2 # PaymentSrv_URL: "http://127.0.0.1:8100"3 PaymentSrv_URL"http://CLOUD-PAYMENT-SERVICE"4
修改RestTemplate支持负载均衡
91public class ApplicationContextConfig {3 4 5 public RestTemplate restTemplate() {6 return new RestTemplate();7 }8}9
3) 测试订单调用支付集群
Eureka Server:http://localhost:1000/

7. Eureka补充
1) 服务发现Discovery
对于注册进eureka里面的微服务,可以通过服务发现来获得该服务的信息。
修改启动类,添加@EnableDiscoveryClient注解
91public class PayApplication {5 public static void main(String[] args) {6 SpringApplication.run(PayApplication.class, args);7 }8}9
修改Controller,注入DiscoveryClient
261package com.huangyuanxin.springcloud.pay.controller;2
3import org.springframework.cloud.client.discovery.DiscoveryClient;4// ....5
6public class PaymentController {9 10 private DiscoveryClient discoveryClient;11
12 (value = "/payment/discovery")13 public Object discovery() {14 List<String> services = discoveryClient.getServices();15 for (String element : services) {16 System.out.println(element);17 }18
19 List<ServiceInstance> instances = discoveryClient.getInstances("CLOUD-PAYMENT-SERVICE");20 for (ServiceInstance element : instances) {21 System.out.println(element.getServiceId() + "\t" + element.getHost() + "\t" + element.getPort() + "\t" + element.getUri());22 }23 return this.discoveryClient;24 }25}26
访问/payment/discovery进行查看

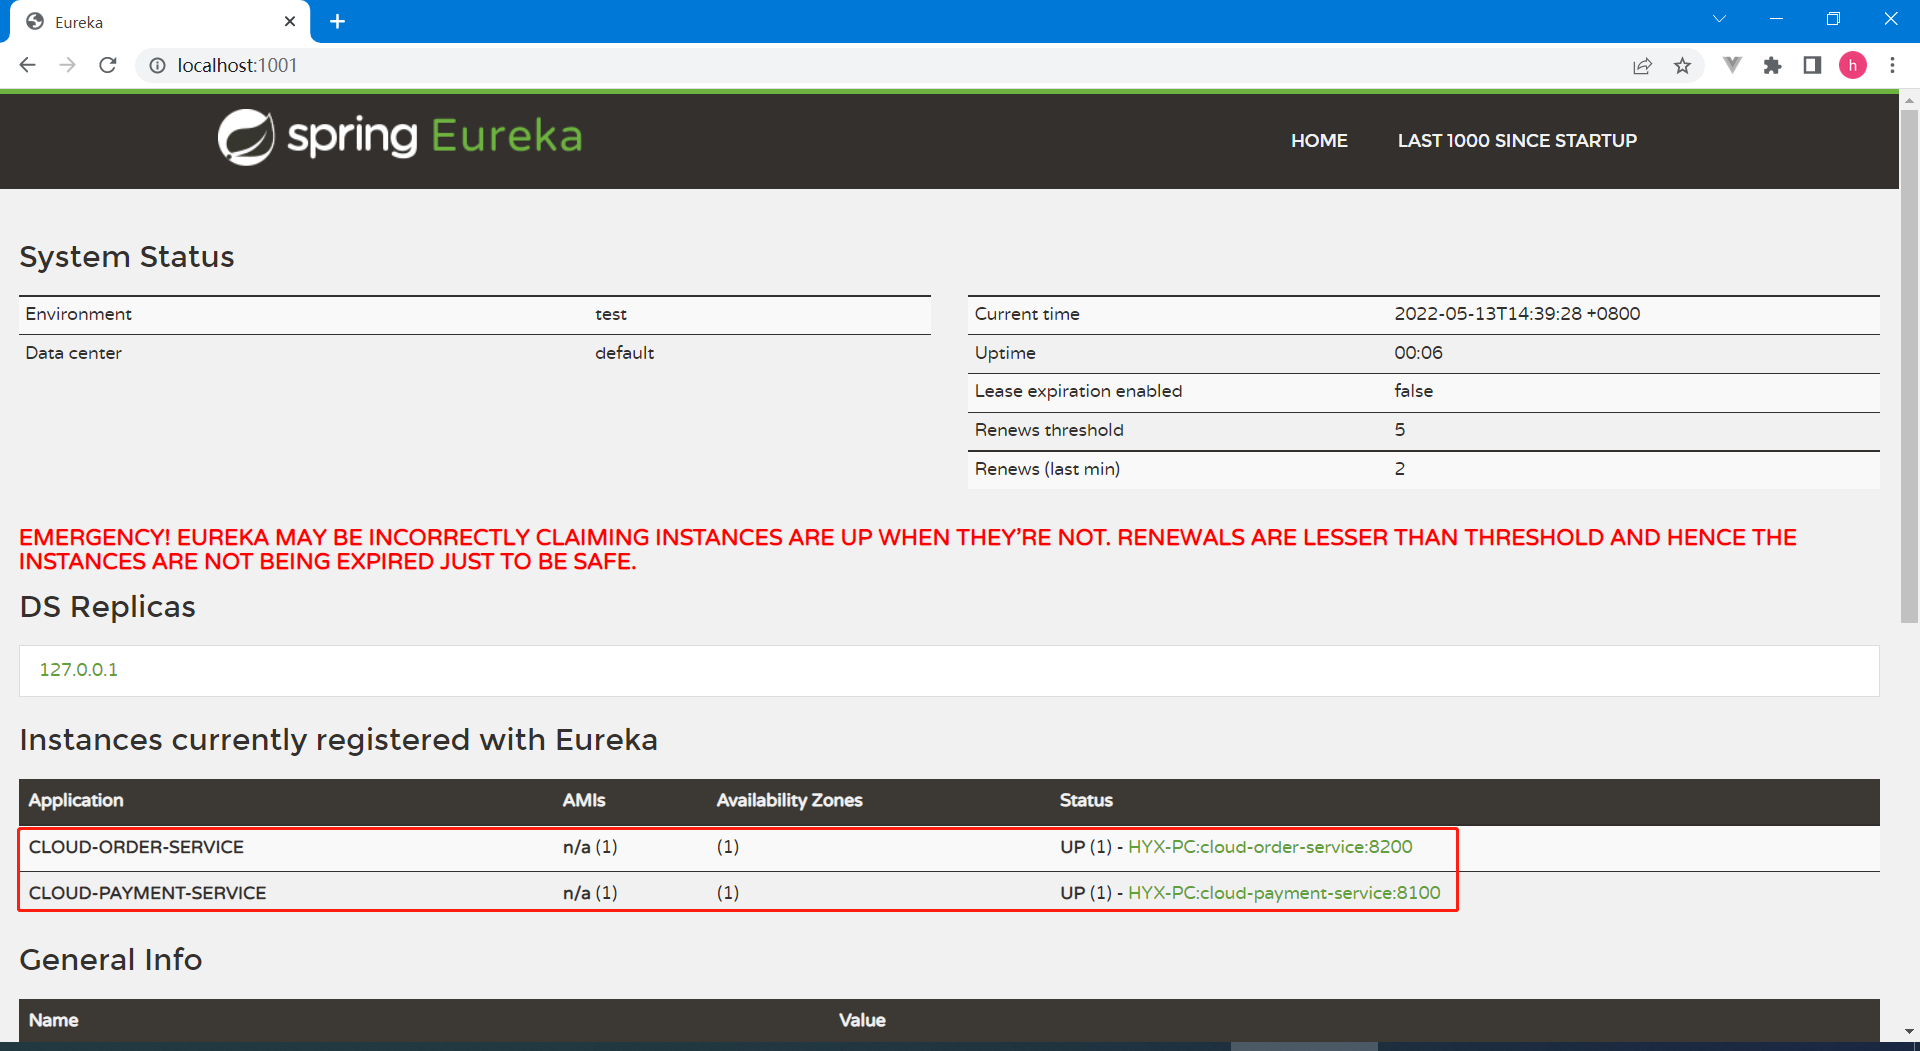
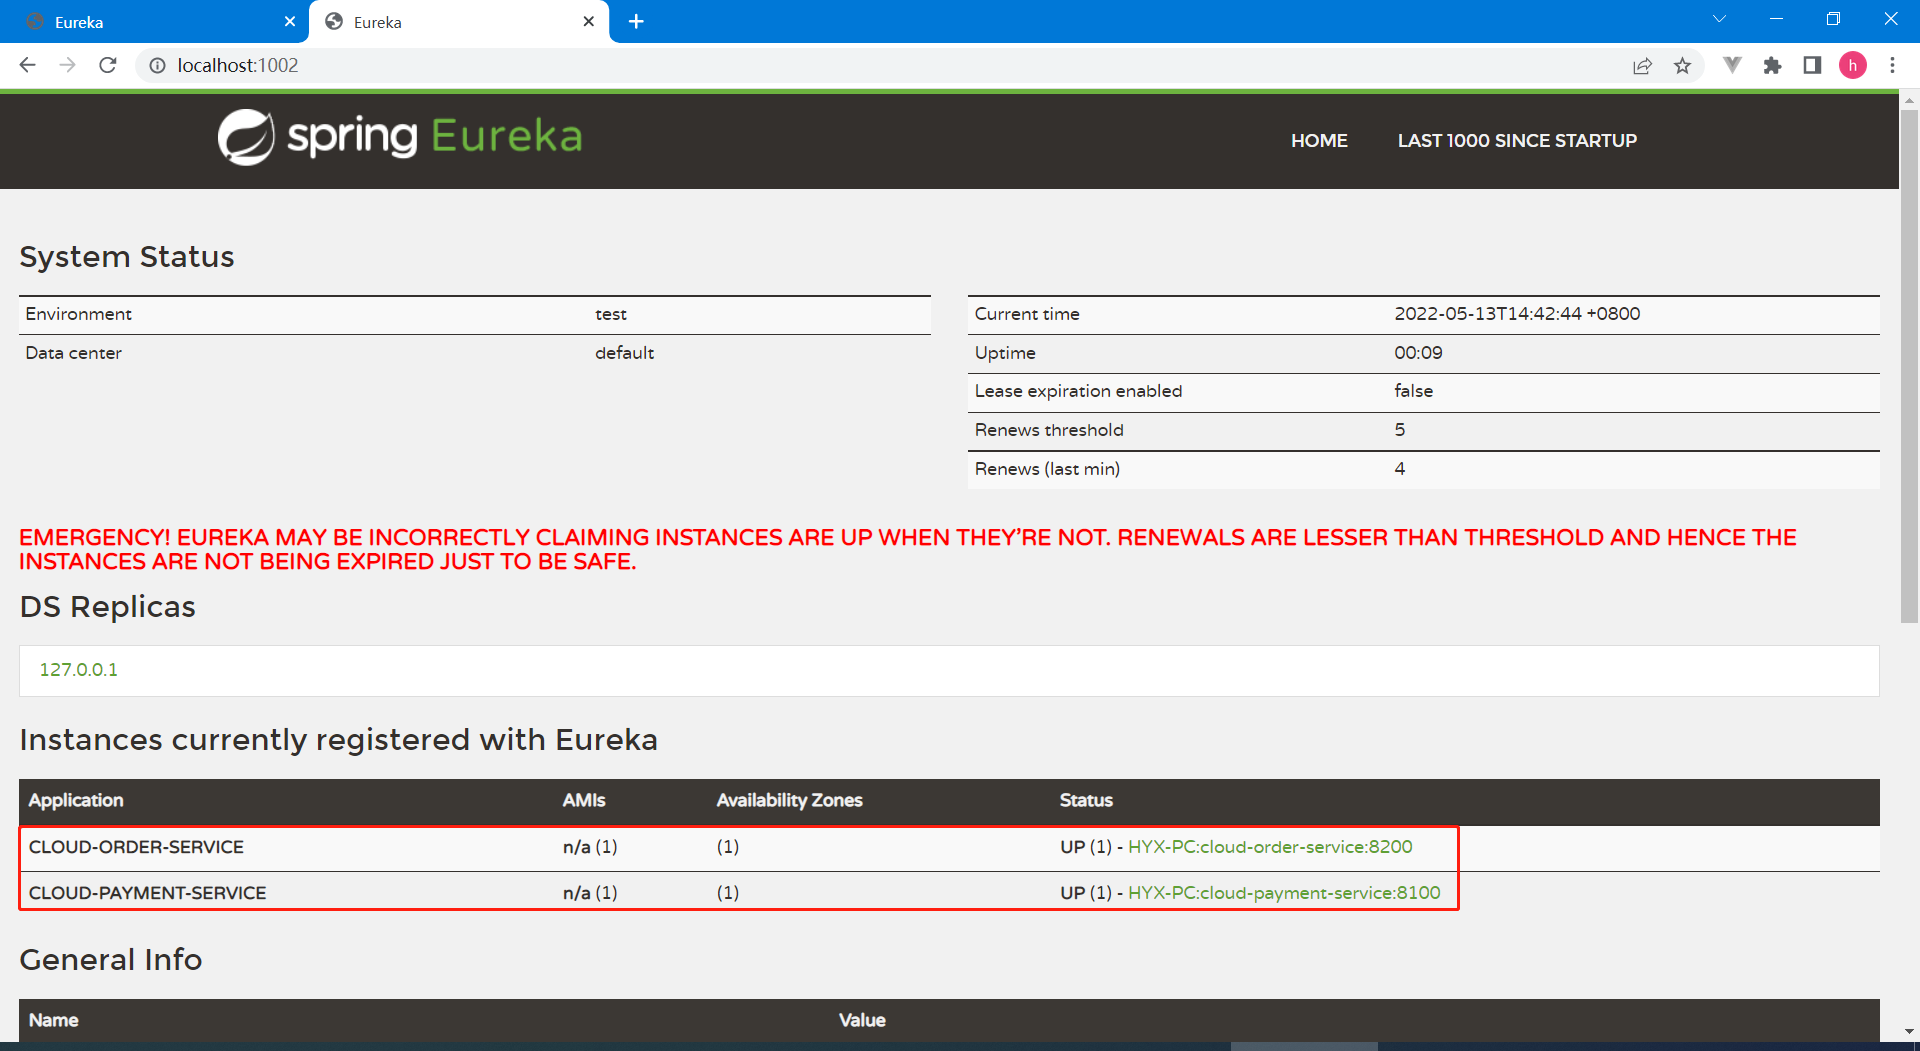
2) Eureka保护模式
在学习过程中,经常在Eureka界面看到如下红色提示,说明Eureka进入了保护模式,将不会注销任何服务。

因为在发生网络故障(延时、卡顿、拥挤)时,Eureka Server可能在一定时间内(90s)没有收到某个微服务实例的心跳,但此时这个微服务是健康的,不能注销。Eureka Server为解决该问题,检测当短时间内丢失过多的客户端时,将启动保护模式,不进行任何服务注销。
使用eureka.server.enable-self-preservation=false可以关闭Eureka Server的保护模式。或者使用如下参数来调整Eureka Client的心跳间隔和超时等待时间。
71eureka2 instance3 #Eureka客户端向服务端发送心跳的时间间隔,单位为秒(默认是30秒)4 lease-renewal-interval-in-seconds15 #Eureka服务端在收到最后一次心跳后等待时间上限,单位为秒(默认是90秒),超时将剔除服务6 lease-expiration-duration-in-seconds27
第二节 Zookeeper
1. Zookeeper简介
zookeeper是一个分布式协调工具,可以实现注册中心等功能,详细介绍请参考《ZooKpeer学习笔记(基础篇).md》。
2. 服务提供者向ZK注册
1) 新建服务提供者模块SpringCloud-zookeeper-provider
2) 引入zookeeper及相关依赖
411 2<project xmlns="http://maven.apache.org/POM/4.0.0"3 xmlns:xsi="http://www.w3.org/2001/XMLSchema-instance"4 xsi:schemaLocation="http://maven.apache.org/POM/4.0.0 http://maven.apache.org/xsd/maven-4.0.0.xsd">5 <parent>6 <artifactId>SpringCloud-demo</artifactId>7 <groupId>com.huangyuanxin.SpringCloud</groupId>8 <version>1.0-SNAPSHOT</version>9 </parent>10 <modelVersion>4.0.0</modelVersion>11
12 <artifactId>SpringCloud-zookeeper-provider</artifactId>13 14 <dependencies>15 <!-- SpringBoot整合zookeeper客户端 -->16 <dependency>17 <groupId>org.springframework.cloud</groupId>18 <artifactId>spring-cloud-starter-zookeeper-discovery</artifactId>19 </dependency>20 <dependency>21 <groupId>org.springframework.boot</groupId>22 <artifactId>spring-boot-starter-web</artifactId>23 </dependency>24 <dependency>25 <groupId>org.springframework.boot</groupId>26 <artifactId>spring-boot-devtools</artifactId>27 <scope>runtime</scope>28 <optional>true</optional>29 </dependency>30 <dependency>31 <groupId>org.projectlombok</groupId>32 <artifactId>lombok</artifactId>33 <optional>true</optional>34 </dependency>35 <dependency>36 <groupId>org.springframework.boot</groupId>37 <artifactId>spring-boot-starter-test</artifactId>38 <scope>test</scope>39 </dependency>40 </dependencies>41</project>
3) 配置application.yml
141server2 port81103
4spring5 application6 namecloud-provider-payment7 cloud8 #注册到zookeeper地址9 zookeeper10 connect-string106.53.120.230218111 discovery12 preferIpAddresstrue # 注册时使用ip地址而不是主机名。13 instanceId10.110.5.1918081 # 用于向zookeeper注册的Id。默认为随机UUID14
4) 编写启动类
141package com.huangyuanxin.springcloud.zookeeper.provider;2
3import org.springframework.boot.SpringApplication;4import org.springframework.boot.autoconfigure.SpringBootApplication;5import org.springframework.cloud.client.discovery.EnableDiscoveryClient;6
7public class ZooKeeperProviderApplication {10 public static void main(String[] args) {11 SpringApplication.run(ZooKeeperProviderApplication.class, args);12 }13}14
5) 编写Controller
191package com.huangyuanxin.springcloud.zookeeper.provider.controller;2
3import org.springframework.beans.factory.annotation.Value;4import org.springframework.web.bind.annotation.RequestMapping;5import org.springframework.web.bind.annotation.RestController;6
7import java.util.UUID;8
9public class PaymentController {11 ("${server.port}")12 private String serverPort;13
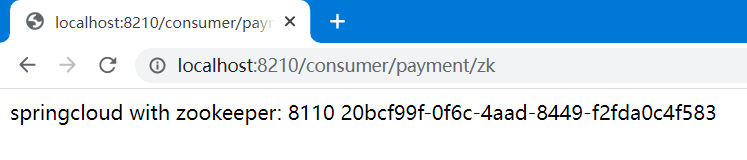
14 (value = "/payment/zk")15 public String paymentzk() {16 return "springcloud with zookeeper: " + serverPort + "\t" + UUID.randomUUID().toString();17 }18}19
6) 测试
ZK:./zkCli.sh -server 127.0.0.1:2181


3. 服务消费者向ZK注册
1) 新建服务消费者模块SpringCloud-zookeeper-consumer
2) 引入zookeeper及相关依赖
421 2<project xmlns="http://maven.apache.org/POM/4.0.0"3 xmlns:xsi="http://www.w3.org/2001/XMLSchema-instance"4 xsi:schemaLocation="http://maven.apache.org/POM/4.0.0 http://maven.apache.org/xsd/maven-4.0.0.xsd">5 <parent>6 <artifactId>SpringCloud-demo</artifactId>7 <groupId>com.huangyuanxin.SpringCloud</groupId>8 <version>1.0-SNAPSHOT</version>9 </parent>10 <modelVersion>4.0.0</modelVersion>11
12 <artifactId>SpringCloud-zookeeper-consumer</artifactId>13
14 <dependencies>15 <!-- SpringBoot整合zookeeper客户端 -->16 <dependency>17 <groupId>org.springframework.cloud</groupId>18 <artifactId>spring-cloud-starter-zookeeper-discovery</artifactId>19 </dependency>20 <dependency>21 <groupId>org.springframework.boot</groupId>22 <artifactId>spring-boot-starter-web</artifactId>23 </dependency>24 <dependency>25 <groupId>org.springframework.boot</groupId>26 <artifactId>spring-boot-devtools</artifactId>27 <scope>runtime</scope>28 <optional>true</optional>29 </dependency>30 <dependency>31 <groupId>org.projectlombok</groupId>32 <artifactId>lombok</artifactId>33 <optional>true</optional>34 </dependency>35 <dependency>36 <groupId>org.springframework.boot</groupId>37 <artifactId>spring-boot-starter-test</artifactId>38 <scope>test</scope>39 </dependency>40 </dependencies>41</project>42
3) 配置application.yml
111server2 port82103
4spring5 application6 namecloud-consumer-order7 cloud8 #注册到zookeeper地址9 zookeeper10 connect-string106.53.120.230218111
4) 编写启动类
151package com.huangyuanxin.springcloud.zookeeper.consumer;2
3import org.springframework.boot.SpringApplication;4import org.springframework.boot.autoconfigure.SpringBootApplication;5import org.springframework.cloud.client.discovery.EnableDiscoveryClient;6
7public class ZooKeeperConsumerApplication {10 public static void main(String[] args) {11 SpringApplication.run(ZooKeeperConsumerApplication.class, args);12 }13}14
15
5) 编写配置类
181package com.huangyuanxin.springcloud.zookeeper.consumer.config;2
3import org.springframework.cloud.client.loadbalancer.LoadBalanced;4import org.springframework.context.annotation.Bean;5import org.springframework.context.annotation.Configuration;6import org.springframework.web.client.RestTemplate;7
8public class ApplicationContextBean10{11 12 13 public RestTemplate getRestTemplate()14 {15 return new RestTemplate();16 }17}18
6) 编写Controller
221package com.huangyuanxin.springcloud.zookeeper.consumer.controller;2
3import org.springframework.beans.factory.annotation.Autowired;4import org.springframework.web.bind.annotation.RequestMapping;5import org.springframework.web.bind.annotation.RestController;6import org.springframework.web.client.RestTemplate;7
8public class OrderController {10 public static final String INVOKE_URL = "http://cloud-provider-payment";11
12 13 private RestTemplate restTemplate;14
15 (value = "/consumer/payment/zk")16 public String paymentInfo() {17 String result = restTemplate.getForObject(INVOKE_URL + "/payment/zk", String.class);18 System.out.println("消费者调用支付服务(zookeeper)--->result:" + result);19 return result;20 }21}22
6) 测试
ZK:./zkCli.sh -server 127.0.0.1:2181

4. 注意事项
1) 关闭防火墙
91# 查看防火墙状态2systemctl status firewalld.service3
4# 临时关闭防火墙5systemctl stop firewalld.service6
7# 永久关闭防火墙8systemctl disable firewalld.service9
2) 排除冲突Jar包
如果Zookeeper的Jar包出现冲突或与ZK服务器版本不匹配,可使用下面配置进行更换。
191<!-- SpringBoot整合zookeeper客户端 -->2<dependency>3 <groupId>org.springframework.cloud</groupId>4 <artifactId>spring-cloud-starter-zookeeper-discovery</artifactId>5 <!--先排除自带的zookeeper3.5.3-->6 <exclusions>7 <exclusion>8 <groupId>org.apache.zookeeper</groupId>9 <artifactId>zookeeper</artifactId>10 </exclusion>11 </exclusions>12</dependency>13<!--添加zookeeper3.4.9版本-->14<dependency>15 <groupId>org.apache.zookeeper</groupId>16 <artifactId>zookeeper</artifactId>17 <version>3.4.9</version>18</dependency>19
第三节 Consul
1. Consul简介
Consul 是一套开源的分布式服务发现和配置管理系统,由HashiCorp公司用Go语言开发,提供了微服务架构中的服务治理、配置中心、控制总线等功能。

2.服务提供者向Consul注册
1) 新建服务提供者模块SpringCloud-cosnul-provider
2) 引入Cosnul及相关依赖
461 2<project xmlns="http://maven.apache.org/POM/4.0.0"3 xmlns:xsi="http://www.w3.org/2001/XMLSchema-instance"4 xsi:schemaLocation="http://maven.apache.org/POM/4.0.0 http://maven.apache.org/xsd/maven-4.0.0.xsd">5 <parent>6 <artifactId>SpringCloud-demo</artifactId>7 <groupId>com.huangyuanxin.SpringCloud</groupId>8 <version>1.0-SNAPSHOT</version>9 </parent>10 <modelVersion>4.0.0</modelVersion>11
12 <artifactId>SpringCloud-consul-provider</artifactId>13
14
15 <dependencies>16 <!--SpringCloud consul-server -->17 <dependency>18 <groupId>org.springframework.cloud</groupId>19 <artifactId>spring-cloud-starter-consul-discovery</artifactId>20 </dependency>21 <dependency>22 <groupId>org.springframework.boot</groupId>23 <artifactId>spring-boot-starter-web</artifactId>24 </dependency>25 <dependency>26 <groupId>org.springframework.boot</groupId>27 <artifactId>spring-boot-starter-actuator</artifactId>28 </dependency>29 <dependency>30 <groupId>org.springframework.boot</groupId>31 <artifactId>spring-boot-devtools</artifactId>32 <scope>runtime</scope>33 <optional>true</optional>34 </dependency>35 <dependency>36 <groupId>org.projectlombok</groupId>37 <artifactId>lombok</artifactId>38 <optional>true</optional>39 </dependency>40 <dependency>41 <groupId>org.springframework.boot</groupId>42 <artifactId>spring-boot-starter-test</artifactId>43 <scope>test</scope>44 </dependency>45 </dependencies>46</project>
3) 配置application.yml
151server2 port81203
4spring5 application6 namecloud-provider-payment7 ####consul注册中心地址8 cloud9 consul10 host127.0.0.111 port850012 discovery13 #hostname: 127.0.0.114 service-name$spring.application.name15
4) 编写启动类
151package com.huangyuanxin.springcloud.consul.provider;2
3import org.springframework.boot.SpringApplication;4import org.springframework.boot.autoconfigure.SpringBootApplication;5import org.springframework.cloud.client.discovery.EnableDiscoveryClient;6
7public class ConsulProviderApplication {10 public static void main(String[] args) {11 SpringApplication.run(ConsulProviderApplication.class, args);12 }13}14
15
5) 编写Controller
191package com.huangyuanxin.springcloud.consul.provider.controller;2
3import org.springframework.beans.factory.annotation.Value;4import org.springframework.web.bind.annotation.RequestMapping;5import org.springframework.web.bind.annotation.RestController;6
7import java.util.UUID;8
9public class PaymentController {11 ("${server.port}")12 private String serverPort;13
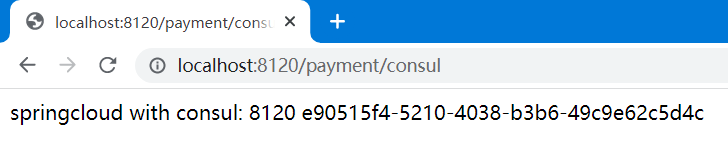
14 (value = "/payment/consul")15 public String paymentconsul() {16 return "springcloud with consul: " + serverPort + "\t" + UUID.randomUUID().toString();17 }18}19
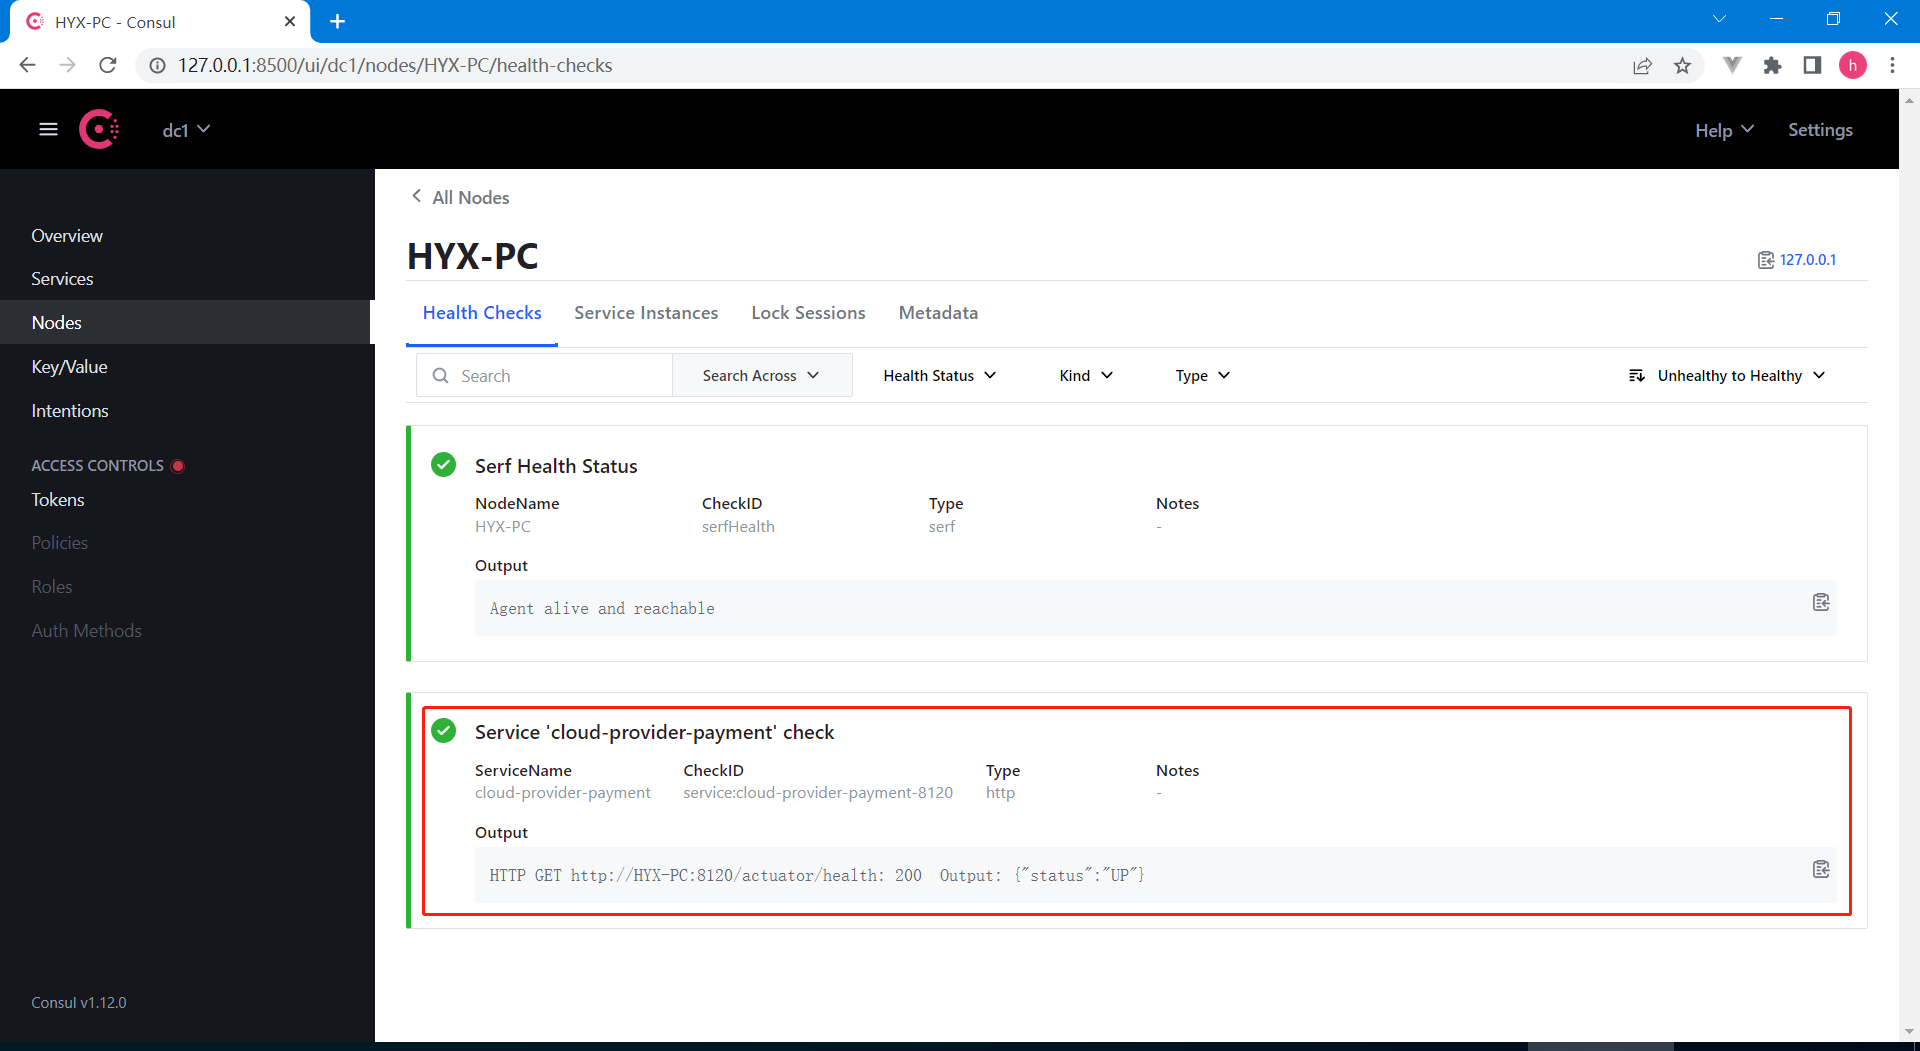
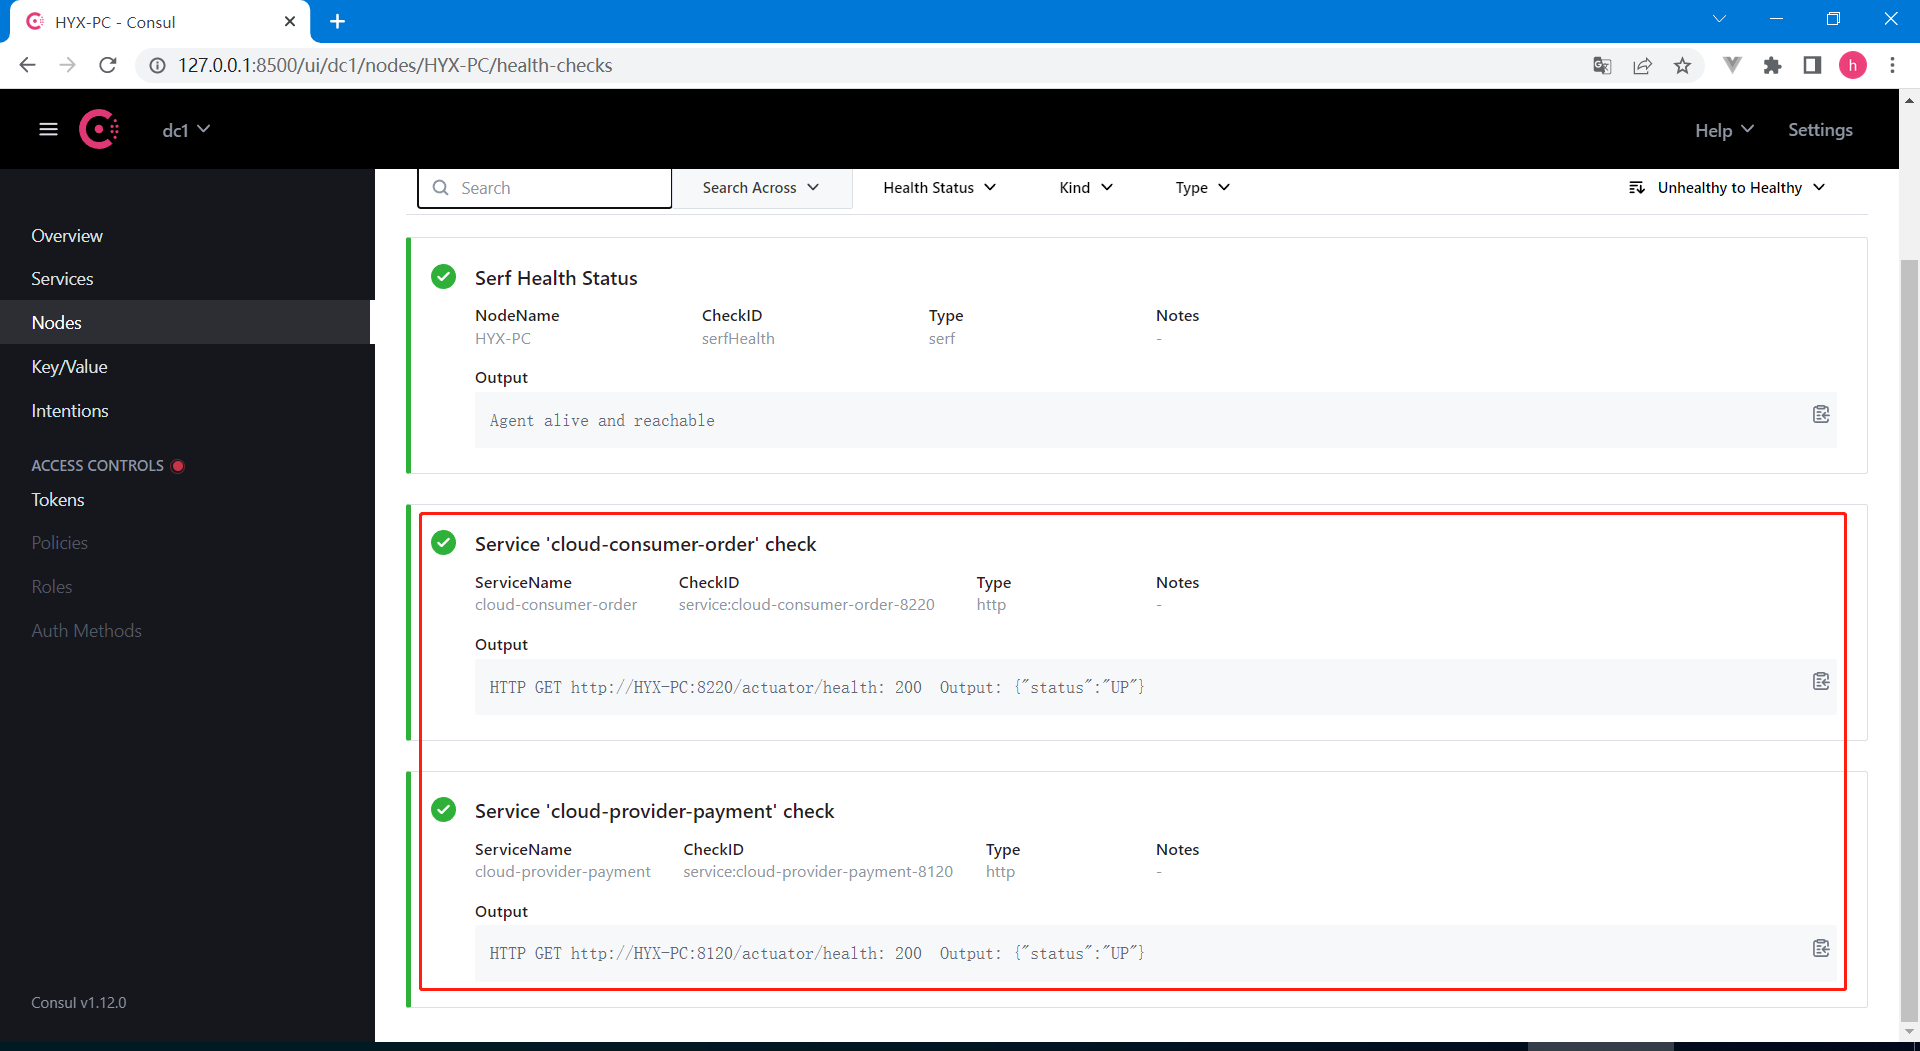
6) 测试
Consul:http://127.0.0.1:8500/
3. 服务消费者向Consul注册
1) 新建服务消费者模块SpringCloud-consul-consumer
2) 引入Consul及相关依赖
451 2<project xmlns="http://maven.apache.org/POM/4.0.0"3 xmlns:xsi="http://www.w3.org/2001/XMLSchema-instance"4 xsi:schemaLocation="http://maven.apache.org/POM/4.0.0 http://maven.apache.org/xsd/maven-4.0.0.xsd">5 <parent>6 <artifactId>SpringCloud-demo</artifactId>7 <groupId>com.huangyuanxin.SpringCloud</groupId>8 <version>1.0-SNAPSHOT</version>9 </parent>10 <modelVersion>4.0.0</modelVersion>11
12 <artifactId>SpringCloud-consul-consumer</artifactId>13
14 <dependencies>15 <!--SpringCloud consul-server -->16 <dependency>17 <groupId>org.springframework.cloud</groupId>18 <artifactId>spring-cloud-starter-consul-discovery</artifactId>19 </dependency>20 <dependency>21 <groupId>org.springframework.boot</groupId>22 <artifactId>spring-boot-starter-web</artifactId>23 </dependency>24 <dependency>25 <groupId>org.springframework.boot</groupId>26 <artifactId>spring-boot-starter-actuator</artifactId>27 </dependency>28 <dependency>29 <groupId>org.springframework.boot</groupId>30 <artifactId>spring-boot-devtools</artifactId>31 <scope>runtime</scope>32 <optional>true</optional>33 </dependency>34 <dependency>35 <groupId>org.projectlombok</groupId>36 <artifactId>lombok</artifactId>37 <optional>true</optional>38 </dependency>39 <dependency>40 <groupId>org.springframework.boot</groupId>41 <artifactId>spring-boot-starter-test</artifactId>42 <scope>test</scope>43 </dependency>44 </dependencies>45</project>
3) 配置application.yml
151server2 port82203
4spring5 application6 namecloud-consumer-order7 # consul注册中心地址8 cloud9 consul10 host127.0.0.111 port850012 discovery13 #hostname: 127.0.0.114 service-name$spring.application.name15
4) 编写启动类
141package com.huangyuanxin.springcloud.consul.consumer;2
3import org.springframework.boot.SpringApplication;4import org.springframework.boot.autoconfigure.SpringBootApplication;5import org.springframework.cloud.client.discovery.EnableDiscoveryClient;6
7public class ConsulConsumerApplication {10 public static void main(String[] args) {11 SpringApplication.run(ConsulConsumerApplication.class, args);12 }13}14
5) 编写配置类
181package com.huangyuanxin.springcloud.consul.consumer.config;2
3import org.springframework.cloud.client.loadbalancer.LoadBalanced;4import org.springframework.context.annotation.Bean;5import org.springframework.context.annotation.Configuration;6import org.springframework.web.client.RestTemplate;7
8public class ApplicationContextBean10{11 12 13 public RestTemplate getRestTemplate()14 {15 return new RestTemplate();16 }17}18
6) 编写Controller
221package com.huangyuanxin.springcloud.consul.consumer.controller;2
3import org.springframework.beans.factory.annotation.Autowired;4import org.springframework.web.bind.annotation.RequestMapping;5import org.springframework.web.bind.annotation.RestController;6import org.springframework.web.client.RestTemplate;7
8public class OrderController {10 public static final String INVOKE_URL = "http://cloud-provider-payment";11
12 13 private RestTemplate restTemplate;14
15 (value = "/consumer/payment/consul")16 public String paymentInfo() {17 String result = restTemplate.getForObject(INVOKE_URL + "/payment/consul", String.class);18 System.out.println("消费者调用支付服务(consul)--->result:" + result);19 return result;20 }21}22
6) 测试
Consul:http://127.0.0.1:8500/

4. 补充说明
1) 部署说明
首先从Consul官网(https://www.consul.io/downloads.html)下载匹配的版本,再使用下面命令进行启动。
121# 查看版本2>consul.exe --version3Consul v1.12.04Revision 09a8cdb45Protocol 2 spoken by default, understands 2 to 3 (agent will automatically use protocol >2 when speaking to compatible agents)6
7# 启动8>consul agent -dev9
10# 打开控制台11http://127.0.0.1:8500/12
2) 参考资料
第03章_服务负载均衡
第一节 Ribbon
1. Ribbon简介
Spring Cloud Ribbon是基于Netflix Ribbon实现的一套客户端负载均衡工具,引入Ribbon后的系统架构图如下:
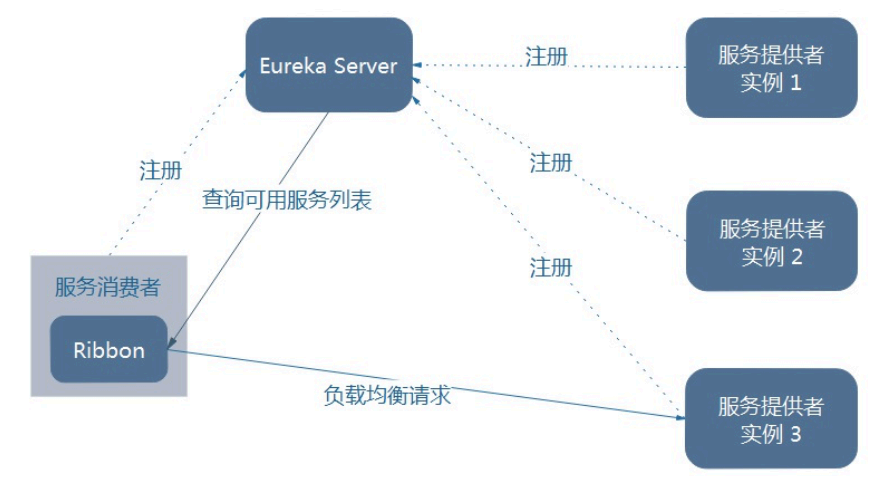
服务消费者(客户端)集成Ribbon,从注册中心查询可用服务列表,然后根据特定的路由算法选择其中一个服务实例进行调用。
2. 客户端负载均衡
1) 客户端导入Ribbon依赖
71<!--SpringCloud-service-order/pom.xml-->2<!--Ribbon依赖-->3<dependency>4 <groupId>org.springframework.cloud</groupId>5 <artifactId>spring-cloud-starter-netflix-ribbon</artifactId>6</dependency>7
注意:某些注册中心客户端(如spring-cloud-starter-netflix-eureka-client)自带了Ribbon依赖,可省略该步骤。
2) 修改服务URL为服务名
41order2 # PaymentSrv_URL: "http://127.0.0.1:8100"3 PaymentSrv_URL"http://CLOUD-PAYMENT-SERVICE"4
3) 添加@LoadBalanced进行负载均衡
91public class ApplicationContextConfig {3 4 5 public RestTemplate restTemplate() {6 return new RestTemplate();7 }8}9
4) 使用RestTemplate进行调用
151public class OrderController {3 ("${order.PaymentSrv_URL}")4 private String PaymentSrv_URL;5
6 7 private RestTemplate restTemplate;8
9 ("/consumer/payment/get/{id}")10 public CommonResult getPayment( Long id) {11 // 通过服务名调用支付服务12 return restTemplate.getForObject(PaymentSrv_URL + "/payment/get/" + id, CommonResult.class, id);13 }14}15
5) 测试
依次启动Eureka、支付集群、订单服务进行测试,发现进行轮询调用。
订单调支付(默认轮询):http://localhost:8200/consumer/payment/get/1


3. 负载均衡算法
1) 内置负载均衡算法
Ribbon内置了一些常见的负载均衡算法,如下:
| LB算法 | 实现类 | 说明 |
|---|---|---|
| 轮询 | RoundRobinRule | 默认算法,轮询可用服务列表进行调用 |
| 随机 | RandomRule | 从可用服务列表中随机调用 |
| 重试 | RetryRule | |
| 最低并发 | BestAvailableRule | |
| 可用过滤 | AvailabilityFilteringRule | |
| 响应时间加权 | WeightedResponseTimeRule | |
| 区域权衡 | ZoneAvoidanceRule |
2) 通过属性修改负载均衡算法
51# 修改调支付时进行随机调用2CLOUD-PAYMENT-SERVICE3 ribbon4 NFLoadBalancerRuleClassNamecom.netflix.loadbalancer.RandomRule5
3) 通过Java配置修改负载均衡算法
首先定义规则配置类如下:
151package com.huangyuanxin.springcloud.order.rule;2
3import com.netflix.loadbalancer.IRule;4import com.netflix.loadbalancer.RandomRule;5import org.springframework.context.annotation.Bean;6import org.springframework.context.annotation.Configuration;7 8// @Configuration9public class RibbonRule {10 11 public IRule randomRule() {12 return new RandomRule();13 }14}15
注意:
请勿将RibbonRule放置在包扫描路径下,如果被注册到容器中,将会替换掉默认的负载均衡算法。
通过
@RibbonClients可以显式的指定默认负载均衡算法,初始值为轮询。
然后在启动类使用@RibbonClient对指定的服务进行配置:
91(name = "CLOUD-PAYMENT-SERVICE", configuration = RibbonRule.class)4public class OrderApplication {5 public static void main(String[] args) {6 SpringApplication.run(OrderApplication.class, args);7 }8}9
4) 自定义负载均衡算法
先继承AbstractLoadBalancerRule抽象类或实现IRule接口,算法实现可参考RandomRule等内置实现,再使用上述方式进行配置。
第04章_服务远程调用
第一节 openFeign
1. openFeign简介
openFeign是一个声明式WebService客户端,使用接口+注解的形式声明外部REST服务,使远程调用变得更加简单。
2. 声明式服务调用
1) 客户端添加openFeign依赖
61<!--SpringCloud-service-order/pom.xml-->2<!--openfeign-->3<dependency>4 <groupId>org.springframework.cloud</groupId>5 <artifactId>spring-cloud-starter-openfeign</artifactId>6</dependency>
2) 启动类开启openFeign支持
101 // 开启openFeign支持4(name = "CLOUD-PAYMENT-SERVICE", configuration = RibbonRule.class)5public class OrderApplication {6 public static void main(String[] args) {7 SpringApplication.run(OrderApplication.class, args);8 }9}10
3) 声明RPC客户端及接口(@FeignClient)
161package com.huangyuanxin.springcloud.order.rpc;2
3import com.huangyuanxin.springcloud.common.model.CommonResult;4import com.huangyuanxin.springcloud.common.model.Payment;5import org.springframework.cloud.openfeign.FeignClient;6import org.springframework.web.bind.annotation.GetMapping;7import org.springframework.web.bind.annotation.PathVariable;8 9("CLOUD-PAYMENT-SERVICE")10public interface PaymentFeignClient {11
12 // 使用openFeign远程调用支付服务,调用路径:/payment/get/{id}13 (value = "/payment/get/{id}")14 CommonResult<Payment> getPaymentById(("id") Long id);15}16
4) 使用RPC客户端调用远程服务接口
211public class OrderController {3 ("${order.PaymentSrv_URL}")4 private String PaymentSrv_URL;5 6 private RestTemplate restTemplate;7 8 private PaymentFeignClient paymentFeignClient;9
10 // 旧方式:使用传统的restTemplate调用11 ("/consumer/payment/get/{id}")12 public CommonResult getPayment( Long id) {13 return restTemplate.getForObject(PaymentSrv_URL + "/payment/get/" + id, CommonResult.class, id);14 }15
16 // 新方式:使用openFeign客户端进行调用17 ("/consumer/feign/payment/get/{id}")18 public CommonResult getPayment2( Long id) {19 return paymentFeignClient.getPaymentById(id);20 }21}
5) 测试
依次开启注册中心、支付服务集群和订单微服务,前端直接调订单服务,订单服务再通过openFeign调支付服务集群,并支持负载均衡。
订单通过openFeign调支付集群:http://localhost:8200/consumer/feign/payment/get/1


3. openFeign的相关配置
1) 超时时间配置
91# SpringCloud-service-order/application.yml2
3#设置feign客户端超时时间(OpenFeign默认支持ribbon)4ribbon5 #指的是建立连接所用的时间,适用于网络状况正常的情况下,两端连接所用的时间6 ReadTimeout50007 #指的是建立连接后从服务器读取到可用资源所用的时间8 ConnectTimeout50009
2) 调用日志配置
首先通过Java配置openFeign的日志级别:
141package com.huangyuanxin.springcloud.order.config;2
3import feign.Logger;4import org.springframework.context.annotation.Bean;5import org.springframework.context.annotation.Configuration;6
7public class FeignConfig {9 // 配置openFeign的日志级别为FULL10 11 Logger.Level feignLoggerLevel() {12 return Logger.Level.FULL;13 }14}openFeign支持的日志级别如下:
NONE:默认的,不显示任何日志;
BASIC:仅记录请求方法、URL、响应状态码及执行时间;
HEADERS:除了 BASIC 中定义的信息之外,还有请求和响应的头信息;
FULL:除了 HEADERS 中定义的信息之外,还有请求和响应的正文及元数据。
然后在属性配置文件中指定对应类的日志级别:
41logging2 level3 # feign日志以什么级别监控哪个接口4 com.huangyuanxin.springcloud.order.rpc.PaymentFeignClientdebug
当发生远程调用时,可看到类似如下的日志信息:
1212022-05-23 23:44:02.308 DEBUG 12528 --- [nio-8200-exec-4] c.h.s.order.rpc.PaymentFeignClient : [PaymentFeignClient#getPaymentById] ---> GET http://CLOUD-PAYMENT-SERVICE/payment/get/1 HTTP/1.122022-05-23 23:44:02.309 DEBUG 12528 --- [nio-8200-exec-4] c.h.s.order.rpc.PaymentFeignClient : [PaymentFeignClient#getPaymentById] ---> END HTTP (0-byte body)32022-05-23 23:44:02.575 DEBUG 12528 --- [nio-8200-exec-4] c.h.s.order.rpc.PaymentFeignClient : [PaymentFeignClient#getPaymentById] <--- HTTP/1.1 200 (266ms)42022-05-23 23:44:02.575 DEBUG 12528 --- [nio-8200-exec-4] c.h.s.order.rpc.PaymentFeignClient : [PaymentFeignClient#getPaymentById] connection: keep-alive52022-05-23 23:44:02.575 DEBUG 12528 --- [nio-8200-exec-4] c.h.s.order.rpc.PaymentFeignClient : [PaymentFeignClient#getPaymentById] content-type: application/json62022-05-23 23:44:02.575 DEBUG 12528 --- [nio-8200-exec-4] c.h.s.order.rpc.PaymentFeignClient : [PaymentFeignClient#getPaymentById] date: Mon, 23 May 2022 15:44:02 GMT72022-05-23 23:44:02.575 DEBUG 12528 --- [nio-8200-exec-4] c.h.s.order.rpc.PaymentFeignClient : [PaymentFeignClient#getPaymentById] keep-alive: timeout=6082022-05-23 23:44:02.575 DEBUG 12528 --- [nio-8200-exec-4] c.h.s.order.rpc.PaymentFeignClient : [PaymentFeignClient#getPaymentById] transfer-encoding: chunked92022-05-23 23:44:02.576 DEBUG 12528 --- [nio-8200-exec-4] c.h.s.order.rpc.PaymentFeignClient : [PaymentFeignClient#getPaymentById]102022-05-23 23:44:02.576 DEBUG 12528 --- [nio-8200-exec-4] c.h.s.order.rpc.PaymentFeignClient : [PaymentFeignClient#getPaymentById] {"code":200,"message":"端口[8102]查询成功","data":{"id":1,"serial":"serial00001"}}112022-05-23 23:44:02.576 DEBUG 12528 --- [nio-8200-exec-4] c.h.s.order.rpc.PaymentFeignClient : [PaymentFeignClient#getPaymentById] <--- END HTTP (88-byte body)12
第05章_服务熔断降级
第一节 Hystrix
1. Hystrix简介
Hystrix是一个处理分布式系统超时和容错的开源库,用于保证一些服务出现异常时,不会导致整体服务出现级联故障(雪崩),以提高分布式系统的弹性。
Hystrix处理非正常服务时有三种方案,分别是服务降级、服务熔断、服务限流:
服务降级:当服务出现
异常、超时、线程池/信号量打满或被熔断等情形,将会执行备选的fallback方法,一般为用户返回一个友好的提示信息,如服务器忙,请稍后再试!服务熔断:当服务压力达到设置的上限后,直接拒绝访问,对之后的所有请求都进行降级处理,待服务压力缓解后再逐步恢复。
服务限流:当服务在一个时间段内接收的请求数超过设置的上限时,多余的请求将排队延后处理,防止突然的高并发压崩服务。
2. 服务端降级
1) 添加hystrix依赖
71<!--SpringCloud-service-pay/pom.xml-->2<!--hystrix-->3<dependency>4 <groupId>org.springframework.cloud</groupId>5 <artifactId>spring-cloud-starter-netflix-hystrix</artifactId>6</dependency>7
注意:某些注册中心客户端(如spring-cloud-starter-netflix-eureka-client)自带了Hystrix依赖,可省略该步骤。
2) 开启Hystrix支持
101 // 开启Hystrix支持5public class PayApplication {6 public static void main(String[] args) {7 SpringApplication.run(PayApplication.class, args);8 }9}10
3) 配置方法支持降级
201(value = "/payment/get/{id}")2(3 fallbackMethod = "getPaymentByIdFallback",4 commandProperties = {5 (name = "execution.isolation.thread.timeoutInMilliseconds", value = "1000")6 }7)8public CommonResult<Payment> getPaymentById(("id") Long id) {9 Payment payment = paymentService.getPaymentById(id);10 if (payment != null) {11 return new CommonResult(200, "端口[" + serverPort + "]查询成功", payment);12 } else {13 return new CommonResult(444, "端口[" + serverPort + "]没有对应记录,查询ID: " + id, null);14 }15}16
17public CommonResult<Payment> getPaymentByIdFallback(("id") Long id) {18 return new CommonResult(500, "服务器忙,请稍后再试!请求端口[" + serverPort + "]");19}20
4) 测试超时导致降级
在方法中添加延时来模拟业务耗时,当延时时间大于设置的超时时间,将会触发降级处理。
21Thread.sleep(30000);2
依次开启Eureka、支付服务,访问http://localhost:8100/payment/get/1进行测试:

5) 测试异常导致降级
在方法中添加一个异常来模拟业务异常,当异常抛出时,也会触发降级处理。
21int a = 10/0;2
依次开启Eureka、支付服务,访问http://localhost:8100/payment/get/1进行测试:
6) @DefaultProperties注解补充
@DefaultProperties注解可以在类上为需要降级的方法配置一些默认属性,以减少重复的降级配置。
841(defaultFallback = "defaultFallbackMethod") // 配置默认降级方法defaultFallbackMethod4public class PaymentController {5 6 private PaymentService paymentService;7
8 ("${server.port}")9 private String serverPort;10
11 12 private DiscoveryClient discoveryClient;13
14 public boolean isTestHystrix = true;15
16 // 不使用降级处理17 (value = "/payment/create")18 public CommonResult create( Payment payment) {19 int result = paymentService.create(payment);20 if (result > 0) {21 return new CommonResult(200, "端口[" + serverPort + "]插入数据库成功", result);22 } else {23 return new CommonResult(444, "端口[" + serverPort + "]插入数据库失败", null);24 }25 }26
27 // 使用自定义降级方法降级处理28 (value = "/payment/get/{id}")29 (30 fallbackMethod = "getPaymentByIdFallback",31 commandProperties = {32 (name = "execution.isolation.thread.timeoutInMilliseconds", value = "5000")33 }34 )35 public CommonResult<Payment> getPaymentById(("id") Long id) throws InterruptedException {36 if (isTestHystrix) {37 // 用于测试超时导致的降级38 Thread.sleep(30000);39 /*// 用于测试异常导致的降级40 int a = 10 / 0;*/41 }42
43 Payment payment = paymentService.getPaymentById(id);44 if (payment != null) {45 return new CommonResult(200, "支付端口[" + serverPort + "]查询成功", payment);46 } else {47 return new CommonResult(444, "支付端口[" + serverPort + "]没有对应记录,查询ID: " + id, null);48 }49 }50
51 // 自定义降级方法52 public CommonResult<Payment> getPaymentByIdFallback(("id") Long id) {53 return new CommonResult(500, "服务器忙,请稍后再试!请求端口[" + serverPort + "]");54 }55
56 // 使用默认降级方法降级处理57 (value = "/payment/discovery")58 59 public Object discovery() throws InterruptedException {60 List<String> services = discoveryClient.getServices();61 for (String element : services) {62 System.out.println(element);63 }64
65 if (isTestHystrix) {66 // 用于测试超时导致的降级67 Thread.sleep(30000);68 }69
70 List<ServiceInstance> instances = discoveryClient.getInstances("CLOUD-PAYMENT-SERVICE");71 for (ServiceInstance element : instances) {72 System.out.println(element.getServiceId() + "\t" + element.getHost() + "\t" + element.getPort() + "\t"73 + element.getUri());74 }75 return this.discoveryClient;76 }77
78 // 默认降级方法79 public Object defaultFallbackMethod() {80 return "当前服务忙!";81 }82
83}84
3. 客户端降级(结合openFeign)
1) 添加Hystrix依赖
71<!--SpringCloud-service-order/pom.xml-->2<!--hystrix-->3<dependency>4 <groupId>org.springframework.cloud</groupId>5 <artifactId>spring-cloud-starter-netflix-hystrix</artifactId>6</dependency>7 注意:某些注册中心客户端(如spring-cloud-starter-netflix-eureka-client)自带了Hystrix依赖,可省略该步骤。
2) 开启Hystrix支持
111 5(name = "CLOUD-PAYMENT-SERVICE", configuration = RibbonRule.class)6public class OrderApplication {7 public static void main(String[] args) {8 SpringApplication.run(OrderApplication.class, args);9 }10}11
注意: @EnableHystrix 是@EnableCircuitBreaker的组合注解。
3) 打开openFeign的降级开关
61# application.yml2
3feign4 hystrix5 enabledtrue #在Feign中开启Hystrix6
4) 针对FeignClient编写降级逻辑
161package com.huangyuanxin.springcloud.order.rpc.fallback;2
3import com.huangyuanxin.springcloud.common.model.CommonResult;4import com.huangyuanxin.springcloud.common.model.Payment;5import com.huangyuanxin.springcloud.order.rpc.PaymentFeignClient;6import org.springframework.stereotype.Component;7
8// PaymentFeignClient的降级处理逻辑9public class PaymentFeignClientFallback implements PaymentFeignClient {11 12 public CommonResult<Payment> getPaymentById(Long id) {13 return new CommonResult<>(500, "支付服务无响应,请稍后再试!");14 }15}16
5) 配置FeignClient的降级处理类
151import com.huangyuanxin.springcloud.common.model.CommonResult;2import com.huangyuanxin.springcloud.common.model.Payment;3import com.huangyuanxin.springcloud.order.rpc.fallback.PaymentFeignClientFallback;4import org.springframework.cloud.openfeign.FeignClient;5import org.springframework.web.bind.annotation.GetMapping;6import org.springframework.web.bind.annotation.PathVariable;7
8// 支付远程调用客户端,降级处理类为PaymentFeignClientFallback9(value = "CLOUD-PAYMENT-SERVICE", fallback = PaymentFeignClientFallback.class)10public interface PaymentFeignClient {11
12 (value = "/payment/get/{id}")13 CommonResult<Payment> getPaymentById(("id") Long id);14}15
6) 测试服务端异常导致降级(超时、异常、宕机等)
依次打开Eureka注册中心、支付服务、订单服务,先测试正常情形OK;随后关闭支付服务,测试服务端宕机情形,发现客户端调用时正确降级处理:localhost:8200/consumer/feign/payment/get/1

4. 服务熔断
1) 熔断机制简介
熔断机制是应对雪崩效应的一种微服务链路保护机制。当扇出链路的某个微服务出错不可用或者响应时间太长时,会进行服务的降级,进而熔断该节点微服务的调用,快速返回错误的响应信息。当检测到该节点微服务调用响应正常后,再逐步恢复调用链路。其设计思想如下图所示,具体内容可参考https://martinfowler.com/bliki/CircuitBreaker.html。
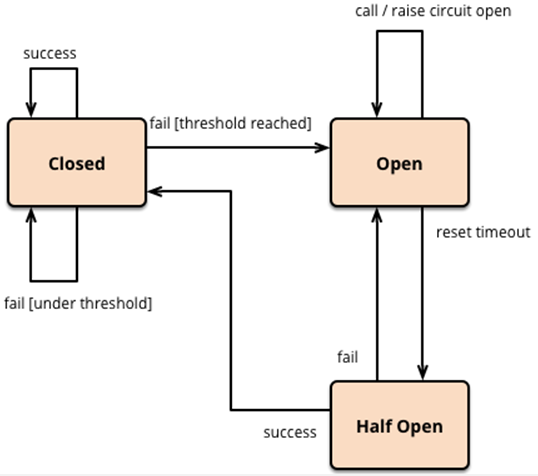
初始情况下,断路器处于关闭(closed)状态。当某一时间窗口内请求次数和失败率都达到阈值时,触发熔断,进入开启(open)状态,此后的所有请求直接进入降级逻辑,以减少响应时间。
当熔断时间达到设置的阈值时,将会进入半开(half open)状态,释放少量的请求执行主逻辑,如果请求成功,则关闭断路器,恢复服务的正常访问,否则重置熔断时间,重新进入开启状态。
2) 配置Hystrix熔断相关属性
241(value = "/payment/get/{id}")2(3 fallbackMethod = "getPaymentByIdFallback",4 commandProperties = {5 (name = "execution.isolation.thread.timeoutInMilliseconds", value = "5000"),6 (name = "circuitBreaker.enabled", value = "true"), // 开启熔断:如果10s内至少请求了20次,且失败率达到50%,则触发熔断7 (name = "circuitBreaker.sleepWindowInMilliseconds", value = "10000"), //快照时间窗口 8 (name = "circuitBreaker.requestVolumeThreshold", value = "20"), // 请求数阈值9 (name = "circuitBreaker.errorThresholdPercentage", value = "50") // 失败率阈值10 }11)12public CommonResult<Payment> getPaymentById(("id") Long id) throws InterruptedException {13 if (id <= 0) {14 throw new RuntimeException("ID不合法");15 }16
17 Payment payment = paymentService.getPaymentById(id);18 if (payment != null) {19 return new CommonResult(200, "支付端口[" + serverPort + "]查询成功", payment);20 } else {21 return new CommonResult(444, "支付端口[" + serverPort + "]没有对应记录,查询ID: " + id, null);22 }23}24
更详细的熔断属性配置可参考如下示例或官方文档:
751(fallbackMethod = "str_fallbackMethod",2 groupKey = "strGroupCommand",3 commandKey = "strCommand",4 threadPoolKey = "strThreadPool",5
6 commandProperties = {7 // 设置隔离策略,THREAD 表示线程池 SEMAPHORE:信号池隔离8 (name = "execution.isolation.strategy", value = "THREAD"),9 // 当隔离策略选择信号池隔离的时候,用来设置信号池的大小(最大并发数)10 (name = "execution.isolation.semaphore.maxConcurrentRequests", value = "10"),11 // 配置命令执行的超时时间12 (name = "execution.isolation.thread.timeoutinMilliseconds", value = "10"),13 // 是否启用超时时间14 (name = "execution.timeout.enabled", value = "true"),15 // 执行超时的时候是否中断16 (name = "execution.isolation.thread.interruptOnTimeout", value = "true"),17 // 执行被取消的时候是否中断18 (name = "execution.isolation.thread.interruptOnCancel", value = "true"),19 // 允许回调方法执行的最大并发数20 (name = "fallback.isolation.semaphore.maxConcurrentRequests", value = "10"),21 // 服务降级是否启用,是否执行回调函数22 (name = "fallback.enabled", value = "true"),23 // 是否启用断路器24 (name = "circuitBreaker.enabled", value = "true"),25 // 该属性用来设置在滚动时间窗中,断路器熔断的最小请求数。例如,默认该值为 20 的时候,26 // 如果滚动时间窗(默认10秒)内仅收到了19个请求, 即使这19个请求都失败了,断路器也不会打开。27 (name = "circuitBreaker.requestVolumeThreshold", value = "20"),28 // 该属性用来设置在滚动时间窗中,表示在滚动时间窗中,在请求数量超过29 // circuitBreaker.requestVolumeThreshold 的情况下,如果错误请求数的百分比超过50,30 // 就把断路器设置为 "打开" 状态,否则就设置为 "关闭" 状态。31 (name = "circuitBreaker.errorThresholdPercentage", value = "50"),32 // 该属性用来设置当断路器打开之后的休眠时间窗。 休眠时间窗结束之后,33 // 会将断路器置为 "半开" 状态,尝试熔断的请求命令,如果依然失败就将断路器继续设置为 "打开" 状态,34 // 如果成功就设置为 "关闭" 状态。35 (name = "circuitBreaker.sleepWindowinMilliseconds", value = "5000"),36 // 断路器强制打开37 (name = "circuitBreaker.forceOpen", value = "false"),38 // 断路器强制关闭39 (name = "circuitBreaker.forceClosed", value = "false"),40 // 滚动时间窗设置,该时间用于断路器判断健康度时需要收集信息的持续时间41 (name = "metrics.rollingStats.timeinMilliseconds", value = "10000"),42 // 该属性用来设置滚动时间窗统计指标信息时划分"桶"的数量,断路器在收集指标信息的时候会根据43 // 设置的时间窗长度拆分成多个 "桶" 来累计各度量值,每个"桶"记录了一段时间内的采集指标。44 // 比如 10 秒内拆分成 10 个"桶"收集这样,所以 timeinMilliseconds 必须能被 numBuckets 整除。否则会抛异常45 (name = "metrics.rollingStats.numBuckets", value = "10"),46 // 该属性用来设置对命令执行的延迟是否使用百分位数来跟踪和计算。如果设置为 false, 那么所有的概要统计都将返回 -1。47 (name = "metrics.rollingPercentile.enabled", value = "false"),48 // 该属性用来设置百分位统计的滚动窗口的持续时间,单位为毫秒。49 (name = "metrics.rollingPercentile.timeInMilliseconds", value = "60000"),50 // 该属性用来设置百分位统计滚动窗口中使用 “ 桶 ”的数量。51 (name = "metrics.rollingPercentile.numBuckets", value = "60000"),52 // 该属性用来设置在执行过程中每个 “桶” 中保留的最大执行次数。如果在滚动时间窗内发生超过该设定值的执行次数,53 // 就从最初的位置开始重写。例如,将该值设置为100, 滚动窗口为10秒,若在10秒内一个 “桶 ”中发生了500次执行,54 // 那么该 “桶” 中只保留 最后的100次执行的统计。另外,增加该值的大小将会增加内存量的消耗,并增加排序百分位数所需的计算时间。55 (name = "metrics.rollingPercentile.bucketSize", value = "100"),56 // 该属性用来设置采集影响断路器状态的健康快照(请求的成功、 错误百分比)的间隔等待时间。57 (name = "metrics.healthSnapshot.intervalinMilliseconds", value = "500"),58 // 是否开启请求缓存59 (name = "requestCache.enabled", value = "true"),60 // HystrixCommand的执行和事件是否打印日志到 HystrixRequestLog 中61 (name = "requestLog.enabled", value = "true"),62 },63 threadPoolProperties = {64 // 该参数用来设置执行命令线程池的核心线程数,该值也就是命令执行的最大并发量65 (name = "coreSize", value = "10"),66 // 该参数用来设置线程池的最大队列大小。当设置为 -1 时,线程池将使用 SynchronousQueue 实现的队列,67 // 否则将使用 LinkedBlockingQueue 实现的队列。68 (name = "maxQueueSize", value = "-1"),69 // 该参数用来为队列设置拒绝阈值。 通过该参数, 即使队列没有达到最大值也能拒绝请求。70 // 该参数主要是对 LinkedBlockingQueue 队列的补充,因为 LinkedBlockingQueue71 // 队列不能动态修改它的对象大小,而通过该属性就可以调整拒绝请求的队列大小了。72 (name = "queueSizeRejectionThreshold", value = "5"),73 }74)75
3) 测试熔断效果
先访问http://localhost:8100/payment/get/1测试正常情形OK后,然后在10s内发起至少20次请求,并且失败率为50%以上(http://localhost:8100/payment/get/0);再次访问正常情形,发现已被熔断,等待一会后,断路器自动转为半开(全开)状态,正常情形又可访问。
黄原鑫 6-14 14:52:11

黄原鑫 6-14 14:52:23

5. HystrixDashBoard
1) 新建SpringCloud-hystrix-dashboard模块
2) 引入HystrixDashBoard及相关依赖
451 2<project xmlns="http://maven.apache.org/POM/4.0.0"3 xmlns:xsi="http://www.w3.org/2001/XMLSchema-instance"4 xsi:schemaLocation="http://maven.apache.org/POM/4.0.0 http://maven.apache.org/xsd/maven-4.0.0.xsd">5 <parent>6 <artifactId>SpringCloud-demo</artifactId>7 <groupId>com.huangyuanxin.SpringCloud</groupId>8 <version>1.0-SNAPSHOT</version>9 </parent>10 <modelVersion>4.0.0</modelVersion>11
12 <artifactId>SpringCloud-hystrix-dashboard</artifactId>13
14 <dependencies>15 <!--Hystrix监控面板-->16 <dependency>17 <groupId>org.springframework.cloud</groupId>18 <artifactId>spring-cloud-starter-netflix-hystrix-dashboard</artifactId>19 </dependency>20
21 <dependency>22 <groupId>org.springframework.boot</groupId>23 <artifactId>spring-boot-starter-actuator</artifactId>24 </dependency>25
26 <dependency>27 <groupId>org.springframework.boot</groupId>28 <artifactId>spring-boot-devtools</artifactId>29 <scope>runtime</scope>30 <optional>true</optional>31 </dependency>32 <dependency>33 <groupId>org.projectlombok</groupId>34 <artifactId>lombok</artifactId>35 <optional>true</optional>36 </dependency>37 <dependency>38 <groupId>org.springframework.boot</groupId>39 <artifactId>spring-boot-starter-test</artifactId>40 <scope>test</scope>41 </dependency>42 </dependencies>43
44</project>45
3) 配置application.yml
31server2 port11013
4) 编写启动类
321package com.huangyuanxin.springcloud.hystrix;2
3import com.netflix.hystrix.contrib.metrics.eventstream.HystrixMetricsStreamServlet;4import org.springframework.boot.SpringApplication;5import org.springframework.boot.autoconfigure.SpringBootApplication;6import org.springframework.boot.web.servlet.ServletRegistrationBean;7import org.springframework.cloud.netflix.hystrix.dashboard.EnableHystrixDashboard;8import org.springframework.context.annotation.Bean;9
10public class HystrixDashBoard {13 public static void main(String[] args) {14 SpringApplication.run(HystrixDashBoard.class, args);15 }16
17 /**18 * 此配置是为了服务监控而配置,与服务容错本身无关,springcloud升级后的坑19 * ServletRegistrationBean因为springboot的默认路径不是"/hystrix.stream",20 * 只要在自己的项目里配置上下面的servlet就可以了21 */22 23 public ServletRegistrationBean getServlet() {24 HystrixMetricsStreamServlet streamServlet = new HystrixMetricsStreamServlet();25 ServletRegistrationBean registrationBean = new ServletRegistrationBean(streamServlet);26 registrationBean.setLoadOnStartup(1);27 registrationBean.addUrlMappings("/hystrix.stream");28 registrationBean.setName("HystrixMetricsStreamServlet");29 return registrationBean;30 }31}32
5) 测试监控服务
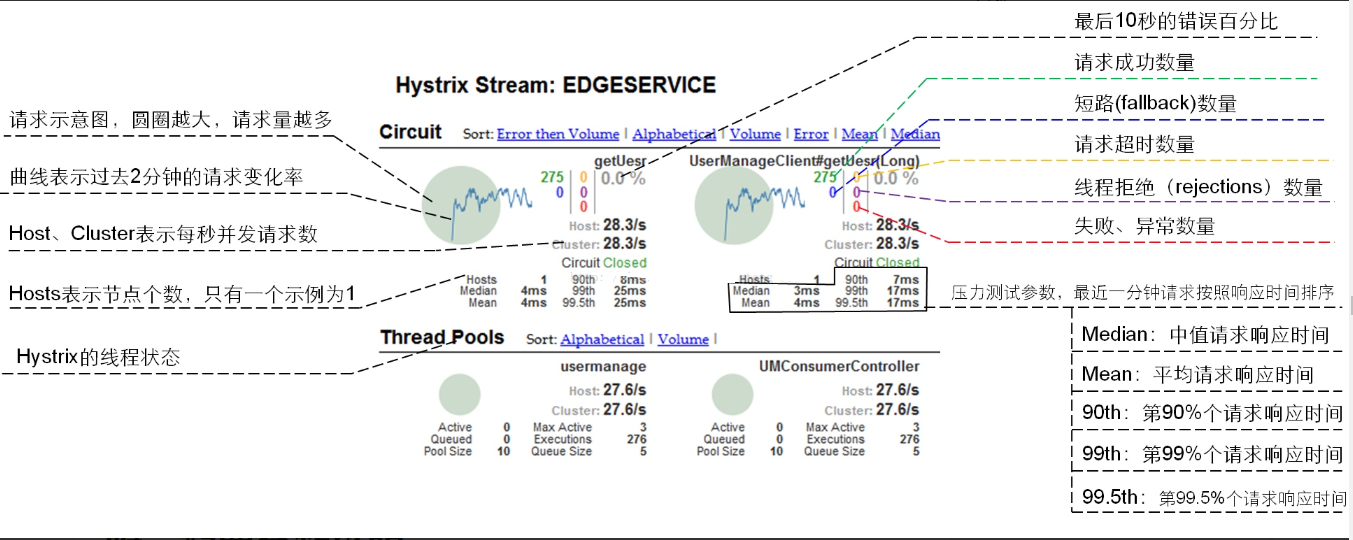
依次打开注册中心和支付服务,并对配置了服务降级的方法进行一些调用操作,然后打开Hystrix监控面板http://localhost:1101/hystrix,输入监控端点进行监控:
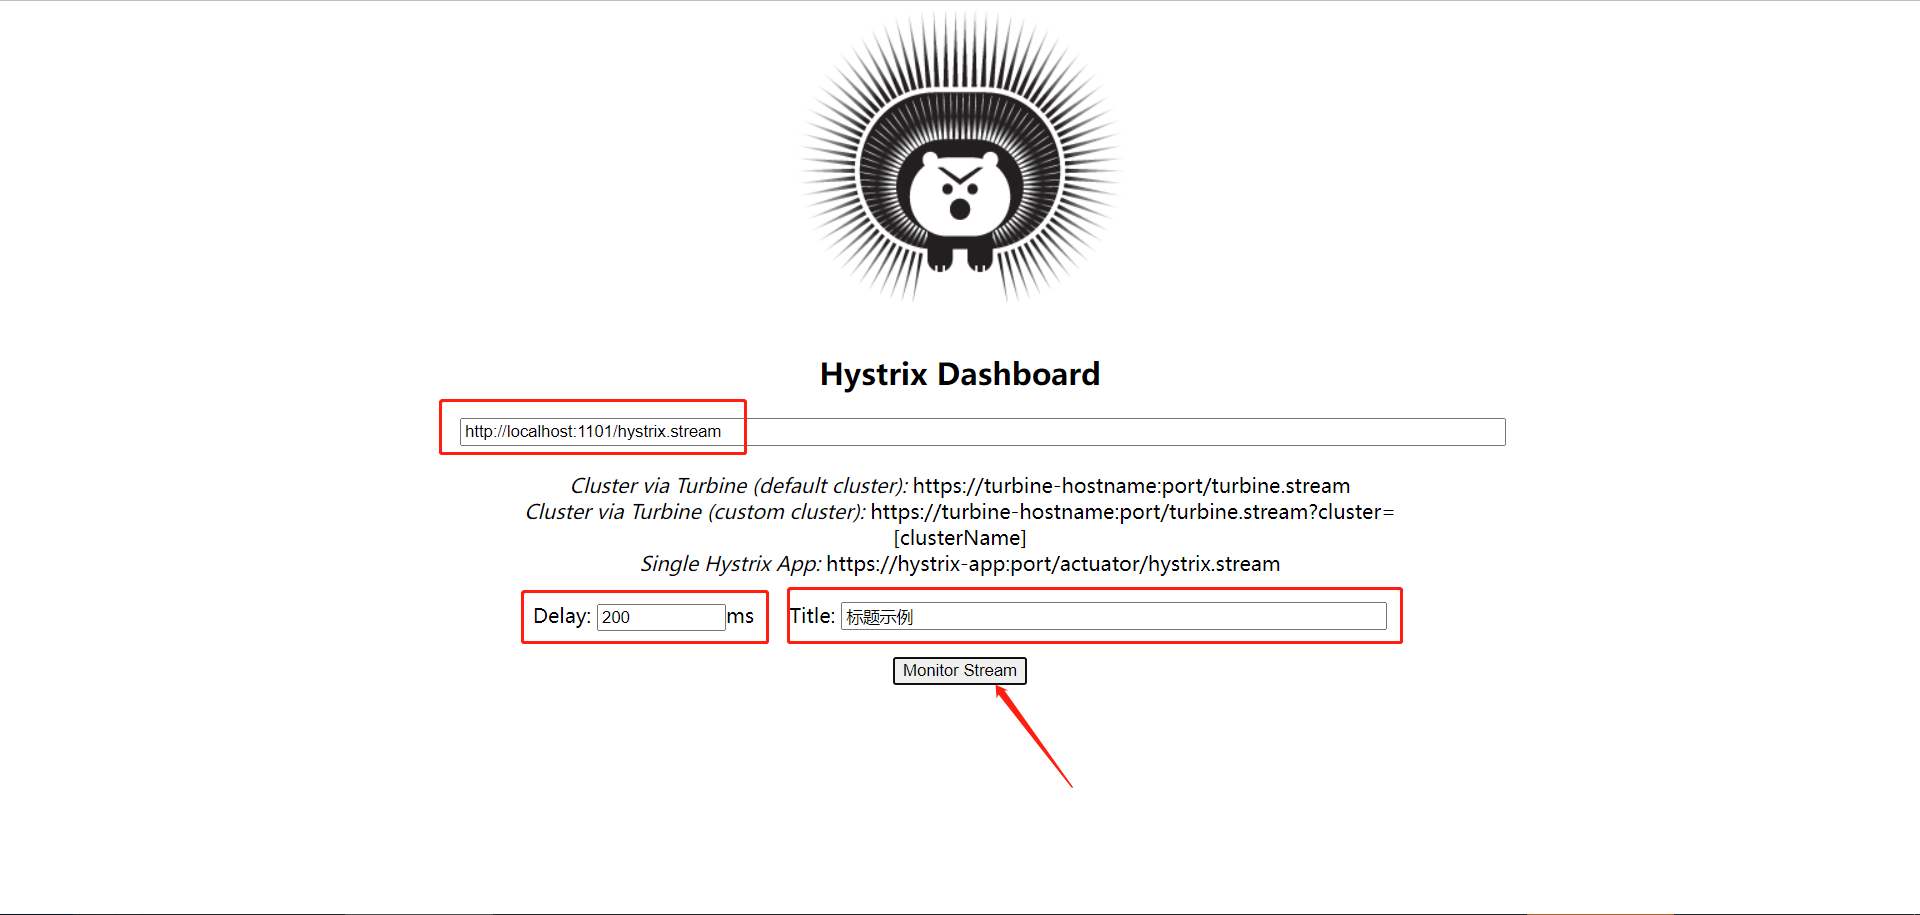
下面是监控面板示例及相关说明:
第06章_服务配置中心
第一节 Config
1. Config简介
SpringCloud Config为多个微服务提供了集中化的外部配置支持,其部署架构图如下所示:
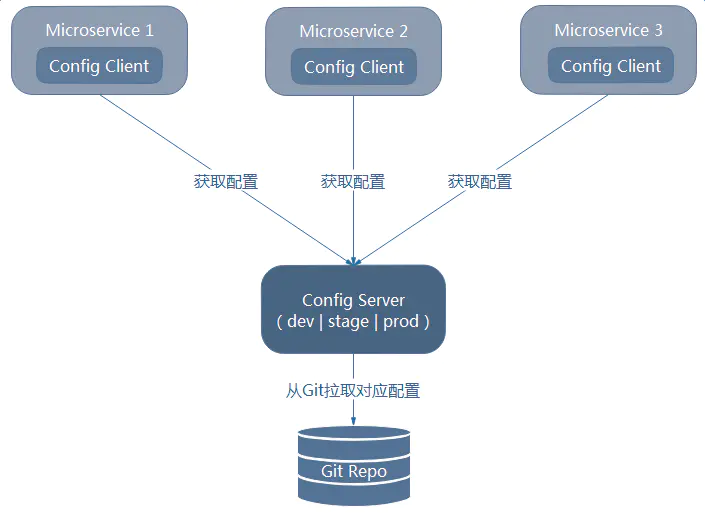
其中Config Server称为分布式配置中心,它是一个独立的微服务应用,用来连接配置服务器(git/svn/本地),并为客户端提供配置信息以及加密和解密服务等。
Config Client则是通过指定的配置中心来管理应用资源,以及与业务相关的配置内容,并在启动的时候从配置中心获取和加载配置信息。
2. Config Server
1) 新建SpringCloud-config-server模块
2) 引入Config Server及相关依赖
531 2<project xmlns="http://maven.apache.org/POM/4.0.0"3 xmlns:xsi="http://www.w3.org/2001/XMLSchema-instance"4 xsi:schemaLocation="http://maven.apache.org/POM/4.0.0 http://maven.apache.org/xsd/maven-4.0.0.xsd">5 <parent>6 <artifactId>SpringCloud-demo</artifactId>7 <groupId>com.huangyuanxin.SpringCloud</groupId>8 <version>1.0-SNAPSHOT</version>9 </parent>10 <modelVersion>4.0.0</modelVersion>11
12 <artifactId>SpringCloud-config-server</artifactId>13
14
15 <dependencies>16 <dependency>17 <groupId>org.springframework.cloud</groupId>18 <artifactId>spring-cloud-config-server</artifactId>19 </dependency>20
21 <dependency>22 <groupId>org.springframework.cloud</groupId>23 <artifactId>spring-cloud-starter-netflix-eureka-client</artifactId>24 </dependency>25 <dependency>26 <groupId>org.springframework.boot</groupId>27 <artifactId>spring-boot-starter-web</artifactId>28 </dependency>29
30 <dependency>31 <groupId>org.springframework.boot</groupId>32 <artifactId>spring-boot-starter-actuator</artifactId>33 </dependency>34 <dependency>35 <groupId>org.springframework.boot</groupId>36 <artifactId>spring-boot-devtools</artifactId>37 <scope>runtime</scope>38 <optional>true</optional>39 </dependency>40 <dependency>41 <groupId>org.projectlombok</groupId>42 <artifactId>lombok</artifactId>43 <optional>true</optional>44 </dependency>45 <dependency>46 <groupId>org.springframework.boot</groupId>47 <artifactId>spring-boot-starter-test</artifactId>48 <scope>test</scope>49 </dependency>50 </dependencies>51
52</project>53
3) 编写启动类
191package com.huangyuanxin.springcloud.config.server;2
3import org.springframework.boot.SpringApplication;4import org.springframework.boot.autoconfigure.SpringBootApplication;5import org.springframework.cloud.config.server.EnableConfigServer;6import org.springframework.cloud.netflix.eureka.EnableEurekaClient;7import org.springframework.web.bind.annotation.RestController;8 9public class ConfigServer {14 public static void main(String[] args) {15 SpringApplication.run(ConfigServer.class, args);16 }17}18
19
4) 从git拉取配置
241# server2server3 port13104
5# Eureka6eureka7 client8 service-url9 defaultZonehttp//127.0.0.11000/eureka10
11# Spring12spring13 application14 namecloud-config-server15 cloud16 config17 server18 git19 urihttps//gitee.com/qjwxwsg/spring-cloud-config.git 20 username1897486515521 passwordMy14774122 skip-ssl-validationtrue23 timeout6024
5) 测试
首先在配置的Git仓库中准备一个master分支和slave分支,分别包含两个application-dev.yml和application-test.yml文件,然后依次启动注册中心和配置中心进行测试:


6) 从本地拉取配置
241# 类路径形式2spring3 application4 nameconfig-server5 profiles6 activenative7 cloud8 config9 server10 native11 search-locationsclasspath/config-server/gitee # 查找类路径下对应目录中的文件12
13# 文件系统路径14pring15 application16 nameconfig-server17 profiles18 activenative19 cloud20 config21 server22 native23 search-locationsfile///D/spring-cloud-demo/config-server/src/main/resources/config-server/gitee # 查找指定系统路径下的文件,Linux为 file:/conf/config-repo 类似格式24
3. Config Client
1) 支付服务添加Config Client依赖
61<!--SpringCloud-service-pay/pom.xml--->2<dependency>3 <groupId>org.springframework.cloud</groupId>4 <artifactId>spring-cloud-starter-config</artifactId>5</dependency>6
2) 配置bootstrap.yml文件
111# bootstrap.yml是系统级的Spring配置,读取优先级在application.yml之上2
3spring4 cloud5 # Config客户端配置 http://127.0.0.1:1310/master/application-dev.yml6 config7 urihttp//127.0.0.11310 #配置中心地址8 labelmaster9 nameapplication10 profiledev11
3) 使用远程配置
121("/info")3public class InfoController {4 ("${app.info}")5 private String info;6
7 ("/get")8 public String queryInfo() {9 return info;10 }11}12
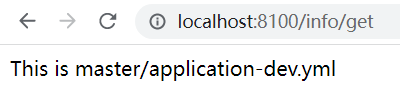
4) 测试
访问http://localhost:8100/info/get获取远程配置信息:
4. 配置刷新
经过如上配置,客户端可以在启动的时候从配置中心获取最新配置,但如果配置发生了修改,在不重启的情形下是无法实时生效的。下面方法可让配置实时生效:
1) 支付服务引入actuator依赖
51<dependency>2 <groupId>org.springframework.boot</groupId>3 <artifactId>spring-boot-starter-actuator</artifactId>4</dependency>5
2) 暴露监控端点
61management2 endpoints3 web4 exposure5 include"*"6
3) 配置刷新注解
221package com.huangyuanxin.springcloud.pay.controller;2
3import org.springframework.beans.factory.annotation.Value;4import org.springframework.cloud.context.config.annotation.RefreshScope;5import org.springframework.web.bind.annotation.GetMapping;6import org.springframework.web.bind.annotation.RequestMapping;7import org.springframework.web.bind.annotation.RestController;8 9 // 支持配置刷新11("/info")12public class InfoController {13 ("${app.info}")14 private String info;15
16 ("/get")17 public String queryInfo() {18 return info;19 }20}21
22
4) 刷新配置实时生效
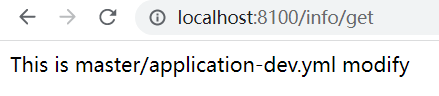
修改Git仓库上的配置文件,Config Server会自动拉取,然后发送给各Client,使用如下命令即可刷新配置实时生效。
31# 刷新支付服务2curl -X POST "http://127.0.0.1:8100/actuator/refresh"3
第07章_服务消息总线
第一节 Bus
1. Bus简介
Spring Cloud Bus通过轻量级消息系统,将多个微服务链接起来,用于广播状态更改或其他管理指令(例如实现分布式配置的动态刷新),因此也被称为消息总线。
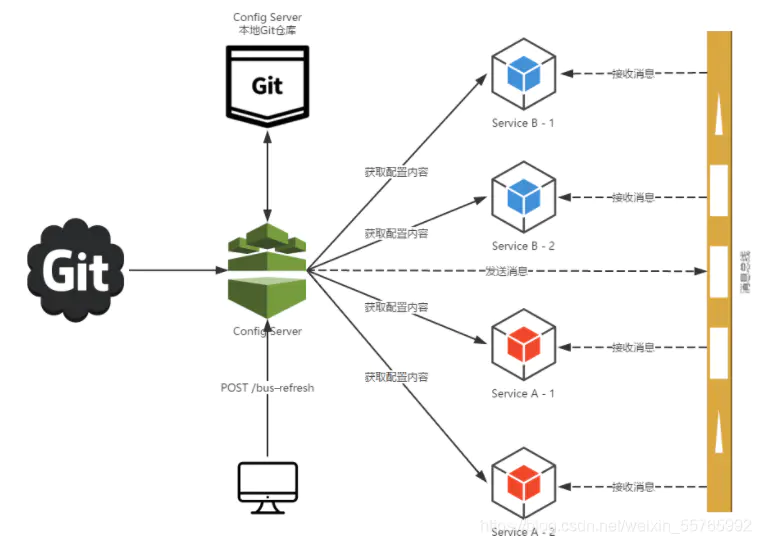
提示:我们通常会使用消息中间件(RabbitMQ/Kafka)来构建一个主题,然后将微服务连接到这个主题上去,当我们向该主题发送消息时,所有订阅该主题的服务都会收到消息然后进行消费。
2. 分布式配置的动态刷新
1) 添加Bus依赖
51<!--消息总线-RabbitMQ-->2<dependency>3 <groupId>org.springframework.cloud</groupId>4 <artifactId>spring-cloud-starter-bus-amqp</artifactId>5</dependency>注意:配置中心服务端和客户端都需要添加该依赖,并且进行下面的消息中间件和端点配置。
2) 配置消息中间件
71# rabbitmq相关配置2rabbitmq3 host127.0.0.14 port56725 usernameguest6 passwordguest7
提示:RabbitMQ安装可参考:https://blog.csdn.net/lxw1844912514/article/details/122738713。
3) 暴露Bus刷新端点
71# 暴露bus刷新配置的端点2management3 endpoints4 web5 exposure6 include'bus-refresh'7
4) 测试动态刷新
依次启动注册中心、配置中心和支付服务,修改Git上的配置文件,然后在配置中心服务端进行配置刷新(curl -X POST "http://127.0.0.1:1310/actuator/bus-refresh"),再测试支付服务(http://localhost:8100/info/get),发现也一起刷新了。

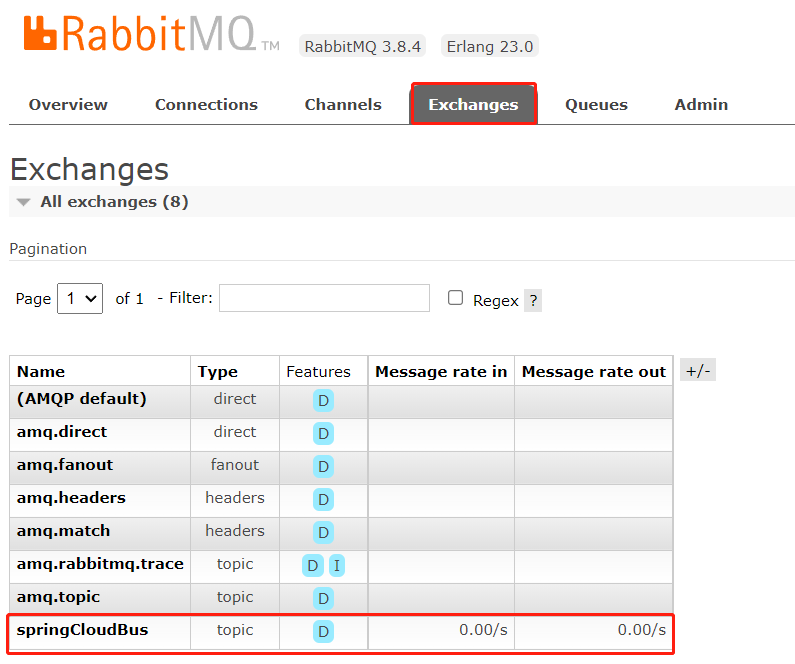
观察RabbitMQ(http://localhost:15672/),发现自动创建了一个主题,默认为SpringCloudBus。
提示:如果只想刷新某一个微服务,可指定服务名和端口,如curl -X POST "http://127.0.0.1:1310/actuator/bus-refresh/cloud-payment-service:8100"。
第08章_服务请求网关
第一节 Zuul
1. Zuul简介
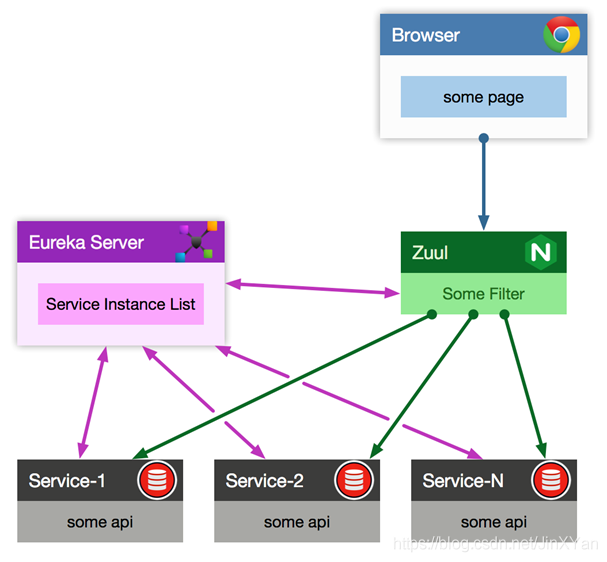
Zuul是Netflix公司开源的一款API网关产品,其将业务系统内部多个微服务进行封装,对外提供唯一的访问入口,实现系统内高内聚,系统间通过网关交互达到低耦合的效果。它可以和Eureka、Ribbon、Hystrix等组件配合使用,实现身份认证与安全、审查与监控、动态路由、压力测试、负载均衡、流量控制等功能。
2. 基本路由配置
1) 新建SpringCloud-zuul-server模块
2) 引入Zuul及相关依赖
481 2<project xmlns="http://maven.apache.org/POM/4.0.0"3 xmlns:xsi="http://www.w3.org/2001/XMLSchema-instance"4 xsi:schemaLocation="http://maven.apache.org/POM/4.0.0 http://maven.apache.org/xsd/maven-4.0.0.xsd">5 <parent>6 <artifactId>SpringCloud-demo</artifactId>7 <groupId>com.huangyuanxin.SpringCloud</groupId>8 <version>1.0-SNAPSHOT</version>9 </parent>10 <modelVersion>4.0.0</modelVersion>11
12 <artifactId>SpringCloud-zuul-server</artifactId>13
14
15 <dependencies>16 <dependency>17 <groupId>org.springframework.cloud</groupId>18 <artifactId>spring-cloud-starter-netflix-eureka-client</artifactId>19 </dependency>20 <dependency>21 <groupId>org.springframework.cloud</groupId>22 <artifactId>spring-cloud-starter-netflix-zuul</artifactId>23 </dependency>24
25 <dependency>26 <groupId>org.springframework.boot</groupId>27 <artifactId>spring-boot-starter-actuator</artifactId>28 </dependency>29 <dependency>30 <groupId>org.springframework.boot</groupId>31 <artifactId>spring-boot-devtools</artifactId>32 <scope>runtime</scope>33 <optional>true</optional>34 </dependency>35 <dependency>36 <groupId>org.projectlombok</groupId>37 <artifactId>lombok</artifactId>38 <optional>true</optional>39 </dependency>40 <dependency>41 <groupId>org.springframework.boot</groupId>42 <artifactId>spring-boot-starter-test</artifactId>43 <scope>test</scope>44 </dependency>45 </dependencies>46
47</project>48
3) 配置application.yml
221server2 port12103
4spring5 application6 namecloud-zuul-server7
8eureka9 client10 service-url11 defaultZonehttp//127.0.0.11000/eureka12 instance13 instance-idcloud-zuul-server121014 prefer-ip-addresstrue15
16# 开放routes端点,就可以通过 /actuator/routes 和 /actuator/filters 查看路由信息和过滤器信息了17management18 endpoints19 web20 exposure21 include'routes'22
4) 编写启动类
141package com.huangyuanxin.springcloud.zuul;2
3import org.springframework.boot.SpringApplication;4import org.springframework.boot.autoconfigure.SpringBootApplication;5import org.springframework.cloud.netflix.zuul.EnableZuulProxy;6 7 // 开启Zuul网关9public class ZuulServer {10 public static void main(String[] args) {11 SpringApplication.run(ZuulServer.class, args);12 }13}14
5) 测试通过网关进行访问
首先通过原访问地址http://localhost:8100/payment/get/1测试访问正常后,再拼接服务名前缀,通过网关进行访问:http://localhost:1210/cloud-payment-service/payment/get/1

3. 路由映射规则
1) 修改路由映射规则
91zuul2 # 网关前缀3 prefix/api4 # 忽略所有服务(*)代理,仅代理routes配置的服务。5 ignored-services"*"6 # 自定义映射配置7 routes8 cloud-payment-service/zuul-pay/**9
2) 测试路由映射


4. Zuul过滤器
1) 过滤器简介
Zuul过滤器负责对请求过程进行额外的处理,是请求校验过滤及服务聚合的基础。其生命周期图解如下:
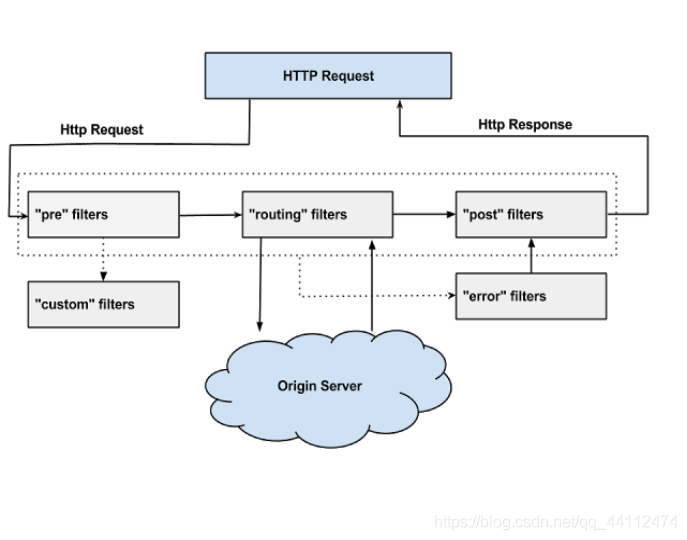
Zuul中定义了4种标准过滤器类型,这些过滤器类型对应于请求的典型生命周期:
前置过滤器(PRE):在请求被路由之前调用。可利用这种过滤器实现身份验证、在集群中选择请求的微服务、记录调试信息等。 路由过滤器(ROUTING):在进行路由请求时调用。用于构建发送给微服务的请求,并使用Apache HttpClient或Netflix Ribbon请求微服务。 后置过滤器(POST):在请求被路由之后调用。用于为响应添加额外的响应头、收集统计信息和指标、将响应从微服务发送给客户端等。 错误过滤器(ERROR):在其他阶段发生错误时执行该过滤器。
除了默认的过滤器类型,Zuul还允许创建自定义的过滤器类型。例如,可以定制一种 STATIC 类型的过滤器,直接在Zuul中生成响应,而不将请求转发到后端的微服务。
2) 前置过滤器打印日志案例
431package com.huangyuanxin.springcloud.zuul.filter;2
3import com.netflix.zuul.ZuulFilter;4import com.netflix.zuul.context.RequestContext;5import com.netflix.zuul.exception.ZuulException;6import org.springframework.cloud.netflix.zuul.filters.support.FilterConstants;7import org.springframework.stereotype.Component;8
9import javax.servlet.http.HttpServletRequest;10 11public class PreLogFilter extends ZuulFilter {13 14 public String filterType() {15 // 前置过滤器16 return FilterConstants.PRE_TYPE;17 }18
19 20 public int filterOrder() {21 // 执行顺序,越小越先执行。22 return 1;23 }24
25 26 public boolean shouldFilter() {27 // 是否应该通过28 return true;29 }30
31 32 public Object run() throws ZuulException {33 // 执行的前置逻辑:打印日志34 RequestContext requestContext = RequestContext.getCurrentContext();35 HttpServletRequest request = requestContext.getRequest();36 String host = request.getRemoteHost();37 String method = request.getMethod();38 String uri = request.getRequestURI();39 System.out.println("=====> Remote host:" + host + ",method:" + method + ",uri:" + uri);40 return null;41 }42}43
通过网关访问被代理的服务localhost:1210/api/zuul-pay/payment/get/1,发现控制台打印日志如下:
11=====> Remote host:0:0:0:0:0:0:0:1,method:GET,uri:/api/zuul-pay/payment/get/1
第二节 Gateway
1. Gateway简介
Gateway是Spring官方基于Spring 5.0、Spring Boot 2.0和Project Reactor等技术开发的新一代API网关产品,旨在为微服务架构提供一种简单而有效的统一的API路由管理方式,并且基于Filter链的方式提供网关基本的功能,例如:安全、监控、埋点和限流等。
Gateway由三大部分组成,分别是路由(Route)、断言(Predicate)和过滤器(Filter):
路由(Route): 构建网关的基本模块,由ID、目标URI、一系列的断言和过滤器组成,如果断言为true则匹配该路由。
断言(Predicate): 开发人员可以匹配HTTP请求中的所有内容(例如请求头或请求参数),如果请求与断言相匹配则进行路由。
过滤器(Filter): 用于在请求被路由之前或之后对请求进行修改。
2. 基本路由配置
1) 新建SpringCloud-gateway-server模块
2) 引入Gateway及相关依赖
451 2<project xmlns="http://maven.apache.org/POM/4.0.0"3 xmlns:xsi="http://www.w3.org/2001/XMLSchema-instance"4 xsi:schemaLocation="http://maven.apache.org/POM/4.0.0 http://maven.apache.org/xsd/maven-4.0.0.xsd">5 <parent>6 <artifactId>SpringCloud-demo</artifactId>7 <groupId>com.huangyuanxin.SpringCloud</groupId>8 <version>1.0-SNAPSHOT</version>9 </parent>10 <modelVersion>4.0.0</modelVersion>11
12 <artifactId>SpringCloud-gateway-server</artifactId>13
14 <dependencies>15 <!--gateway-->16 <dependency>17 <groupId>org.springframework.cloud</groupId>18 <artifactId>spring-cloud-starter-gateway</artifactId>19 </dependency>20 <!--eureka-client-->21 <dependency>22 <groupId>org.springframework.cloud</groupId>23 <artifactId>spring-cloud-starter-netflix-eureka-client</artifactId>24 </dependency>25 <!--一般基础配置类-->26 <dependency>27 <groupId>org.springframework.boot</groupId>28 <artifactId>spring-boot-devtools</artifactId>29 <scope>runtime</scope>30 <optional>true</optional>31 </dependency>32 <dependency>33 <groupId>org.projectlombok</groupId>34 <artifactId>lombok</artifactId>35 <optional>true</optional>36 </dependency>37 <dependency>38 <groupId>org.springframework.boot</groupId>39 <artifactId>spring-boot-starter-test</artifactId>40 <scope>test</scope>41 </dependency>42 </dependencies>43
44</project>45
3) 配置application.yml
271server2 port12203
4spring5 application6 namecloud-gateway-server7 cloud8 gateway9 discovery10 locator11 enabledtrue #开启从注册中心动态创建路由的功能,利用微服务名进行路由12 routes13idpayment_route01 #路由的ID,没有固定规则但要求唯一,建议配合服务名14 urilb//CLOUD-PAYMENT-SERVICE #匹配后提供服务的路由地址15 # uri: http://127.0.0.1:8100 #匹配后提供服务的路由地址16 predicates17Path=/payment/get/** # 断言,路径相匹配的进行路由18
19eureka20 instance21 hostnamecloud-gateway-server22 client#服务提供者provider注册进eureka服务列表内23 service-url24 register-with-eurekatrue25 fetch-registrytrue26 defaultZonehttp//127.0.0.11000/eureka27
4) 编写启动类
141package com.huangyuanxin.springcloud.gateway;2
3import org.springframework.boot.SpringApplication;4import org.springframework.boot.autoconfigure.SpringBootApplication;5import org.springframework.cloud.netflix.eureka.EnableEurekaClient;6 7public class GatewayServer {10 public static void main(String[] args) {11 SpringApplication.run(GatewayServer.class, args);12 }13}14
5) 测试通过网关进行访问
依次启动注册中心、支付服务集群、Gateway网关,先通过http://localhost:8101/payment/get/1和http://localhost:8102/payment/get/1测试支付服务集群正常访问后,再通过网关进行访问:http://localhost:1220/payment/get/1,预期访问正常,并且默认进行轮询访问。

6) Java代码配置路由
路由规则也可通过Java代码进行配置,示例如下:
231package com.huangyuanxin.springcloud.gateway.config;2
3import org.springframework.cloud.gateway.route.RouteLocator;4import org.springframework.cloud.gateway.route.builder.RouteLocatorBuilder;5import org.springframework.context.annotation.Bean;6import org.springframework.context.annotation.Configuration;7 8public class GatewayConfig {10 11 public RouteLocator routeLocator01(RouteLocatorBuilder builder) {12 // 将路径匹配 /guonei 的请求转发到 http://news.baidu.com/guonei 13 return builder.routes()14 .route("www_route01", predicateSpec -> predicateSpec15 .path("/guonei")16 .uri("http://news.baidu.com/guonei"))17 .route("www_route02", predicateSpec -> predicateSpec18 .path("/guoji")19 .uri("http://news.baidu.com/guoji"))20 .build();21 }22}23
3. 路由断言
Gateway支持多种不同类型的路由断言,除上述用到的Path外,常用的还有After、Cookie、Query类型等,它们之间通过"逻辑与"组合,实现各种精细的路由匹配规则。
1) 路径断言(Path)
31# 匹配请求路径2Path=/payment/get/** 3
2) 请求信息断言(Cookie、Header、Host、RemoteAddr、Method)
151# 匹配Cokkie和值(正则),如下要求Cookie中有username且值为zzyy2Cookie=username,zzyy3
4# 匹配请求头和值(正则),如下要求有X-Request-Id请求头属性并且值为数字5Header=X-Request-Id, \d+6
7# 匹配请求头Host8Host=**.atguigu.com,**.huangyuanxin.com9
10# 匹配IP地址11RemoteAddr=192.168.1.1/2412
13# 匹配请求方法14Method=GET15
3) 请求参数断言(Query)
31# 匹配请求参数,如下要求有username参数且值为数字2Query=username, \d+ 3
4) 时间断言(After/Before/Between)
91# 匹配当前时间,要求在配置的时间之后2After=2020-02-05T15:10:03.685+08:00Asia/Shanghai 3
4# 匹配当前时间,要求在配置的时间之前5Before=2020-02-05T15:10:03.685+08:00Asia/Shanghai 6
7# 匹配当前时间,要求在配置的时间之间8Between=2020-02-02T17:45:06.206+08:00Asia/Shanghai,2020-03-25T18:59:06.206+08:00Asia/Shanghai9
提示:时间格式可通过打印ZonedDateTime.now()获得。
5) 权重断言(Weight)
141# 将把80%的流量转发到weighthigh.org,并将20%的流量转发到weighlow.org2spring3 cloud4 gateway5 routes6idweight_high7 urihttps//weighthigh.org8 predicates9Weight=group1, 810idweight_low11 urihttps//weightlow.org12 predicates13Weight=group1, 214
6) 综合案例
181# 满足如下所有断言的请求将会被转发到 http://ityouknow.com2# 如果一个请求满足多个路由的谓词条件时,请求只会被首个成功匹配的路由转发3spring4 cloud5 gateway6 routes7idhost_foo_path_headers_to_httpbin8 urihttp//ityouknow.com9 predicates10Host=**.foo.org11Path=/headers12Method=GET13Header=X-Request-Id, \d+14Query=foo, ba.15Query=baz16Cookie=chocolate, ch.p17After=2018-01-20T06:06:06+08:00Asia/Shanghai18
4. 路由过滤器
1) 内置过滤器
路由过滤器可用于修改进入的HTTP请求和返回的HTTP响应,Gateway有两种类型的路由过滤器,分别是GatewayFilter(作用于单个路由)和GlobalFilter(作用于全部路由),可以在路由之前执行(pre)或路由之后执行(post)。如下为一个GatewayFilter使用示例:
x1# 给指定路由添加一个AddRequestHeader过滤器2spring3 cloud4 gateway5 routes6idadd_request_header_route7 urihttps//example.org8 filters9AddRequestHeader=X-Request-red, blue10
2) 自定义过滤器
除了Gateway内置的过滤器,你也可以定义自己的全局过滤器,如下:
321package com.huangyuanxin.springcloud.gateway.filter;2
3import org.springframework.cloud.gateway.filter.GatewayFilterChain;4import org.springframework.cloud.gateway.filter.GlobalFilter;5import org.springframework.core.Ordered;6import org.springframework.http.HttpStatus;7import org.springframework.stereotype.Component;8import org.springframework.web.server.ServerWebExchange;9import reactor.core.publisher.Mono;10
11public class MyLogFilter implements GlobalFilter, Ordered {13
14 15 public Mono<Void> filter(ServerWebExchange exchange, GatewayFilterChain chain) {16 String userName = exchange.getRequest().getQueryParams().getFirst("userName");17 if (userName == null) {18 exchange.getResponse().setStatusCode(HttpStatus.NOT_ACCEPTABLE);19 return exchange.getResponse().setComplete();20 }21
22 // 放行23 return chain.filter(exchange);24 }25
26 27 public int getOrder() {28 return 0;29 }30}31
32
依次启动注册中心,支付服务、Gateway网关,通过网关进行支付服务访问,如果请求参数不存在userName,将返回406错误。
http://localhost:1220/payment/get/1?userName=zhangsan

http://localhost:1220/payment/get/1
第09章_服务链路追踪
第一节 Sleuth
Spring Cloud Sleuth 提供了一套完整的分布式链路追踪解决方案,并且支持Zipkin进行图形化展示。
1. 安装Zipkin
访问Github(https://github.com/openzipkin/zipkin)下载Zipkin的最新稳定版本,然后通过java -jar zipkin-server-2.23.16-exec.jar启动。

启动完成后,访问http://localhost:9411/zipkin/进入监控界面。
2. 支持链路追踪
1) 引入Zipkin及相关依赖
61<!--sleuth+zipkin-->2<dependency>3 <groupId>org.springframework.cloud</groupId>4 <artifactId>spring-cloud-starter-zipkin</artifactId>5</dependency>6
注意: 所有需要支持链路追踪的服务都需要引入该依赖及进行下面链路追踪配置。
2) 链路追踪配置
81spring2 zipkin3 base-urlhttp//localhost94114 sleuth5 sampler6 #采样率,值介于0到1之间,1则表示全部采集7 probability18
3) 测试链路追踪效果
依次启动注册中心、支付服务、订单服务,先调用订单、支付服务的一些接口(http://localhost:8100/payment/get/1, http://localhost:8200/consumer/payment/get/1),然后打开Zipkin(http://localhost:9411/zipkin/)查看调用追踪信息。
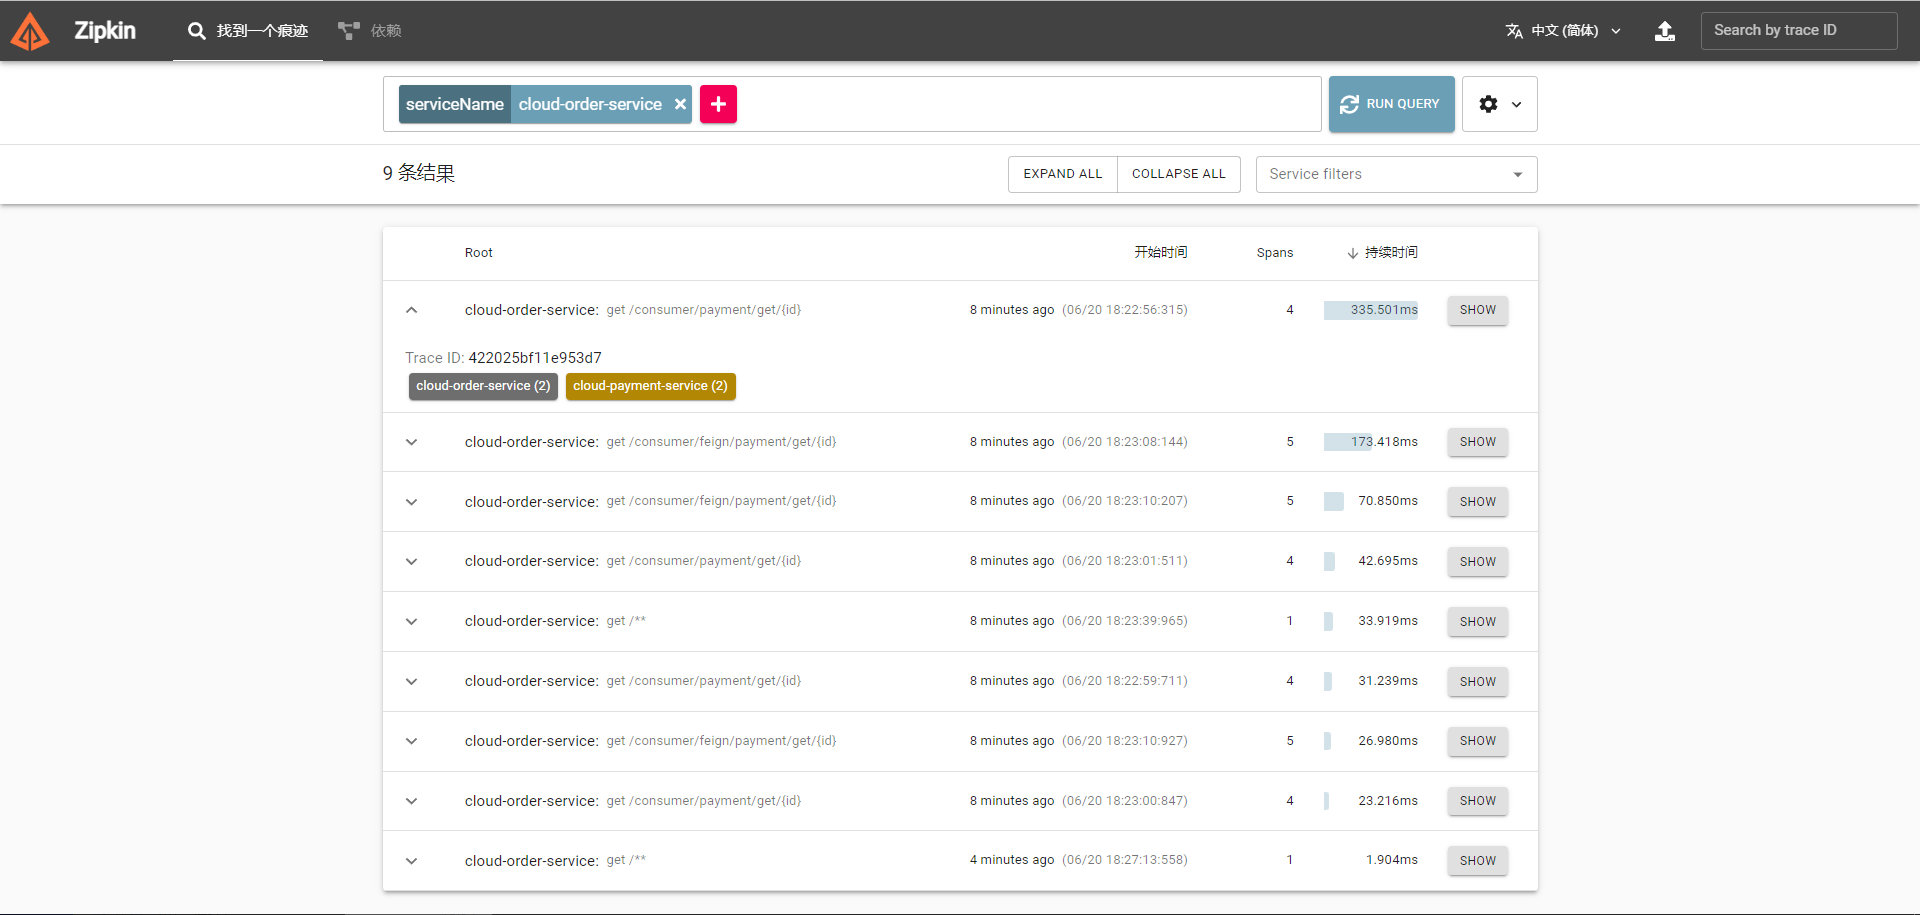

3. 调用链路图
下面是一次链路追踪图解,其中Trace id作为链路的唯一标识,Span id标识链路中的某个调用节点,各Span id通过Parent id进行关联。