第03篇_并发编程
第01章_线程基本操作
第一节 线程的基本概念
1. 创建和启动线程
1) 直接自定义线程
可以通过继承java.lang.Thread类,重写其run方法来直接定义一个线程。
x1// 1. 继承Thread类2public class HelloThread extends Thread {3
4 // 2. 重写run方法:线程入口,无参无返回值,不能抛出受检异常5 6 public void run() {7 System.out.println("hello");8 }9}10
11public static void main(String[] args) {12 Thread thread = new HelloThread(); // 3. 创建线程对象13 thread.start(); // 4. 启动线程,分配程序计数器、栈等线程资源14}
2) 定义Runnable实现类
由于Java只支持单继承,因此一般都是定义java.lang.Runnable接口的实现类,然后创建Runnable的对象传给Thread对象去执行。
141// 1. 实现Runnable接口2public class HelloRunnable implements Runnable {3
4 // 2. 重写run方法,该方法将优先于Thread的run方法进行调用5 6 public void run() {7 System.out.println("hello");8 }9}10
11public static void main(String[] args) {12 Thread helloThread = new Thread(new HelloRunnable()); // 3. 创建Thread对象,并传递一个Runnable对象13 helloThread.start(); // 4. 启动线程14}
2. 线程基本属性
221// 1. 获取当前线程2public static native Thread currentThread(); // Thread类静态方法3
4// 2. 线程ID和名称5public long getId(); // 线程ID,一个递增的整数,每创建一个线程就加一6public final String getName(); // 线程名称,默认值是"Thread-"后跟一个编号7public final synchronized void setName(String name) // 设置线程名称(也可以在创建Thread对象时指定)8    9// 3. 线程优先级10public final int getPriority() // 获取线程优先级,从1~10,默认为5,映射到不同操作系统优先级上(仅供提示)11public final void setPriority(int newPriority) // 设置线程优先级12    13// 4. 线程状态14public State getState() // 获取线程状态15    16// 5. 线程存活状态17public final native boolean isAlive() // 线程只有在NEW和TERMINATED状态才为false,其它都为true18
19// 6. 是否为守护线程(daemo线程,即其它线程的辅助线程,如垃圾回收线程等,当整个程序只剩下daemo线程时,程序就会退出。)20public final boolean isDaemon() // 是否为守护线程,默认为false21public final void setDaemon(boolean on) // 设置为守护线程22
3. 线程状态
线程状态为Thread.State枚举,有如下六种状态:
| 线程状态 | 状态说明 |
|---|---|
| NEW | 新建。线程创建但未启动。 |
RUNNABLE | 可运行。线程在运行或具备运行条件只是在等待操作系统调度。 |
BLOCKED | 阻塞。等待锁或IO等资源。 |
WAITING | 等待。线程在等待某个条件,调用wait()/join()方法会进入该状态。 |
| TIMED_WAITING | 超时等待。线程在等待某个条件或超时,调用wait(long timeout)/join(long millis)/sleep(long millis)会进入该状态。 |
| TERMINATED | 终止。线程已结束。 |
注意:
RUNNABLE不代表CPU一定在执行该线程的代码,也可能在等待操作系统分配时间片,只是它没有在等待其他条件。
4. 线程基本方法
211// 1. 睡眠指定毫秒。时间有一定的偏差,在睡眠期间,会让出CPU,可以被其他线程中断(中断后抛出InterruptedException)2public static native void sleep(long millis) throws InterruptedException; // Thread的静态方法3
4// 2. 让出CPU(仅供提示)。5public static native void yield(); // Thread的静态方法6
7// 3. 等待该线程结束。转为WAIT/TIMED_WAITING状态,等待期间可以被其他线程中断8public final void join() throws InterruptedException // 内部调用了join(0)9public final synchronized void join(long millis) throws InterruptedException 10
11// 4. 一些过时的方法,不应该去使用。12public final void stop()13public final void suspend()14public final void resume()15    16// 示例1:主线程等待thread线程,先不要退出17public static void main(String[] args) throws InterruptedException {18    Thread thread = new HelloThread();19    thread.start();20    thread.join();21}
5. 线程共享内存
多个线程可以对同一个变量进行读写操作,但由于读写是非原子性的以及CPU缓存等原因,可能形成竞态条件或出现内存可见性等问题。
1) 竞态条件
竞态条件(race condition)指当多个线程读写同一个对象时,最终执行结果与执行时序有关,可能正确也可能不正确。
291public class CounterThread extends Thread {2 private static int counter = 0; // 1. 共享变量counter,初始值为03
4 5 public void run() {6 // 2. 每个线程对其自增1000次7 for (int i = 0; i < 1000; i++) {8 counter++;9 }10 }11
12 public static void main(String[] args) throws InterruptedException {13 // 3. 创建和启动1000个线程14 int num = 1000;15 Thread[] threads = new Thread[num];16 for (int i = 0; i < num; i++) {17 threads[i] = new CounterThread();18 threads[i].start();19 }20
21 // 4. 等待所有线程结束22 for (int i = 0; i < num; i++) {23 threads[i].join();24 }25
26 // 5. 发现执行结果基本都<1000*1000次27 System.out.println(counter); // 998964/998469/99908228 }29}为什么会这样呢?因为counter++不是原子操作,它先取counter的当前值,然后在当前值的基础上加1,再赋值回counter,而在它取到当前值到赋新值之间,当前值也可能被其它线程取走。
2) 内存可见性
内存可见性指一个线程对共享变量的修改,另一个线程不一定马上就能看到,甚至永远也看不到。
261public class VisibilityDemo {2 private static boolean shutdown = false; // 1. 共享变量shutdown,初始为false3
4 static class HelloThread extends Thread {5 6 public void run() {7 // 2. 当shutdown为true时,子线程退出并输出"exit hello"8 while (!shutdown) {9 // do nothing10 }11 System.out.println("exit hello");12 }13 }14
15 public static void main(String[] args) throws InterruptedException {16 // 3. 启动子线程并将shutdown改为true,发现子线程并没有退出17 HelloThread helloThread = new HelloThread();18 helloThread.start();19 Thread.sleep(1000);20 shutdown = true;21 22 // 4. 无论是否等待子线程,子线程都不会发现shutdown已经改为true了23 // helloThread.join();24 System.out.println("exit main");25 }26}为什么会这样呢?由于CPU缓存等原因,可能修改没有及时同步到内存,也可能另一个线程根本就没从内存读。
6. 线程的优点及成本
多线程可以充分利用多核CPU的计算能力以及相关的硬件资源,因为一个线程在占用CPU时,另一个线程可以同时进行IO等操作。同理,由于多个执行流,对保持程序的响应性也十分有帮助,如GUI程序中,一个线程处理慢任务时,另一个线程还能够向用户反馈进度信息。
但是,创建和启动线程需要消耗操作系统的资源,并且,线程调度和切换也是有成本的。因此,如果执行的任务都是CPU密集型的,即主要消耗的都是CPU,那创建超过CPU数量的线程就是没有必要的,并不会加快程序的执行。
第二节 线程竞争
1. 线程竞争及解决方案(synchronized)
前面说到,当多个线程读写同一个变量时,可能形成竞态条件或出现内存可见性问题,这就是线程之间的竞争,在Java中,最简单的解决方式是使用synchronized关键字。
1) 修饰实例方法
上节我们介绍竞态条件时,了解到counter++是非原子操作,可能造成结果比预期偏小,现在我们可以对counter其进行包装,通过synchronized关键字修饰的实例方法来对其进行自增和读取操作,这样就始终和预期一致了。
131public class Counter {2    private int count; // 共享变量3
4    // synchronized5    public synchronized void incr() {6        count++;7    }8
9 // synchronized10 public synchronized int getCount() {11 return count;12 }13}这里,synchronized到底做了什么呢?在进入synchronized实例方法前,会尝试对this对象进行加锁操作,当前线程不能获得锁的时候,它会进入等待队列(此时线程状态变为BLOCKED),这样来确保只有一个线程执行。
注意:
synchronized是对this对象加锁,而非对方法加锁。
当this对象不同时,是可以执行同一个synchronized实例方法的;
当this对象相同时,即使是其它synchronized实例方法也是不可以执行的。
synchronized机制不能防止非synchronized方法被同时执行,如Counter类添加一个非synchronized的decr方法,进行count--操作,是无法同步的,因此,一般在保护变量时,需要在所有访问该变量的方法上加上synchronized。
2) 修饰静态方法
synchronized同样可以用于静态方法,比如:
111public class StaticCounter {2    private static int count = 0; // 共享变量3
4    public static synchronized void incr() {5        count++;6    }7
8 public static synchronized int getCount() {9 return count;10 }11}当修饰静态方法时,不能对this对象加锁了,它将对类对象(StaticCounter.class)进行加锁,加锁逻辑基本一致。
注意:
synchronized静态方法和synchronized实例方法对不同对象进行加锁,也就是说,不同的两个线程,可以一个执行synchronized静态方法,另一个执行synchronized实例方法。
3) 修饰代码块
除了用于修饰方法外,synchronized还可以用于修饰代码块,比如对于前面的Counter类,等价的代码可以为:
161public class Counter {2 private int count; // 共享变量3 private Object lock = new Object(); // 锁对象(lock也可以是this或类对象)4 5 public void incr(){6 synchronized(lock){ 7 count ++; 8 }9 }10 11 public int getCount() {12 synchronized(lock){13 return count;14 }15 }16} 此时,加锁的对象就是小括号里面的lock变量,它可以是任意对象。但是一般来说,在使用synchronized修饰代码块时,习惯使用this(实例方法中)或类对象(静态方法中)作为锁对象。
2. synchronized的特性
1) 可重入性
synchronized方法或代码块是可重入的,即某个线程获得锁之后,再次调用synchronized方法可直接调用,它是通过记录锁的持有线程和持有数量来实现的。
2) 内存可见性
synchronized还可以保证共享变量的内存可见性,在获得锁后,会始终从内存读取最新数据,在释放锁后,所有写入都会写回内存。
但如果只需要保证内存可见性,而无需保证原子性,可以使用更轻量级的方式,那就是给共享变量加修饰符volatile。
111public class Switcher {2    private volatile boolean on; // 共享变量,加volatile保证内存可见性3
4    public boolean isOn() {5        return on;6    }7
8    public void setOn(boolean on) {9        this.on = on;10    }11}
加了volatile之后,Java会在操作对应变量时插入特殊的指令,保证读写到内存最新值,而非缓存的值。
3) 可能死锁
synchronized需进行加锁,当修饰代码块时,如果以不同顺序对多个对象进行加锁时,可能造成死锁。
481public class DeadLockDemo {2 private static Object lockA = new Object(); // 锁A3 private static Object lockB = new Object(); // 锁B4
5 private static void startThreadA() {6 Thread aThread = new Thread() {7
8 9 public void run() {10 // 1. 线程A:先持有锁A,等待会后去申请锁B11 synchronized (lockA) {12 try {13 Thread.sleep(1000);14 } catch (InterruptedException e) {15 }16 synchronized (lockB) {17 }18 }19 }20 };21 aThread.start();22 }23
24 private static void startThreadB() {25 Thread bThread = new Thread() {26 27 public void run() {28 // 2. 线程B:先持有锁B,等待会后去申请锁A29 synchronized (lockB) {30 try {31 Thread.sleep(1000);32 } catch (InterruptedException e) {33 }34 synchronized (lockA) {35 }36 }37 }38 };39 bThread.start();40 }41
42 public static void main(String[] args) {43 // 3. 启动两个线程,可能造成死锁(线程A等线程B释放B锁,线程B等待线程A释放A锁)44 startThreadA();45 startThreadB();46 }47}48
死锁可通过jstack -pid命令查看,我们在写程序时,应该尽量避免在持有一个锁的同时去申请另一个锁,如果确实需要多个锁,所有代码都应该按照相同的顺序去申请锁。在Java中,也有一些显式锁支持tryLock以及加锁超时的设定,也可以一定程度解决死锁问题。
4) 无法响应中断
获取synchronized锁时,如果未获取到,将进入BLOCK状态,该状态无法响应中断请求,而显式锁Lock则支持以响应中断的方式获取锁。
5) 只有一个条件队列
synchronized的协作机制wait/notify,只支持一个条件队列,如果有多个等待条件,只能共用,并且在通知时必须通知所有等待的线程。
3. synchronized容器
1) 基本使用
Collections类有一些方法可以修饰普通容器,返回线程安全的同步容器,它们是给所有容器方法都加上synchronized来实现安全的。
31public static <T> Collection<T> synchronizedCollection(Collection<T> c)2public static <T> List<T> synchronizedList(List<T> list)3public static <K,V> Map<K,V> synchronizedMap(Map<K,V> m)这里线程安全针对的是容器对象,指的是当多个线程并发访问同一个容器对象时,不需要额外的同步操作,也不会出现错误的结果。
2) 复合操作与伪同步
加了synchronized,所有方法调用变成了原子操作,客户端在调用时,是不是就绝对安全了呢?不是的,至少有如下情况需要注意:
191// 自定义Map2public class EnhancedMap <K, V> {3 Map<K, V> map;4 5 public EnhancedMap(Map<K,V> map){6 this.map = Collections.synchronizedMap(map); // 1. 修饰为同步的Map7 }8 9 // 2. 期望实现putIfAbsent的原子操作10 public V putIfAbsent(K key, V value){11 V old = map.get(key);12 if(old!=null){13 return old;14 }15 map.put(key, value);16 return null;17 }18}19
上述案例中的原子操作显然是不能实现的,虽然map.get(key)和map.put(key, value)是原子的,但是它们组合后就不是原子的了。
那给putIfAbsent方法加上synchronized呢?也同样也不能实现原子操作,因为putIfAbsent方法的synchronized是对当前的EnhancedMap对象加锁,而map.get(key)和map.put(key, value)方法是对map加锁,这是一种伪同步。
但我们可以在putIfAbsent方法中使用synchronized代码块,并且使用map进行加锁。
111public V putIfAbsent(K key, V value){2 // synchronized,使用map进行加锁3 synchronized(map){4 V old = map.get(key);5 if(old!=null){6 return old;7 }8 map.put(key, value);9 return null; 10 }11}
3) 并发修改异常
此外,还需注意,虽然同步容器的单个操作是安全的,但是在增删元素时进行迭代操作依然可能会抛出ConcurrentModificationException。
381private static void startModifyThread(final List<String> list) {2 Thread modifyThread = new Thread(new Runnable() {3 4 public void run() {5 // 1. 线程1:增删list的元素6 for (int i = 0; i < 100; i++) {7 list.add("item " + i);8 try {9 Thread.sleep((int) (Math.random() * 10));10 } catch (InterruptedException e) {11 }12 }13 }14 });15 modifyThread.start();16}17
18private static void startIteratorThread(final List<String> list) {19 Thread iteratorThread = new Thread(new Runnable() {20 21 public void run() {22 // 2. 线程2:重复进行遍历操作23 while (true) {24 for (String str : list) {25 }26 }27 }28 });29 iteratorThread.start();30}31
32public static void main(String[] args) {33 // 3. 创建同步容器list进行测试,发现会抛出ConcurrentModificationException34 final List<String> list = Collections.synchronizedList(new ArrayList<String>());35 startIteratorThread(list);36 startModifyThread(list);37}38
同步容器并没有解决这个问题,如果要避免这个异常,需要在遍历的时候给整个容器对象加锁,如startIteratorThread可以改为:
161private static void startIteratorThread(final List<String> list) {2 Thread iteratorThread = new Thread(new Runnable() {3 4 public void run() {5 // 2. 线程2:重复进行遍历操作6 while (true) {7 // 但是在遍历前对list进行加锁8 synchronized(list){9 for (String str : list) {10 } 11 }12 }13 }14 });15 iteratorThread.start();16}
4) 性能问题
除了以上这些注意事项,同步容器的性能也是比较低的,当并发访问量比较大的时候性能很差。在高并发场景,可以使用CopyOnWriteArrayList、ConcurrentHashMap、ConcurrentLinkedQueue、ConcurrentSkipListSet等专为并发设计的容器类,它们都是线程安全的,但都没有使用synchronized、没有迭代问题、直接支持一些复合操作、性能也高得多。
第三节 线程协作
多线程之间除了竞争,还经常需要相互协作,本节就来介绍下多线程协作的基本机制wait/notify。
1. 线程协作的场景
多线程之间需要协作的场景有很多,比如说:
生产者/消费者协作模式:生产者线程和消费者线程通过共享队列进行协作,生产者将数据或任务放到队列上,而消费者从队列上取数据或任务,如果队列长度有限,在队列满的时候,生产者需要等待,而在队列为空的时候,消费者需要等待。
同时开始:类似运动员比赛,在听到比赛开始枪响后同时开始,在一些程序,尤其是模拟仿真程序中,要求多个线程能同时开始。
等待结束:主从协作模式也是一种常见的协作模式,主线程将任务分解为若干个子任务,为每个子任务创建一个线程,主线程在继续执行其他任务之前需要等待每个子任务执行完毕。
异步结果:在主从协作模式中,主线程手工创建子线程的写法往往比较麻烦,一种常见的模式是将子线程的管理封装为异步调用,异步调用马上返回,但返回的不是最终的结果,而是一个一般称为Promise或Future的对象,通过它可以在随后获得最终的结果。
集合点:比如并行迭代计算中,每个线程负责一部分计算,然后在集合点等待其他线程完成,所有线程到齐后,交换数据和计算结果,再进行下一次迭代。
我们会探讨如何实现这些协作场景,在此之前,我们先来了解协作的基本方法wait/notify。
2. wait/notify机制
在Java中,任意对象都可以参与线程协作,它们都有wait和notify方法,可以在synchronized代码块中调用:
71// 1. wait2public final void wait() throws InterruptedException // 无限期等待,等同wait(0)3public final native void wait(long timeout) throws InterruptedException // 超时等待,timeout表示等待时间,单位为毫秒4
5// 2. notify6public final native void notify(); // 通知,从条件队列中选一个线程,将其从队列中移除并唤醒7public final native void notifyAll(); // 通知所有,移除条件队列中所有的线程并全部唤醒前面提到,当线程等待synchronized锁时,会将线程加入到锁对象的等待队列中。而线程在synchronized代码块内主动调用wait方法时,会将线程加入到另一个条件队列,并进行阻塞。
调用wait方法后,将释放持有的锁,线程状态变为WAITING/TIMED_WAITING,当被唤醒后,需重新竞争锁。
如果获取到锁,线程状态变为RUNNABLE,并从wait调用中返回。
如果未获取到锁,将会进入等待队列,线程状态变为
BLOCKED,直到获得锁后才能从wait调用返回。
被阻塞的线程需要其它线程调用该对象的notify方法来将它唤醒。调用notify后,不会立即释放持有的锁,而是等待synchronzied代码块执行完后才释放。这意味着wait方法必须等到调用notify的那段同步代码执行结束后才可能获得锁响应通知。
注意:
wait/notify方法只能在synchronized代码块内被调用,否则将抛出IllegalMonitorStateException。
join方法也可进行等待,如前面介绍的主线程等待子线程结束案例,当子线程运行结束时,由java系统调用notifyAll来通知。
在使用wait/notify时,一定要明确wait等待的是什么?在满足什么条件后调用notify?并且需注意,从wait返回后,不一定表示等待的条件就满足了,仍需进行条件检查,因此,wait方法的一般调用模式为:
51synchronized (obj) {2 while (!条件成立)3 obj.wait();4 // 执行条件满足后的操作5}接下来,我们通过一些场景来进一步理解wait/notify的应用。
3. 生产者/消费者模式
在生产者/消费者模式中,协作的共享变量是队列,生产者往队列上放数据,如果满了就wait,而消费者从队列上取数据,如果队列为空也wait。我们将队列作为单独的类进行设计,代码如下:
281static class MyBlockingQueue<E> {2    private Queue<E> queue = null; // 1. 共享变量:队列3    private int limit; // 队列上限4
5    public MyBlockingQueue(int limit) {6        this.limit = limit;7        queue = new ArrayDeque<>(limit);8    }9
10    // 2. 生产者调用,放数据,如果满了则等待11    public synchronized void put(E e) throws InterruptedException {12        while (queue.size() == limit) {13            wait(); // 等待(注意,锁对象为this)14        }15        queue.add(e);16        notifyAll(); // 4. 生产数据后可通知消费者“有数据了”!(注意:这里只能通知所有线程)17    }18
19 // 3. 消费者调用,拿数据,空了也等待20 public synchronized E take() throws InterruptedException {21 while (queue.isEmpty()) {22 wait();23 }24 E e = queue.poll();25 notifyAll(); // 5. 拿走数据后可通知生产者“有空位了”(注意:这里只能通知所有线程)26 return e;27 }28}在上面代码中,生产者和消费者都调用了wait方法,但它们等待的条件是不一样的。生产者在队列为满时等待,而消费者在队列为空的时候等待,它们等待条件不同但又使用相同的条件队列,所以要调用notifyAll而不能调用notify,因为notify可能唤醒的恰好是同类线程。
类似的,它们也都调用了notifyAll方法,但是需满足的条件也不一致,生产者在“有数据了”的条件下通知消费者,消费者在“有空位了”的条件下通知生产者。
注意:synchronized的局限性
synchronized获取锁的
wait/notify协作机制,只能有一个条件等待队列,这是它的局限性,使的分析变得复杂,后面将会介绍支持多个条件的显式锁。
使用synchronized关键字获取锁的过程中不响应中断请求,这也是synchronized的局限性。
4. 同时开始
在同时开始模式中,协作的共享变量是一个开始信号。我们用一个类FireFlag来表示这个协作对象:
161static class FireFlag {2    private volatile boolean fired = false; // 1. 共享变量:是否开始3
4    // 2. 子线程在启动后调用,等待开始5    public synchronized void waitForFire() throws InterruptedException {6        while (!fired) {7            wait(); // 等待(注意,锁对象为this)8        }9    }10
11    // 3. 主线程调用,发起开始指令12    public synchronized void fire() {13        this.fired = true; 14        notifyAll(); // 通知所有wait的线程15    }16}
子线程应该调用waitForFire()等待枪响,而主线程应该调用fire()发射比赛开始信号。代码如下所示:
341// 子线程2static class Racer extends Thread {3 FireFlag fireFlag; // 1. 共享变量4
5 public Racer(FireFlag fireFlag) {6 this.fireFlag = fireFlag;7 }8
9 10 public void run() {11 try {12 // 2. 等待开始13 this.fireFlag.waitForFire();14 System.out.println("start run " + Thread.currentThread().getName());15 } catch (InterruptedException e) {16 }17 }18}19
20// 主线程21public static void main(String[] args) throws InterruptedException {22 // 1. 启动20个子线程23 int num = 10;24 FireFlag fireFlag = new FireFlag();25 Thread[] racers = new Thread[num];26 for (int i = 0; i < num; i++) {27 racers[i] = new Racer(fireFlag);28 racers[i].start();29 }30 Thread.sleep(1000);31 32 // 2. 开始33 fireFlag.fire(); 34}
5. 等待结束
在等待结束模式中,主线程与各个子线程协作的共享变量是一个数,这个数表示未结束线程个数。
221public class MyLatch {2    private int count; // 1. 共享变量3
4    public MyLatch(int count) {5        this.count = count; // 初始化为子线程个数6    }7
8    // 2. 主线程调用,等待所有子线程结束9    public synchronized void await() throws InterruptedException {10        while (count > 0) {11            wait();12        }13    }14
15    // 3. 子线程在退出前调用,线程计数 - 116    public synchronized void countDown() {17        count--;18        if (count <= 0) {19            notifyAll();20        }21    }22}
应用代码示例如下:
381// 子线程2static class Worker extends Thread {3 MyLatch latch;4
5 public Worker(MyLatch latch) {6 this.latch = latch;7 }8
9 10 public void run() {11 try {12 // 1. 执行业务13 Thread.sleep((int) (Math.random() * 1000));14
15 // 2. 结束前调用countDown,线程计数-116 this.latch.countDown(); 17 } catch (InterruptedException e) {18 }19 }20}21
22// 主线程23public static void main(String[] args) throws InterruptedException {24 // 1. 初始化计数25 int workerNum = 100;26 MyLatch latch = new MyLatch(workerNum); 27 28 // 2. 启动100个线程29 Worker[] workers = new Worker[workerNum];30 for (int i = 0; i < workerNum; i++) {31 workers[i] = new Worker(latch);32 workers[i].start();33 }34 35 // 3. 等待子线程都结束36 latch.await(); 37 System.out.println("collect worker results");38}注意:
可将线程计数初始值设置为1,由子线程调用await(),主线程调用countDown(),还可实现上面的“同时开始”模式。
7. 集合点
在集合点模式,协作的共享变量依然是一个数,这个数表示未到集合点的线程个数。
281// CyclicBarrier2public class AssemblePoint {3    private int n; // 1. 共享变量4
5    public AssemblePoint(int n) {6        this.n = n;7    }8
9    // 2. 集合,线程达到集合点时调用,等待其它未到的线程。10    public synchronized void await() throws InterruptedException {11        // 2.1 n >0 表示还有线程未到12        if (n > 0) {13            // 2.2 线程计数-114            n--;15            16            // 2.3 n==0 表示当前线程为最后一个到达线程,此时唤醒其它线程17            if (n == 0) {18                notifyAll();19            } else {20                // 2.3 n>0 表示还有线程未到,进行等待21                while (n != 0) {22                    wait();23                }24            }25            26        }27    }28}
多个游客线程,各自先独立运行,然后使用该协作对象到达集合点进行同步的示例代码如下:
371// 需集合的线程2public class AssemblePointDemo {3 static class Tourist extends Thread {4 AssemblePoint ap; // 1. 共享变量5
6 public Tourist(AssemblePoint ap) {7 this.ap = ap;8 }9
10 11 public void run() {12 try {13 // 2. 模拟先各自独立运行14 Thread.sleep((int) (Math.random() * 1000));15
16 // 3. 集合17 ap.await();18 System.out.println("arrived");19 20 // 4. 集合后执行其他操作21 } catch (InterruptedException e) {22 }23 }24 }25
26 // 主线程27 public static void main(String[] args) {28 // 1. 启动多个需集合的线程29 int num = 10;30 Tourist[] threads = new Tourist[num];31 AssemblePoint ap = new AssemblePoint(num);32 for (int i = 0; i < num; i++) {33 threads[i] = new Tourist(ap);34 threads[i].start();35 }36 }37}
6. 异步结果
异步结果模式依赖异步调用框架,主要由调用者、执行器、异步任务、异步结果四个部分组成。
其中异步任务和异步结果代码表示如下:
91// 异步任务2public interface Callable<V> {3    V call() throws Exception;4}5
6// 异步结果7public interface MyFuture <V> {8 V get() throws Exception ; // 返回真正的结果。如果尚未计算完成,则等待。如果计算过程发生了异常,则抛出保存的异常。9}执行器用于执行子任务并返回异步结果,使用执行器后调用者就无需创建并管理子线程了,其代码如下:
781// 执行器2public <V> MyFuture<V> execute(final Callable<V> task) {3 // 1. 创建锁对象4 final Object lock = new Object(); 5 6 // 2. 创建和启动执行线程7 final ExecuteThread<V> thread = new ExecuteThread<>(task, lock);8 thread.start();9
10 // 3. 创建异步结果对象,用于获取异步结果11 MyFuture<V> future = new MyFuture<V>() {12 13 public V get() throws Exception {14 synchronized (lock) {15 16 // 3.1 执行线程未结束,则等待17 while (!thread.isDone()) {18 try {19 lock.wait();20 } catch (InterruptedException e) {21 }22 }23 24 // 3.2 执行过程中出现异常,在调用get时直接抛出异常25 if (thread.getException() != null) {26 throw thread.getException(); 27 }28 29 // 3.3 执行线程完结束后,直接返回保存的真实结果30 return thread.getResult(); 31 }32 }33 };34 35 // 4. 返回一个异步结果对象36 return future;37}38
39// 执行器委托给执行线程去执行40static class ExecuteThread<V> extends Thread {41 private V result = null; // 结果42 private Exception exception = null; // 异常43 private boolean done = false; // 是否完成44 private Callable<V> task; // 任务45 private Object lock; // 锁对象46 47 public ExecuteThread(Callable<V> task, Object lock) {48 this.task = task;49 this.lock = lock;50 }51
52 53 public void run() {54 // 1. 执行任务,捕获异常,修改完成标记,通知其它线程55 try {56 result = task.call();57 } catch (Exception e) {58 exception = e;59 } finally {60 synchronized (lock) {61 done = true;62 lock.notifyAll();63 }64 }65 }66
67 public V getResult() {68 return result;69 }70
71 public boolean isDone() {72 return done;73 }74
75 public Exception getException() {76 return exception;77 }78}调用者只需创建执行器,然后执行异步任务,即可得到异步结果对象。
281public static void main(String[] args) {2 // 1. 创建执行器3 MyExecutor executor = new MyExecutor();4 5 // 2. 创建异步任务6 Callable<Integer> subTask = new Callable<Integer>() {7 8 public Integer call() throws Exception {9 // 执行异步任务10 int millis = (int) (Math.random() * 1000);11 Thread.sleep(millis);12 return millis;13 }14 };15 16 // 3. 执行异步任务,返回异步结果17 MyFuture<Integer> future = executor.execute(subTask);18 19 // 4. 执行其他操作20 21 try {22 // 5. 获取异步调用的真实结果23 Integer result = future.get();24 System.out.println(result); // 6.1 处理真实结果25 } catch (Exception e) {26 e.printStackTrace(); // 6.2 处理异步任务异常27 }28}
第四节 线程中断
在Java中,停止一个线程的主要机制是中断,中断并不是强迫终止一个线程,而是一种协作机制,是给线程传递一个取消信号,但是由线程来决定如何以及何时退出,本节我们主要就是来理解Java的中断机制。
1. 线程中断的场景
通过线程的start方法启动一个线程后,线程开始执行run方法,run方法运行结束后线程退出,但有些场景需要对其进行中断:
线程的运行模式是死循环,无法自己停止。如在前面生产者/消费者模式案例中,生产者的代码就是一个死循环,不断的生产数据。
希望中途取消该线程执行的任务。如从远程服务器下载一个文件,在下载过程中,用户可能会希望取消该任务。
希望在限定的时间内得到结果。如从第三方服务器查询一个结果,超过设定的时间后仍未查询结束,则关闭查询。
通知取消其他渠道。如让多个好友帮忙抢火车票,只要有一个渠道抢到了,则通知其他人取消抢票。
2. 线程中断相关方法
每个线程都有一个中断标志位,表示该线程是否被中断,可通过如下方式获取和设置:
61// 1. Thread类的实例方法2public boolean isInterrupted() // 获取线程是否被中断,即获取中断标志位3public void interrupt() // 中断该线程,即设置中断标志位为true4
5// 2. Thread类的静态方法6public static boolean interrupted() // 当前线程是否被中断,同时清空中断标志位
注意:
线程中还定义了stop()等一些方法,但它们已经过时了,不应该再继续使用。
3. 线程对中断的反应
线程被中断时,如何进行响应与线程的状态及进行的IO操作有关。
| 线程状态或IO操作 | 响应 |
|---|---|
| NEW/TERMINATE状态 | 调用interrupt()对它没有任何效果,中断标志位也不会被设置 |
| RUNNABLE状态(未执行IO操作) | 只会设置线程的中断标志位,没有其它任何作用。 |
| WAITING/TIMED_WAITING状态 | 抛出InterruptedException,同时清空线程的中断标志位。 |
| BLOCKED状态 (如进入synchronized代码块时未获取到锁) | 设置线程的中断标志位,但线程依然会处于BLOCKED状态。 也就是说,interrupt()并不能使一个在等待锁的线程真正"中断"。 |
| 等待IO操作,且IO通道是可中断的 (即实现了InterruptibleChannel接口) | 抛出ClosedByInterruptException,同时设置线程的中断标志位。 |
| 线程阻塞于Selector调用 | 设置线程的中断标志位,同时,阻塞的调用会立即返回。 |
此外,重点介绍下InputStream的read调用,在流中没有数据时,read会阻塞 ,但线程依然是RUNNABLE状态。如果此时被中断,只会设置线程中断标志,并不能真正“中断”它。
271public class InterruptReadDemo {2 // 子线程3 private static class A extends Thread {4 5 public void run() {6 while(!Thread.currentThread().isInterrupted()){7 try {8 System.out.println(System.in.read()); // read,在流中无数据时阻塞9 } catch (IOException e) {10 e.printStackTrace();11 } 12 }13 System.out.println("exit");14 }15 }16
17 // 调用者18 public static void main(String[] args) throws InterruptedException {19 // 启动线程A20 A t = new A();21 t.start();22 Thread.sleep(100);23
24 // 想要中断线程A,实际上并不会被中断25 t.interrupt();26 }27}子线程启动后调用read方法,此时标准输入流无数据,会进行阻塞,虽然主线程设置了中断标记,但子线程并不能响应中断。如果输入一个字符,read方法执行通过,随后进入while循环的中断标志判断逻辑,此时发现被中断才会退出。
4. 如何处理线程中断
线程中断时,可能抛出InterruptedException异常,也可能只设置中断标识位。
对于前者,可以捕捉该异常,然后进行资源释放等一些操作,一般来说,还会重新设置中断标志位,方便后续程序处理。
对于后者,可以在循环代码中判断中断标志位,进行一系列的中断处理,如打印日志和退出循环等。
351public class InterruptDemo {2 public static void main(String[] args) throws InterruptedException {3 // 1. 子线程4 Thread thread = new Thread(new Runnable() {5 6 public void run() {7 // 1.1 执行业务代码8 while (true) {9 // 业务代码10 System.out.println("当前时间:" + System.currentTimeMillis());11 try {12 Thread.sleep(100); // 进入TIMED_WAITING状态13 } catch (InterruptedException e) {14 // 1.2 处理WAIT/TIMED_WAITING状态状态被中断15 System.out.println("close...");16 System.out.println(Thread.currentThread().isInterrupted()); // false,标志被重置17 Thread.currentThread().interrupt(); // 重设中断标志位18 }19
20 // 1.3 处理Runnable状态被中断21 if (Thread.currentThread().isInterrupted()) {22 System.out.println("exit!");23 break;24 }25 }26 }27 });28 thread.start();29
30 // 2. 中断该子线程31 Thread.sleep(1000);32 thread.interrupt();33 thread.join();34 }35}注意:
BLOCKED状态的线程虽然会被设置中断标识位,但依然保持阻塞状态,无法对其进行处理。
5. 如何取消/关闭线程
线程中断只是一种协作机制,而不一定会真正"中断"线程,如果不明白线程在做什么,不应该贸然的调用线程的interrupt方法。
那如何取消或关闭线程呢?一般而言,对于以线程提供服务的程序模块,它应该封装取消或关闭的操作,从而使调用者能正确关闭线程。
如上节的InterruptReadDemo,可以在子线程中提供如下cancel方法,调用后关闭流(注意,流在关闭时返回-1),并进行中断退出。
81// 取消2public void cancel() {3 try {4 System.in.close(); // 先关闭IO流5 } catch (IOException e) {6 }7 interrupt(); // 再中断当前线程8}同样的,Java并发库的一些代码也提供了单独的取消/关闭方法:
61// Future接口提供了如下方法以取消任务2boolean cancel(boolean mayInterruptIfRunning);3
4// ExecutorService提供了如下两个关闭方法5void shutdown();6List<Runnable> shutdownNow();
第02章_并发协作工具
第一节 原子变量
1. 基础用法
原子变量可以保证更新操作的原子性,且无需加锁以及上下文切换,效率更高。常用基本类型的原子变量及相关变体如下:
| 基本类型 | 原子变量 | 原子数组 | 原子字段更新器 |
|---|---|---|---|
| Boolean | AtomicBoolean | ||
| Integer | AtomicInteger | AtomicIntegerArray | AtomicIntegerFieldUpdater |
| Long | AtomicLong | AtomicLongArray | AtomicLongFieldUpdater |
| Reference | AtomicReference | AtomicReferenceArray | AtomicReferenceFieldUpdater |
1) AtomicInteger
AtomicInteger可以用作计数器等场景,常用方法如下:
441// 1. 构造方法2public AtomicInteger(int initialValue) // initialValue-初始值3public AtomicInteger() // initialValue为04 5// 2. 获取和设置6public final int get() 7public final void set(int newValue) 8
9// 3. 组合操作方法10public final int getAndSet(int newValue) // 以原子方式 获取旧值 并 设置新值11public final int getAndIncrement() // 以原子方式获取旧值并给当前值加1,类似于count++12public final int getAndDecrement() // 以原子方式获取旧值并给当前值减1,类似于count--13public final int incrementAndGet() // 以原子方式给当前值加1并获取新值,类似于++count14public final int decrementAndGet() // 以原子方式给当前值减1并获取新值,类似于--count15public final int addAndGet(int delta) // 以原子方式给当前值加delta并获取新值,类似于count = count + delta16public final int getAndAdd(int delta) // 以原子方式获取旧值并给当前值加delta17 18// 示例1:计数器19public class AtomicIntegerDemo {20 private static AtomicInteger counter = new AtomicInteger(0); // 原子变量计数器21
22 static class Visitor extends Thread {23 24 public void run() {25 for (int i = 0; i < 100; i++) {26 counter.incrementAndGet(); // 原子自增27 Thread.yield();28 }29 }30 }31
32 public static void main(String[] args) throws InterruptedException {33 int num = 100;34 Thread[] threads = new Thread[num];35 for (int i = 0; i < num; i++) {36 threads[i] = new Visitor();37 threads[i].start();38 }39 for (int i = 0; i < num; i++) {40 threads[i].join();41 }42 System.out.println(counter.get()); // 计数结果总是1000043 }44}AtomicBoolean可以用来在程序中表示一个标志位,它的原子操作方法有:
21public final boolean getAndSet(boolean newValue) 2public final boolean compareAndSet(boolean expect, boolean update)AtomicLong可以用来在程序中生成唯一序列号,它的方法与AtomicInteger类似。
2) AtomicReference
AtomicReference用来以原子方式更新引用类型,它有一个类型参数,使用时需要指定引用的类型。以下代码演示了其基本用法:
321public class AtomicReferenceDemo {2    // 引用类型3    static class Pair {4        final private int first;5        final private int second;6
7        public Pair(int first, int second) {8            this.first = first;9            this.second = second;10        }11
12        public int getFirst() {13            return first;14        }15
16        public int getSecond() {17            return second;18        }19    }20
21    public static void main(String[] args) {22        // 1. 创建引用类型23        Pair p = new Pair(100, 200);24        25        // 2. 创建原子引用类型26        AtomicReference<Pair> pairRef = new AtomicReference<>(p);27        28        // 3. CAS更新29        pairRef.compareAndSet(p, new Pair(200, 200));30        System.out.println(pairRef.get().getFirst());31    }32}
3) AtomicArray
原子数组方便以原子的方式更新数组中的每个元素,我们以AtomicIntegerArray为例来简要介绍下。
181// 1. 构造方法2public AtomicIntegerArray(int length) // 创建一个长度为length的空数组3public AtomicIntegerArray(int[] array) // 创建一个长度为array.length的空数组,并从array拷贝元素4
5// 2. 原子更新方法(大多带有数组索引参数)6public final boolean compareAndSet(int i, int expect, int update)7public final int getAndIncrement(int i)8public final int getAndAdd(int i, int delta)9    10// 示例111public class AtomicArrayDemo {12    public static void main(String[] args) {13        int[] arr = { 1, 2, 3, 4 };14        AtomicIntegerArray atomicArr = new AtomicIntegerArray(arr);15        atomicArr.compareAndSet(1, 2, 100); // 如果索引位置为1的元素值为2,则更新为10016        System.out.println(atomicArr.get(1)); // 10017    }18}
4) FieldUpdater
FieldUpdater方便以原子方式更新对象中的字段,字段不需要声明为原子变量,FieldUpdater是基于反射机制实现的,看代码:
401public class FieldUpdaterDemo {2    static class DemoObject {3        private volatile int num; // volatile4        private volatile Object ref; // volatile5
6        // DemoObject类num字段的原子更新器7        private static final AtomicIntegerFieldUpdater<DemoObject> numUpdater8            = AtomicIntegerFieldUpdater.newUpdater(DemoObject.class, "num");9        10        // DemoObject类ref字段的原子更新器11        private static final AtomicReferenceFieldUpdater<DemoObject, Object> refUpdater 12            = AtomicReferenceFieldUpdater.newUpdater(DemoObject.class, Object.class, "ref");13
14        // CAS更新num字段15        public boolean compareAndSetNum(int expect, int update) {16            return numUpdater.compareAndSet(this, expect, update);17        }18
19        public int getNum() {20            return num;21        }22
23        // CAS更新ref字段24        public Object compareAndSetRef(Object expect, Object update) {25            return refUpdater.compareAndSet(this, expect, update);26        }27
28        public Object getRef() {29            return ref;30        }31    }32
33    public static void main(String[] args) {34        DemoObject obj = new DemoObject();35        obj.compareAndSetNum(0, 100);36        obj.compareAndSetRef(null, new String("hello"));37        System.out.println(obj.getNum());38        System.out.println(obj.getRef());39    }40}
2. 实现原理
原子变量的组合操作都依赖一个特殊的方法,称之为CAS,比较并设置。如AtomicInteger中的CAS方法为:
51// CAS:如果当前值等于expect,则更新为update,否则不更新。如果更新成功,返回true,否则返回false。2public final boolean compareAndSet(int expect, int update) {3 // Unsafe类的CAS方法:依赖底层计算机系统在硬件层次上直接支持的CAS指令4 return unsafe.compareAndSwapInt(this, valueOffset, expect, update); // Long和Object类型也有对应的方法5}它在内部调用了Unsafe类的CAS方法,而该方法依赖底层计算机系统在硬件层次上直接支持的CAS指令。
有了CAS方法后,就可以通过死循环+CAS实现原子更新了,如AtomicInteger的incrementAndGet方法:
121public final int incrementAndGet() {2 // 死循环,不断尝试CAS更新3 for (;;) {4 // 获取当前值,计算最新值5 int current = get();6 int next = current + 1;7 8 // CAS更新9 if (compareAndSet(current, next))10 return next;11 }12}
3. ABA问题
使用CAS方式更新有一个ABA问题,指一个线程刚开始看到的值是A,随后使用CAS进行更新,它实际期望的是没有其他线程修改过才更新,但普通的CAS做不到,因为可能在这个过程中,已经有其他线程修改过了,比如先改为了B,然后又改回为了A。
一般来说,这对业务没啥影响,如果确实需要解决该问题,可以使用AtomicReference的增强类AtomicStampedReference,它在修改值的同时附加一个时间戳,只有值和时间戳都相同才进行修改。
171// AtomicStampedReference中的CAS:同时修改两个值,一个是值,另一个是时间戳,将两个组合为一个对象进行CAS操作2public boolean compareAndSet(V expectedReference, V newReference, int expectedStamp, int newStamp) {3 Pair<V> current = pair;4 return expectedReference == current.reference && // 期望值与当前值相等5 expectedStamp == current.stamp && // 期望时间戳与当前时间戳相等6 (7 (newReference == current.reference && newStamp == current.stamp) // 无需更新8 || casPair(current, Pair.of(newReference, newStamp)) // 使用组合对象进行CAS更新9 );10}11 12// 示例1:13Pair pair = new Pair(100, 200);14int stamp = 1;15AtomicStampedReference<Pair> pairRef = new AtomicStampedReference<Pair>(pair, stamp); // 初始值,初始时间戳16int newStamp = 2;17pairRef.compareAndSet(pair, new Pair(200, 200), stamp, newStamp); // 比较旧值和旧时间戳都一致才更新此外,还可以使用AtomicMarkableReference,它多关联了一个boolean类型的标志位,只有值和标志位都相同的情况下才进行修改。
4. 对比synchronized
原子变量的更新方式与synchronized方式的相比,代表一种不同的思维方式。
synchronized方式是悲观的,它假定更新很可能冲突,所以先获取锁,得到锁后才更新,代表一种阻塞式算法,有上下文切换开销。
原子变量的更新方式是乐观的,它假定冲突比较少,使用死循环进行CAS更新,是非阻塞式的,不会有上下文切换开销。
对于大部分比较简单的操作,无论是在低并发还是高并发情况下,这种乐观非阻塞方式的性能都要远高于悲观阻塞式方式。
实际上,CAS也可以实现悲观阻塞式算法,Java并发包中的所有阻塞式工具、容器、算法都是使用了CAS (当然,也需要一些别的支持)。
151public class MyLock {2    private AtomicInteger status = new AtomicInteger(0); // 0-无锁 1-加锁3
4    public void lock() {5        // 加锁,即将0->16        while (!status.compareAndSet(0, 1)) {7            Thread.yield();8        }9    }10
11    public void unlock() {12        // 解锁,即将1->013        status.compareAndSet(1, 0);14    }15}
上例中的这种阻塞方式过于消耗CPU,有更为高效的方式,我们后续章节介绍。
第二节 显式锁
Java并发包中的显式锁接口和类位于包java.util.concurrent.locks下,主要接口和类有:
锁接口
Lock,主要实现类是ReentrantLock。读写锁接口
ReadWriteLock,主要实现类是ReentrantReadWriteLock。
本节主要介绍Lock接口和实现类ReentrantLock,关于读写锁,我们后续章节介绍。
1. LOCK接口
显式锁接口Lock的定义为:
151public interface Lock {2 // 加锁3 void lock(); // 阻塞直到加锁成功4 void lockInterruptibly() throws InterruptedException; // 可响应中断的加锁5 6 // 尝试获取锁7 boolean tryLock(); // 不阻塞,立即返回,如果获取成功,则返回true,否则返回false8 boolean tryLock(long time, TimeUnit unit) throws InterruptedException; // 限时尝试获取锁,可响应中断9 10 // 解锁11 void unlock();12 13 // 新建条件,一个Lock可以关联多个条件14 Condition newCondition(); // 关于条件,我们留待下节介绍15}可以看出,相比synchronized,显式锁支持以非阻塞方式获取锁、可以响应中断、可以限时,这使得它灵活的多。
2. ReentrantLock
1) 加锁/解锁
Lock接口的主要实现类是ReentrantLock,它的基本方法lock/unlock实现了与synchronized一样的语义,包括:
可以解决竞态条件问题。
可以保证内存可见性。
可重入,一个线程在持有一个锁的前提下,可以继续获得该锁。
231// 构造方法2public ReentrantLock()3public ReentrantLock(boolean fair) // fair-是否公平(时间优先),默认为false。4    5// 示例1:6public class Counter {7    private final Lock lock = new ReentrantLock(); // 可重入锁8    private volatile int count; // 计数器,加volatile保证共享内存的可见性9
10    public void incr() {11        lock.lock(); // 加锁12        try {13            count++;14        } finally {15            lock.unlock(); // finally中释放锁16        }17    }18
19    public int getCount() {20        return count;21    }22}23
注意:是否需要保证公平
保证公平会让活跃线程得不到锁,进入等待状态,引起上下文切换,降低整体效率,因此一般都是不保证公平的。
通常情况下,谁先运行关系不大,而且长时间运行,从统计角度而言,虽然不保证公平,也基本是公平的。
而且,即使fair参数为true,不带参数的tryLock方法也是不保证公平的,它不会检查是否有其他等待时间更长的线程。
2) 避免死锁(tryLock)
如果以不同顺序获取多个锁,可能造成死锁,可以使用tryLock()以尝试的方式获取锁,如果获取不到,还可以先释放已持有的锁,给其他线程获取锁的机会,然后再重试获取所有锁。
371// 尝试转账2public static boolean tryTransfer(Account from, Account to, double money) throws NoEnoughMoneyException {3    // 1. 尝试获取第一个锁4    if (from.tryLock()) {5        try {6            // 1. 尝试获取第二个锁7            if (to.tryLock()) {8                try {9                    // 3. 执行业务10                    if (from.getMoney() >= money) {11                        from.reduce(money);12                        to.add(money);13                    } else {14                        throw new NoEnoughMoneyException();15                    }16                    return true;17                } finally {18                    to.unlock(); // 执行业务完毕后解锁19                }20            }21        } finally {22            from.unlock(); // 执行业务完毕后解锁;获取不到第二个锁时也会解锁。23        }24    }25    return false;26}27
28// 转账29public static void transfer(Account from, Account to, double money) throws NoEnoughMoneyException {30    boolean success = false;31    do {32        success = tryTransfer(from, to, money); // 可重试多次33        if (!success) {34            Thread.yield();35        }36    } while (!success);37}
注意:
做转账业务时,需在同事务内增加A账户余额并减少B账户余额,要保证AB账户按一致的顺序更新,否则相互转账会死锁。
3) 获取锁信息
除了实现Lock接口中的方法,ReentrantLock还有一些其他方法,可以获取关于锁的一些信息,这些信息可以用于监控和调试目的,比如:
121// 1. 锁持有情况2public boolean isLocked() // 是否被某个线程持有3public boolean isHeldByCurrentThread() // 是否被当前线程持有4public int getHoldCount() // 锁被当前线程持有的数量,0表示不被当前线程持有5
6// 2. 锁等待情况7public final boolean hasQueuedThreads() // 是否有线程在等待该锁8public final boolean hasQueuedThread(Thread thread) // 指定的线程thread是否在等待该锁9public final int getQueueLength() // 在等待该锁的线程个数10    11// 3. 锁等待策略12public final boolean isFair() // 是否公平
4) 对比synchronized
synchronized是一种声明式编程,使用更为简单,不易出错,而且Java编译器和虚拟机可以不断优化synchronized的实现。但是,它不能响应中断,没有尝试加锁或限时加锁的方式避免死锁,并且协作时只有一个条件队列。
显式锁是一种命令式编程,需程序员实现所有细节,但是更为灵活,可以解决上述一些synchronized的局限。
简单总结,能用synchronized就用synchronized,不满足要求,再考虑ReentrantLock。
3. ReentrantLock的实现基础
1) CAS + LockSupport
ReentrantLock在最底层依赖于前面介绍的CAS方法,另外,还依赖了LockSupport中的一些方法,它的基本方法有:
291// 1. 搁置,可响应中断,中断时直接返回,并设置线程中断标志(和其它等待方法类似,需循环判断条件是否满足)2public static void park() // 放弃CPU,进入等待状态3public static void parkNanos(long nanos) // 搁置指定纳秒4public static void parkUntil(long deadline) // 搁置到指定时间(毫秒值)5 6// 2. 搁置,同时指定blocker对象,表示是因为该对象进行等待的,一般为this,可用于调试等7public static void park(Object blocker)8public static void parkNanos(Object blocker, long nanos)9public static void parkUntil(Object blocker, long deadline)10public static Object getBlocker(Thread t) // 返回一个线程的blocker对象11 12// 3. 解除搁置13public static void unpark(Thread thread) // 使指定线程恢复可运行状态14 15// 示例1:16public static void main(String[] args) throws InterruptedException {17 // 子线程18 Thread t = new Thread (){19 public void run(){20 LockSupport.park(); // 搁置21 System.out.println("exit");22 }23 };24 t.start(); 25 26 // 主线程27 Thread.sleep(1000);28 LockSupport.unpark(t); // 解除搁置29}这些park/unpark方法是怎么实现的呢?与CAS方法一样,它们也调用了Unsafe类中的对应方法,Unsafe类最终调用了操作系统的API,从程序员的角度,我们可以认为LockSupport中的这些方法就是基本操作。
2) AQS (AbstractQueuedSynchronizer)
AbstractQueuedSynchronizer是Java提供的一个抽象类,它封装了CAS和LockSupport,简化了并发工具的实现。
AQS封装了一个状态。
91// 封装的状态变量2private volatile int state;34// 获取或设置状态5protected final int getState()6protected final void setState(int newState)78// CAS方式设置状态9protected final boolean compareAndSetState(int expect, int update)AQS用于实现锁时,可以保存锁的当前持有线程。
61// 封装的持有线程(独有)2private transient Thread exclusiveOwnerThread;34// 获取和设置持有线程5protected final void setExclusiveOwnerThread(Thread t)6protected final Thread getExclusiveOwnerThread()AQS内部维护了一个等待队列,借助CAS方法实现了无阻塞算法进行更新。
4. ReentrantLock的实现代码
ReentrantLock内部定义了一个继承自AQS的抽象类Sync,它有两个实现类NonfairSync和FairSync。
21// 内部有一个Sync引用2private final Sync sync; // 默认为NonfairSync,如果构造参数fair为true,则为FairSync
1) 实现lock方法
我们先来看下ReentrantLock的lock方法:
211// =>ReentrantLock.lock2public void lock() {3    sync.lock(); // 直接调用了Sync的lock4}5
6// =>NonfairSync.lock7final void lock() {8    // 判断是否被加过锁(使用state表示锁持有数量),如果未被锁定,则直接加锁9    if (compareAndSetState(0, 1))10        setExclusiveOwnerThread(Thread.currentThread()); // 设置锁持有线程为当前线程11    else12        acquire(1); // 询问锁13}14
15// =>AQS.acquire16public final void acquire(int arg) {17    // 尝试获取锁,获取不到则加入等待队列18    if (!tryAcquire(arg) && acquireQueued(addWaiter(Node.EXCLUSIVE), arg))19        selfInterrupt(); // 如果acquireQueued发生过中断,则设置当前线程的中断标志20}21
其中tryAcquire必须被子类重写,NonfairSync的实现为:
291// =>NonfairSync.tryAcquire2protected final boolean tryAcquire(int acquires) {3    return nonfairTryAcquire(acquires);4}5
6// =>nonfairTryAcquire是Sync中实现的7final boolean nonfairTryAcquire(int acquires) {8    final Thread current = Thread.currentThread();9    int c = getState();10    if (c == 0) {11        // a) 如果未被锁定,则使用CAS进行锁定12        // 注意:如果是FairSync,这里会多一个!hasQueuedPredecessors()检查13        // 表示不存在其他等待时间更长的线程,它才会尝试获取锁14        if (compareAndSetState(0, acquires)) {15            setExclusiveOwnerThread(current);16            return true;17        }18    }19    else if (current == getExclusiveOwnerThread()) {20        // b) 如果已被当前线程锁定,则增加锁定次数21        int nextc = c + acquires;22        if (nextc < 0) // overflow23            throw new Error("Maximum lock count exceeded");24        setState(nextc);25        return true;26    }27    return false;28}29
如果tryAcquire返回false,即被其它线程锁定,则AQS会调用acquireQueued(addWaiter(Node.EXCLUSIVE), arg),其中addWaiter会新建一个节点Node,代表当前线程,然后加入到内部的等待队列中。
放入等待队列中后,再调用acquireQueued尝试获得锁,代码为:
281// => AQS.cquireQueued2final boolean acquireQueued(final Node node, int arg) {3 boolean failed = true;4 try {5 boolean interrupted = false;6 7 // 1. 主体是一个死循环8 for (;;) {9 // 2. 检查当前节点是不是第一个等待的节点10 final Node p = node.predecessor();11 if (p == head && tryAcquire(arg)) {12 // 2.1 如果是,且能获取到锁,则将当前节点从等待队列中移除并返回13 setHead(node);14 p.next = null; // help GC15 failed = false;16 return interrupted;17 }18 19 // 2.2 否则最终调用LockSupport.park放弃CPU,进入等待20 if (shouldParkAfterFailedAcquire(p, node) && parkAndCheckInterrupt())21 // 3. 被唤醒后,检查是否发生了中断,记录中断标志,后重新开始循环22 interrupted = true;23 }24 } finally {25 if (failed)26 cancelAcquire(node);27 }28}以上就是lock方法的基本过程,能获得锁就立即获得,否则加入等待队列,被唤醒后检查自己是否是第一个等待的线程,如果是且能获得锁,则返回,否则继续等待,这个过程中如果发生了中断,lock会记录中断标志位,但不会提前返回或抛出异常。
2) 实现unlock方法
ReentrantLock的unlock方法的代码为:
161// =>ReentrantLock.unlock2public void unlock() {3    sync.release(1);4}5
6// =>AQS.release7public final boolean release(int arg) {8    // 1. 修改状态释放锁9    if (tryRelease(arg)) {10        Node h = head;11        if (h != null && h.waitStatus != 0)12            unparkSuccessor(h); // 2. 调用LockSupport.unpark将第一个等待的线程唤醒13        return true;14    }15    return false;16}
第三节 显式条件
显式条件是基于显式锁的线程协作机制,它们之间的关系类似于synchronized与wait/notify协作机制的关系。
1. Condition接口
创建显式条件需要通过显式锁,Lock接口定义了创建方法:
11Condition newCondition();其中Condition为显式条件的接口,它的定义为:
141public interface Condition {2 // 1. 可中断等待(如果发生了中断,会抛出InterruptedException,但中断标志位会被清空)3 void await() throws InterruptedException; // 无限期等待,对应wait()4 long awaitNanos(long nanosTimeout) throws InterruptedException; // 超时等待,单位为纳秒,返回值为 nanosTimeout - 实际等待的时间5 boolean await(long time, TimeUnit unit) throws InterruptedException; // 超时等待,可指定单位,如果由于等待超时返回,返回值为false,否则为true6 boolean awaitUntil(Date deadline) throws InterruptedException; // 超时等待,参数为截至时间戳,如果由于等待超时返回,返回值为false,否则为true7 8 // 2. 不可中断等待(不会由于中断结束,但当它返回时,如果等待过程中发生了中断,中断标志位会被设置)9 void awaitUninterruptibly();10 11 // 3. 通知12 void signal(); // 对应notify13 void signalAll(); // 对应notifyAll()14}与wait/notify协作机制类似,await()/signal()也具有如下一些特性:
调用await()/signal()等方法前必须先获取显式锁,否则会抛出异常IllegalMonitorStateException。
await在进入等待队列后,会释放锁,释放CPU,当其他线程将它唤醒后,或等待超时后,或发生中断异常后,它都需要重新获取锁,获取锁后,才会从await方法中退出。
await返回后,不代表其等待的条件就一定满足了,通常要将await的调用放到一个循环内,只有条件满足后才退出。
2. 生产者/消费者模式案例
生产者/消费者模式存在一个与队列满有关的条件,还存在一个与队列空有关的条件,而在前面通过wait/notify机制实现时,不得不共用同一个条件队列,而使用显式锁,则可以分别创建对应的条件队列。
401static class MyBlockingQueue<E> {2    private Queue<E> queue = null; // 队列3    private int limit; // 队列上限4    private Lock lock = new ReentrantLock(); // 可重入锁5    private Condition notFull  = lock.newCondition(); // lock条件01:队列非满6    private Condition notEmpty = lock.newCondition(); // lock条件02:队列非空7
8
9    public MyBlockingQueue(int limit) {10        this.limit = limit;11        queue = new ArrayDeque<>(limit);12    }13
14    public void put(E e) throws InterruptedException {15        lock.lockInterruptibly(); // 加锁16        try{17            while (queue.size() == limit) {18                notFull.await(); // 队列已满,在notFull条件等待19            }20            queue.add(e);21            notEmpty.signal(); // 队列非空,通知notEmpty条件22        }finally{23            lock.unlock(); // 解锁24        }25    }26
27    public E take() throws InterruptedException {28        lock.lockInterruptibly(); // 加锁29        try{30            while (queue.isEmpty()) {31                notEmpty.await(); // 队列是空的,在notEmpty条件等待32            }33            E e = queue.poll();34            notFull.signal(); // 队列非满,通知notFull条件35            return e;    36        }finally{37            lock.unlock // 解锁38        }39    }40}
这样,代码更为清晰易读,同时避免了不必要的唤醒和检查,提高了效率。
3. 显式条件的实现代码
1) ConditionObject
ConditionObject是AQS中定义的一个成员内部类,它可以直接访问AQS中的数据,比如AQS中定义的锁等待队列。它通过显式锁创建:
91// => ReentrantLock.newCondition2public Condition newCondition() {3    return sync.newCondition();4}5
6// => Sync.newCondition7final ConditionObject newCondition() {8 return new ConditionObject();9}它内部也有一个条件等待队列,其成员声明为:
21private transient Node firstWaiter; // 条件队列的头节点2private transient Node lastWaiter; // 条件队列的尾节点
2) await实现分析
301public final void await() throws InterruptedException {2 // 如果等待前中断标志位已被设置,直接抛异常3 if (Thread.interrupted()) throw new InterruptedException();4 5 // 1.为当前线程创建节点,加入条件等待队列6 Node node = addConditionWaiter();7 8 // 2.释放持有的锁9 int savedState = fullyRelease(node);10 int interruptMode = 0;11 12 // 3.放弃CPU,进行等待,直到被中断或isOnSyncQueue变为true13 // isOnSyncQueue为true表示节点被其他线程从条件等待队列移到了外部的锁等待队列,等待的条件已满足14 while (!isOnSyncQueue(node)) {15 LockSupport.park(this);16 if ((interruptMode = checkInterruptWhileWaiting(node)) != 0)17 break;18 }19 20 // 4.重新获取锁21 if (acquireQueued(node, savedState) && interruptMode != THROW_IE)22 interruptMode = REINTERRUPT;23 if (node.nextWaiter != null) // clean up if cancelled24 unlinkCancelledWaiters();25 26 // 5.处理中断,抛出异常或设置中断标志位27 if (interruptMode != 0)28 reportInterruptAfterWait(interruptMode);29}30
3) awaitNanos实现分析
awaitNanos与await的实现是基本类似的,区别主要是会限定等待的时间,如下所示:
381public final long awaitNanos(long nanosTimeout) throws InterruptedException {2    if (Thread.interrupted()) throw new InterruptedException();3    4    Node node = addConditionWaiter();5    6    int savedState = fullyRelease(node);7    long lastTime = System.nanoTime();8    int interruptMode = 0;9    10    while (!isOnSyncQueue(node)) {11        if (nanosTimeout <= 0L) {12            // 等待超时,将节点从条件等待队列移到外部的锁等待队列13            transferAfterCancelledWait(node);14            break;15        }16        17        // 限定等待的最长时间18        LockSupport.parkNanos(this, nanosTimeout);19        if ((interruptMode = checkInterruptWhileWaiting(node)) != 0)20            break;21
22        23        // 计算下次等待的最长时间24        long now = System.nanoTime();25        nanosTimeout -= now - lastTime;26        lastTime = now;27    }28    29    if (acquireQueued(node, savedState) && interruptMode != THROW_IE)30        interruptMode = REINTERRUPT;31    if (node.nextWaiter != null)32        unlinkCancelledWaiters();33    34    if (interruptMode != 0)35        reportInterruptAfterWait(interruptMode);36    37    return nanosTimeout - (System.nanoTime() - lastTime);38}
4) signal实现分析
91public final void signal() {2 // 验证当前线程持有锁3 if (!isHeldExclusively()) throw new IllegalMonitorStateException();4 5 // 调用doSignal唤醒等待队列中第一个线程6 Node first = firstWaiter;7 if (first != null)8 doSignal(first); // 将节点从条件等待队列移到锁等待队列,调用LockSupport.unpark将线程唤醒9}
第四节 线程本地变量(ThreadLocal)
1. 基本概念和用法
线程本地变量指与线程绑定的变量,即每个线程都有同一个变量的独有拷贝,在Java中,用ThreadLocal表示。
381// 1. 构造方法2public ThreadLocal() // 有一个泛型,表示变量的实际类型3public static <S> ThreadLocal<S> withInitial(Supplier<? extends S> supplier) // 静态方法,指定初始值构造4
5// 2. 获取和设置当前线程变量6public T get()7public void set(T value)8
9// 3. 提供初始值10// 默认无参构造无法提供初始值,通过重写如下方法,可提供初始值11protected T initialValue() // 当调用get方法时,如果之前没有set过,会调用该方法获取初始值,默认实现是返回null12
13// 4. 删掉当前线程对应的值14public void remove() // 如果删掉后,再次调用get,会再调用initialValue获取初始值15
16// 示例1:主线程和子线程操作同一个变量互不干扰17public class ThreadLocalBasic {18 // 定义线程本地变量,存储一个Integer19 static ThreadLocal<Integer> local = new ThreadLocal<>();20
21 public static void main(String[] args) throws InterruptedException {22 // 子线程23 Thread child = new Thread() {24 25 public void run() {26 System.out.println("child thread initial: " + local.get()); // null27 local.set(200);28 System.out.println("child thread final: " + local.get()); // 20029 }30 };31 32 // 主线程33 local.set(100);34 child.start();35 child.join();36 System.out.println("main thread final: " + local.get()); // 10037 }38}
2. 使用场景
1) SimpleDateFormat
ThreadLocal是实现线程安全的一种方案。如前面介绍的SimpleDateFormat类,它是线程不安全的,除了使用锁进行同步或每次都创建新对象外,更好的方式是使用ThreadLocal,每个线程使用自己的DateFormat,就不存在安全问题了,在线程的整个使用过程中,只需要创建一次,又避免了频繁创建的开销。
201public class ThreadLocalDateFormat {2 // 线程本地的DateFormat3 static ThreadLocal<DateFormat> sdf = new ThreadLocal<DateFormat>() {4
5 // 初始值为SimpleDateFormat("yyyy-MM-dd HH:mm:ss")6 7 protected DateFormat initialValue() {8 return new SimpleDateFormat("yyyy-MM-dd HH:mm:ss");9 }10 };11
12 public static String date2String(Date date) {13 return sdf.get().format(date);14 }15
16 public static Date string2Date(String str) throws ParseException {17 return sdf.get().parse(str);18 }19}20
注意:
一般来说,ThreadLocal对象都定义为static,以便于引用。
2) ThreadLocalRandom
ThreadLocal可以降低线程竞争,提高性能。如前面介绍的Random类,即使它是线程安全的,但如果并发访问竞争激烈的话,性能会下降,因此Java并发包提供了ThreadLocalRandom类。
41public static void main(String[] args) {2 ThreadLocalRandom rnd = ThreadLocalRandom.current(); // 获取Random实例3 System.out.println(rnd.nextInt()); // 获取下一个整型4}其中current方法为静态方法,用于获取线程本地的Random实例:
121// current方法2public static ThreadLocalRandom current() {3    return localRandom.get();4}5
6// localRandom变量7private static final ThreadLocal<ThreadLocalRandom> localRandom =8    new ThreadLocal<ThreadLocalRandom>() {9        protected ThreadLocalRandom initialValue() {10            return new ThreadLocalRandom();11        }12};
3) 上下文信息
ThreadLocal的典型用途是提供上下文信息。如在Web服务器中,一个线程执行用户的请求时,多个方法都会用到请求信息、用户身份信息、数据库连接、当前事务等全局信息,如果作为参数传递则很不方便,这时就可以存放在线程本地变量中。
231public class RequestContext {2    public static class Request { //...3    };4
5    private static ThreadLocal<String> localUserId = new ThreadLocal<>(); // 线程本地的UserId6    private static ThreadLocal<Request> localRequest = new ThreadLocal<>(); // 线程本地的Request 7
8    public static String getCurrentUserId() {9        return localUserId.get();10    }11
12    public static void setCurrentUserId(String userId) {13        localUserId.set(userId);14    }15
16    public static Request getCurrentRequest() {17        return localRequest.get();18    }19
20    public static void setCurrentRequest(Request request) {21        localRequest.set(request);22    }23}
在首次获取到信息时,调用set方法进行设置,然后就可以在代码的任意其他地方调用get相关方法进行获取了。
3. 基本实现原理
ThreadLocal对同一个变量是如何实现线程之间的隔离的呢?其实很简单,每个线程(Thread)都有一个ThreadLocalMap,当该线程第一次对某个ThreadLocal变量的操作时,就使用该变量引用作为key,存储值作为value在当前线程的Map中建立一个条目(Entry),后续get/set都将操作该条目,这样,就实现了每个线程都有自己的独立的存储空间。
其中ThreadLocalMap是一个专门用于ThreadLocal的内部类,它的键类型为WeakReference<ThreadLocal>,我们没有提过WeakReference,它与Java的垃圾回收机制有关,使用它,便于回收内存,具体我们就不探讨了。
1) set方法实现
每个线程都有一个ThreadLocalMap,调用set实际上是在线程自己的Map里设置了一个条目,键为当前的ThreadLocal对象,值为value。
231// ThreadLocal.set2public void set(T value) {3    // 1. 获取当前线程的ThreadLocalMap4    Thread t = Thread.currentThread();5    ThreadLocalMap map = getMap(t); 6
7    // 2. 创建和存储value8    if (map != null)9        map.set(this, value);10    else11        createMap(t, value);12}13
14// ThreadLocal.set -> getMap15ThreadLocalMap getMap(Thread t) {16    return t.threadLocals; // 返回线程的实例变量threadLocals,初始值为null17}18
19// ThreadLocal.set -> createMap20void createMap(Thread t, T firstValue) {21    t.threadLocals = new ThreadLocalMap(this, firstValue); 22}23
2) get方法实现
311public T get() {2    // 1. 获取当前线程的ThreadLocalMap3    Thread t = Thread.currentThread();4    ThreadLocalMap map = getMap(t);5
6    // 2. key为当前ThreadLocal变量,value为在当前线程存储的值7    if (map != null) {8        ThreadLocalMap.Entry e = map.getEntry(this);9        if (e != null)10            return (T)e.value;11    }12    13    // 3. 如果未set值(而非值为null),则返回初始值14    return setInitialValue();15}16
17// ThreadLocal.get -> setInitialValue18private T setInitialValue() {19    // 1. 获取初始值20    T value = initialValue();21
22    // 2. 进行set23    Thread t = Thread.currentThread();24    ThreadLocalMap map = getMap(t);25    if (map != null)26        map.set(this, value);27    else28        createMap(t, value);29
30    return value;31}
3) remove方法实现
81public void remove() {2    // 1. 获取当前线程ThreadLocalMap3    ThreadLocalMap m = getMap(Thread.currentThread());4
5    // 2. 移出当前TL变量对应的条目6    if (m != null)7       m.remove(this);8}
4. ThreadLocal与线程池
1) 未清理数据
线程池中的线程是会重用的,如果异步任务使用了ThreadLocal,并且未进行清理操作,会将修改后的值带到了下一个异步任务。
301public class ThreadPoolProblem {2 // 1. ThreadLocal变量3 static ThreadLocal<AtomicInteger> sequencer = new ThreadLocal<AtomicInteger>() {4 5 6 protected AtomicInteger initialValue() {7 return new AtomicInteger(0);8 }9 };10
11 // 2. 异步任务,操作ThreadLocal变量12 static class Task implements Runnable {13
14 15 public void run() {16 AtomicInteger s = sequencer.get(); 17 int initial = s.getAndIncrement();18 System.out.println(initial); // 每次任务开始时,期望初始为019 }20 }21
22 public static void main(String[] args) {23 ExecutorService executor = Executors.newFixedThreadPool(2); // 2个线程24 executor.execute(new Task()); // 3个任务25 executor.execute(new Task());26 executor.execute(new Task()); // 第3个任务复用了第1个任务的线程27 executor.shutdown();28 }29}30
上述代码输出为0 0 1,第1个任务将修改后的结果带到了第3个任务,造成了数据混乱。
2) 解决方法
第一种方法,在Task的run方法开始处,添加set或remove代码,如下所示:
111static class Task implements Runnable {2
3 4 public void run() {5 sequencer.set(new AtomicInteger(0));6 //或者 sequencer.remove();7 8 AtomicInteger s = sequencer.get();9 //...10 }11}第二种方法,将Task的run方法包裹在try/finally中,并在finally语句中调用remove,如下所示:
141static class Task implements Runnable {2
3 4 public void run() {5 try{6 AtomicInteger s = sequencer.get();7 int initial = s.getAndIncrement();8 // 期望初始为09 System.out.println(initial); 10 }finally{11 sequencer.remove();12 }13 }14}第三种方法,扩展线程池ThreadPoolExecutor,重写beforeExecute方法(在线程池将任务交给线程执行之前,会在线程中先调用该方法),通过反射清空所有ThreadLocal变量,这种方式无需修改异步任务的代码,推荐使用。
201static class MyThreadPool extends ThreadPoolExecutor {2 public MyThreadPool(int corePoolSize, int maximumPoolSize, long keepAliveTime, TimeUnit unit,3 BlockingQueue<Runnable> workQueue) {4 super(corePoolSize, maximumPoolSize, keepAliveTime, unit, workQueue);5 }6
7 8 protected void beforeExecute(Thread t, Runnable r) {9 try {10 // 使用反射清空所有ThreadLocal11 Field f = t.getClass().getDeclaredField("threadLocals");12 f.setAccessible(true);13 f.set(t, null);14 } catch (Exception e) {15 e.printStackTrace();16 }17 18 super.beforeExecute(t, r);19 }20}
第五节 并发容器
1. CopyOnWrite的List和Set
1) 写时复制
写时复制是指每次修改都创建一个新数组,然后复制所有内容,但如果数组比较大,修改操作又比较频繁,那么性能是非常低的。
写时复制是解决线程安全问题的一种重要思维,用于各种计算机程序中,比如操作系统内部的进程管理和内存管理等。
注意:
解决线程安全问题还可以通过加锁(synchronized或ReentrantLock)或循环CAS的方式实现。
写时复制的特点是写写互斥、读写兼容(和读写锁最大的差别)、读读兼容,只能保证最终一致性,不能保证实时一致性。
2) CopyOnWriteArrayList
CopyOnWriteArrayList实现了List接口,用法与ArrayList基本一致,主要区别有:
是线程安全的,可以被多个线程并发访问。
在迭代时无需给整个列表加锁,会复制副本进行迭代,并不会抛出ConcurrentModificationException。
以原子方式支持一些复合操作。
21public boolean addIfAbsent(E e) // 不存在才添加,如果添加了,返回true,否则返回false2public int addAllAbsent(Collection<? extends E> c) // 批量添加c中的非重复元素,不存在才添加,返回实际添加的个数
CopyOnWriteArrayList是基于写时复制机制实现的,内部有一个普通数组,在读的时候,直接访问该数组,在写的时候,则会复制一个新数组,在新数组进行修改操作,修改完后再以原子方式设置内部的数组引用。
如果读的过程中,发生了写操作,可能内部的数组引用已经被修改了,但不会影响读操作,它依旧访问原数组内容。
换句话说,数组内容是只读的,写操作都是通过新建数组,然后原子性的修改数组引用来实现的。
在CopyOnWriteArrayList中,读不需要锁,可以并行,读和写也可以并行,但多个线程不能同时写,每个写操作都需要先获取锁。
下面是一些常用方法的代码实现:
371// 1. 主要成员变量2private volatile transient Object[] array; // 内部数组3transient final ReentrantLock lock = new ReentrantLock(); // 锁4
5// 2. add6public boolean add(E e) {7    final ReentrantLock lock = this.lock; 8    lock.lock(); // 2.1 加锁9    try {10        // 2.2 复制数组11        Object[] elements = getArray();12        int len = elements.length;13        Object[] newElements = Arrays.copyOf(elements, len + 1);14        15        // 2.2 在新数组添加元素16        newElements[len] = e; 17        18        // 2.3 设置数组引用19        setArray(newElements);20        return true;21    } finally {22        lock.unlock(); // 2.4 解锁23    }24}25
26// 3. indexOf27public int indexOf(Object o) {28    // 3.1 保存数组引用29    Object[] elements = getArray();30    // 3.2 通过保存的数组引用进行读31    return indexOf(o, elements, 0, elements.length); // 这个indexOf方法访问的所有数据都是通过参数传递的,数组内容也不会被修改,不存在并发问题32}33
34// 4. 迭代器35public Iterator<E> iterator() {36    return new COWIterator<E>(getArray(), 0); // COWIterator是内部类,传递给它的是不变的数组,只能读该数组,不支持修改37}
注意:
在JDK8以前,CopyOnWriteArrayList返回的迭代器不支持修改相关的操作,如listIterator.set(1)、Collections.sort(list)等。
3) CopyOnWriteArraySet
CopyOnWriteArraySet实现了Set接口,不包含重复元素,用法非常简单,就不再赘述。它是基于CopyOnWriteArrayList实现的,因此性能比较低,不适用于元素个数特别多的集合。
下面是一些常用方法的代码实现:
171// 1. 主要成员变量2private final CopyOnWriteArrayList<E> al;3
4// 2. 构造方法5public CopyOnWriteArraySet() {6    al = new CopyOnWriteArrayList<E>();7}8
9// 3. add10public boolean add(E e) {11    return al.addIfAbsent(e);12}13
14// 4. contains15public boolean contains(Object o) {16    return al.contains(o);17}
注意:
Java并发包中没有与HashSet对应的并发容器,但可以使用Collections.newSetFromMap方法基于ConcurrentHashMap构建一个。
2. ConcurrentHashMap
1) ConcurrentHashMap
ConcurrentHashMap是HashMap的并发版本,主要区别如下:
线程安全,并且支持高并发,读操作完全并行,写操作支持一定程度的并行。
在迭代时无需给整个列表加锁,表现为弱一致性,并不会抛出ConcurrentModificationException。
以原子方式支持一些复合操作。
81// 条件更新,如果Map中没有key,设置key为value,返回原来key对应的值,如果没有,返回null2V putIfAbsent(K key, V value);3// 条件删除,如果Map中有key,且对应的值为value,则删除,如果删除了,返回true,否则false4boolean remove(Object key, Object value);5// 条件替换,如果Map中有key,且对应的值为oldValue,则替换为newValue,如果替换了,返回ture,否则false6boolean replace(K key, V oldValue, V newValue);7// 条件替换,如果Map中有key,则替换值为value,返回原来key对应的值,如果原来没有,返回null8V replace(K key, V value);
扩展:
HashMap在并发更新的情况下,链表结构可能形成环(在多个线程同时扩容哈希表的时候),出现死循环,占满CPU。
2) 高并发性
ConcurrentHashMap是如何实现高并发的呢?一般的同步容器使用synchronized,所有方法都竞争同一个锁。而ConcurrentHashMap采用分段锁技术,将数据分为多个段,而每个段有一个独立的锁,每一个段相当于一个独立的哈希表,分段的依据也是哈希值,无论是保存键值对还是根据键查找,都先根据键的哈希值映射到段,再在段对应的哈希表上进行操作。
采用分段锁,可以大大提高并发度,多个段之间可以并行读写。默认情况下,段是16个,可通过构造方法进行设置:
21// 构造时设置分段数,其中concurrencyLevel表示并行更新的线程个数,将会转为2的整数次幂2public ConcurrentHashMap(int initialCapacity, float loadFactor, int concurrencyLevel) 在对每个段的数据进行读写时,ConcurrentHashMap也不是简单的使用锁进行同步,内部使用了CAS,对一些写采用原子方式,实现比较复杂,我们就不介绍了,实现的效果是,对于写操作,需要获取锁,不能并行,但是读操作可以,多个读可以并行,写的同时也可以读,这使得ConcurrentHashMap的并行度远远大于同步容器。
3) 弱一致性
ConcurrentHashMap的迭代器创建后,就会按照哈希表结构遍历每个元素,但在遍历过程中,内部元素可能会发生变化,如果变化发生在已遍历过的部分,迭代器就不会反映出来,而如果变化发生在未遍历过的部分,迭代器就会发现并反映出来,这就是弱一致性。
类似的情况还会出现在ConcurrentHashMap的另一个方法:
21//批量添加m中的键值对到当前Map2public void putAll(Map<? extends K, ? extends V> m) 该方法并非原子操作,而是调用put方法逐个元素进行添加的,在该方法没有结束的时候,部分修改效果就会体现出来。
3. 基于SkipList的Map和Set
1) SkipList
SkipList称为跳表或跳跃表,是一种基于链表的数据结构,在链表的基础上加了多层索引,使其更易于实现高效并发算法。
下面是一个包含3, 6, 7, 9, 12, 17, 19, 21, 25, 26元素的跳表结构,两条线展示了查找值19和8的过程:

2) ConcurrentSkipListMap
ConcurrentSkipListMap实现了ConcurrentMap和SortedMap等接口,默认按键自然有序,可以传递比较器自定义排序,用法与TreeMap类似,主要区别如下:
线程安全,可并行读写,所有操作都是无阻塞的,且没有使用锁。
在迭代时无需给整个列表加锁,表现为弱一致性,并不会抛出ConcurrentModificationException,但putAll/clear等方法不是原子性的。
以原子方式支持一些复合操作。
81public static void main(String[] args) {2 Map<String, String> map = new ConcurrentSkipListMap<>(Collections.reverseOrder());3 map.put("a", "abstract");4 map.put("c", "call");5 map.put("b", "basic");6 System.out.println(map.toString()); // {c=call, b=basic, a=abstract}7}8
注意:
ConcurrentSkipListMap的size方法不是常量操作,需要遍历所有元素,且遍历结束后size可能已改变,因此一般用处不大。
3) ConcurrentSkipListSet
TreeSet是基于TreeMap实现的,与此类似,ConcurrentSkipListSet也是基于ConcurrentSkipListMap实现的。
5. 并发队列
Java并发包中提供了丰富的队列类,简单列举如下:
| 队列类型 | 队列类名 |
|---|---|
| 无锁非阻塞并发队列 | ConcurrentLinkedQueue、ConcurrentLinkedDeque |
| 普通阻塞队列 | ArrayBlockingQueue、LinkedBlockingQueue、LinkedBlockingDeque |
| 优先级阻塞队列 | PriorityBlockingQueue |
| 延时阻塞队列 | DelayQueue |
| 其他阻塞队列 | SynchronousQueue、LinkedTransferQueue |
这些队列迭代都不会抛出ConcurrentModificationException,都是弱一致的,后面就不单独强调了。
注意:
无锁非阻塞是指这些队列不使用锁,所有操作总是可以立即执行,主要通过循环CAS实现并发安全。
阻塞队列是指使用锁和条件,很多操作都需要先获取锁或满足特定条件,获取不到锁或等待条件时,会等待(即阻塞)。
1) 无锁非阻塞并发队列
| 队列类名 | 实现接口 | 数据结构 | 基本特性 |
|---|---|---|---|
| ConcurrentLinkedQueue | Queue(先进先出队列,尾进头出) | 单向链表 | 无界(没有限制大小)、szie方法需遍历 |
| ConcurrentLinkedDeque | Deque(双端队列) | 双向链表 | 无界(没有限制大小)、szie方法需遍历 |
这两个类最基础的原理是循环CAS,ConcurrentLinkedQueue的算法基于一篇论文Simple, Fast, and Practical Non-Blocking and Blocking Concurrent Queue Algorithms,ConcurrentLinkedDeque扩展了ConcurrentLinkedQueue的技术,具体实现都非常复杂,我们就不探讨了。
2) 普通阻塞队列
除了刚介绍的两个队列,其他队列都是阻塞队列,都实现了接口BlockingQueue,在入队/出队时可能等待,主要方法有:
81// 1. 入队2void put(E e) throws InterruptedException; // 如果队列满,等待直到队列有空间3boolean offer(E e, long timeout, TimeUnit unit) throws InterruptedException; // 如果队列满,最多等待指定的时间,如果超时还是满,返回false4
5// 2. 出队6E take() throws InterruptedException; // 如果队列空,等待直到队列不为空,返回头部元素7E poll(long timeout, TimeUnit unit) throws InterruptedException; // 如果队列空,最多等待指定的时间,如果超时还是空,返回null8
普通阻塞队列是最常用的队列,可用于生产者/消费者模式等。
| 队列类名 | 实现接口 | 数据结构 | 基本特性 |
|---|---|---|---|
| ArrayBlockingQueue | Queue(先进先出队列,尾进头出) | 循环数组 | 有界(创建时指定大小) |
| LinkedBlockingQueue | Queue(先进先出队列,尾进头出) | 单向链表 | 默认为无界,可以在创建时指定最大长度 |
| LinkedBlockingDeque | Deque(双端队列) | 双向链表 | 默认为无界,可以在创建时指定最大长度 |
注意:
ArrayBlockingQueue的大小在运行过程中不会改变,而同样基于循环数组实现的ArrayDeque是无界的,会自动扩展。
上述普通阻塞式队列都是使用显式锁ReentrantLock和显式条件Condition实现的。
3) 优先级阻塞队列
| 队列类名 | 实现接口 | 数据结构 | 基本特性 |
|---|---|---|---|
| PriorityBlockingQueue | BlockingQueue(队列为空时,take阻塞) | 堆(要求元素可比较) | 无界(没有限制大小),优先级高的先出队 |
PriorityBlockingQueue使用了一个锁ReentrantLock保护所有访问,使用了一个条件协调阻塞等待。
4) 延时阻塞队列
| 队列类名 | 实现接口 | 数据结构 | 基本特性 |
|---|---|---|---|
| DelayQueue<E extends Delayed> | BlockingQueue | 堆(要求元素可比较) | 无界(没有限制大小),按元素的延时时间出队 |
DelayQueue是一种特殊的优先级队列,要求每个元素都实现Delayed接口,该接口的声明为:
41// Delayed接口(可比较且可延迟的)2public interface Delayed extends Comparable<Delayed> {3 long getDelay(TimeUnit unit); // 剩余延迟时间,0表示不再延迟4}只有元素的延迟时间到期后,才能被取走,也就是说,take方法总是返回第一个过期的元素,如果没有,则阻塞等待。
651// 使用DelayQueue实现定时任务2public class DelayedQueueDemo {3 private static final AtomicLong taskSequencer = new AtomicLong(0); 4
5 // 1. 定时任务(Delayed接口实现类)6 static class DelayedTask implements Delayed {7 private long runTime; // 开始运行的时间(第一次序)8 private long sequence; // 运行顺序(第二次序)9 private Runnable task; // 实际执行的任务10
11 public DelayedTask(int delayedSeconds, Runnable task) {12 this.runTime = System.currentTimeMillis() + delayedSeconds * 1000; // 当前时间+延时时间13 this.sequence = taskSequencer.getAndIncrement(); // 自增ID14 this.task = task;15 }16
17 // 1.1 实现compareTo方法18 19 public int compareTo(Delayed o) {20 if (o == this) {21 return 0;22 }23 if (o instanceof DelayedTask) {24 DelayedTask other = (DelayedTask) o;25 if (runTime < other.runTime) {26 return -1;27 } else if (runTime > other.runTime) {28 return 1;29 } else if (sequence < other.sequence) {30 return -1;31 } else {32 return 1;33 }34 }35 throw new IllegalArgumentException();36 }37
38 // 1.2 实现getDelay方法39 40 public long getDelay(TimeUnit unit) {41 return unit.convert(runTime - System.currentTimeMillis(), TimeUnit.MICROSECONDS);42 }43
44 public Runnable getTask() {45 return task;46 }47 }48
49 // 2. 启动定时任务50 public static void main(String[] args) throws InterruptedException {51 // 2.1 构建延时队列52 DelayQueue<DelayedTask> tasks = new DelayQueue<>();53 tasks.put(new DelayedTask(2, new Runnable() {54 55 public void run() {56 System.out.println("execute delayed task");57 }58 }));59
60 // 2.2 从延时队列中取任务执行,如果未到时间则阻塞61 DelayedTask task = tasks.take();62 task.getTask().run();63 }64}65
DelayQueue内部是基于PriorityQueue实现的,它使用一个锁ReentrantLock保护所有访问,使用一个条件available表示头部是否有元素,当头部元素的延时未到时,take操作会根据延时计算需睡眠的时间,然后睡眠,如果在此过程中有新的元素入队,且成为头部元素,则阻塞睡眠的线程会被提前唤醒然后重新检查。以上是基本思路,DelayQueue的实现有一些优化,以减少不必要的唤醒,具体我们就不探讨了。
5) 实时队列
SynchronousQueue不是传统意义上的存储队列,它不存储元素,它的入队操作要等待另一个线程的出队操作,反之亦然。
如果没有其他线程在等待从队列中接收元素,put操作就会等待,take操作需要等待其他线程往队列中放元素,如果没有,也会等待。
它适用于两个线程之间直接传递信息、事件或任务。
6) 传递队列
LinkedTransferQueue实现了TransferQueue接口,TransferQueue是BlockingQueue的子接口,但增加了一些额外功能,生产者在往队列中放元素时,可以等待消费者接收后再返回,适用于一些消息传递类型的应用中。TransferQueue的接口定义为:
71public interface TransferQueue<E> extends BlockingQueue<E> {2 boolean tryTransfer(E e); // 如果有消费者在等待(执行take或限时的poll),直接转给消费者,返回true,否则返回false,不入队3 void transfer(E e) throws InterruptedException; // 如果有消费者在等待,直接转给消费者,否则入队,阻塞等待直到被消费者接收后再返回4 boolean tryTransfer(E e, long timeout, TimeUnit unit) throws InterruptedException // 如果有消费者在等待,直接转给消费者,返回true,否则入队,阻塞等待限定的时间,如果最后被消费者接收,返回true5 boolean hasWaitingConsumer(); // 是否有消费者在等待6 int getWaitingConsumerCount(); // 等待的消费者个数7}LinkedTransferQueue是基于链表实现的,无界的TransferQueue,具体实现比较复杂,我们就不探讨了。
第六节 其它协作工具
在一些特定的同步协作场景中,相比使用最基本的wait/notify或显示锁/条件,使用并发同步协作工具更为方便,效率更高。
1. ReentrantReadWriteLock
1) 基本概念
前面介绍的synchronized锁或ReentrantLock锁,不区分读操作或写操作,在访问前都需要获取锁。但在一些场景中,多个线程的读操作完全可以并行,在读多写少时,可以明显提高性能,这就是读写锁。
在Java并发包中,接口ReadWriteLock表示读写锁,主要实现类是可重入读写锁ReentrantReadWriteLock。
91// 读写锁接口2public interface ReadWriteLock {3    Lock readLock(); // 读操作使用读锁,多个读线程可以并行4    Lock writeLock(); // 写操作使用写锁,写锁是独占的5}6
7// 可重入读写锁8public ReentrantLock()9public ReentrantLock(boolean fair) // fair-是否公平,默认为false
2) 基本示例
341// 使用ReentrantReadWriteLock实现一个缓存类MyCache2public class MyCache {3    private Map<String, Object> map = new HashMap<>();4    private ReentrantReadWriteLock readWriteLock = new ReentrantReadWriteLock(); // 读写锁5    private Lock readLock = readWriteLock.readLock(); // 读锁6    private Lock writeLock = readWriteLock.writeLock(); // 写锁7
8    public Object get(String key) {9        readLock.lock(); // 读前加读锁10        try {11            return map.get(key);12        } finally {13            readLock.unlock(); // 读完释放读锁14        }15    }16
17    public Object put(String key, Object value) {18        writeLock.lock(); // 写前加写锁19        try {20            return map.put(key, value);21        } finally {22            writeLock.unlock(); // 写后释放写锁23        }24    }25
26    public void clear() {27        writeLock.lock(); // 写前加写锁28        try {29            map.clear();30        } finally {31            writeLock.unlock(); // 写后释放写锁32        }33    }34}
3) 基本原理
读写锁内部有一个等待队列存放等待的线程,有一个整数变量表示锁的状态,读锁和写锁各用16位表示。
在获取写锁时,必须确保当前没有其他线程持有任何锁,否则就等待。
在写锁释放时,会将等待队列中的第一个线程唤醒,唤醒的可能是等待读锁的,也可能是等待写锁的。
在获取读锁时,只要写锁没有被其它线程持有,就可以获取成功。此外,在获取到读锁后,它会检查等待队列,逐个唤醒最前面的等待读锁的线程,直到第一个等待写锁的线程为止。
在读锁释放时,会检查读锁和写锁数是否都变为了0,如果是,则会唤醒等待队列中的下一个线程。
2. 信号量(Semaphore)
1) 基本概念
前面介绍的锁一般只允许一个线程同时访问资源,但是部分场景需要允许指定数目的线程访问,类似于限制最大并发数。
信号量类Semaphore就是用来解决这类问题的,它可以限制对资源的并发访问数:
161// 构造方法2public Semaphore(int permits) // permits-最大许可数量3public Semaphore(int permits, boolean fair)4 5// 直接获取许可(可能阻塞)6public void acquire() throws InterruptedException // 阻塞获取许可7public void acquireUninterruptibly() // 阻塞获取许可,不响应中断8public void acquire(int permits) throws InterruptedException // 批量获取多个许可9public void acquireUninterruptibly(int permits) // 批量获取多个许可,不响应中断10 11// 尝试获取许可12public boolean tryAcquire() 13public boolean tryAcquire(int permits, long timeout, TimeUnit unit) throws InterruptedException // 限定等待时间14 15//释放许可16public void release()
2) 基本示例
231// 限制并发访问的用户不超过1002public class AccessControlService {3    public static class ConcurrentLimitException extends RuntimeException {4        private static final long serialVersionUID = 1L;5    }6
7    private static final int MAX_PERMITS = 100; // 最大并发数8    private Semaphore permits = new Semaphore(MAX_PERMITS, true); // 信号量9
10    public boolean login(String name, String password) {11        // 尝试获取许可,超过则报错12        if (!permits.tryAcquire()) {13            throw new ConcurrentLimitException(); // 同时登录用户数超过限制14        }15        16        // ..其他验证17        return true;18    }19
20    public void logout(String name) {21        permits.release(); // 释放许可22    }23}
注意:
Semaphore是不可重入的,即使在同一个线程,每一次的acquire调用都会消耗一个许可。
一般锁只能由持有锁的线程释放,而Semaphore表示的只是一个许可数,任意线程都可以调用其release方法。
因此,即使将permits设置为1,它和一般的锁还是有本质的不同。
3) 基本原理
Semaphore的基本原理比较简单,也是基于AQS实现的,permits表示共享的锁个数,acquire方法就是检查锁个数是否大于0,大于则减一,获取成功,否则就等待,release就是将锁个数加一,唤醒第一个等待的线程。
3. 倒计时门栓(CountDownLatch)
1) 基本概念
倒计时门栓CountDownLatch类似于一次性开关,一开始是关闭的,所有希望通过该门的线程都需要等待。它有一个倒计时,当变为0后,门栓打开,等待的所有线程都可以通过,并且开关是一次性的,打开后就不能再关上了。
91// 构造方法2public CountDownLatch(int count) // count-计数,即参与的线程个数3    4// 等待计数变为05public void await() throws InterruptedException // 检查计数是否为0,如果大于0,就等待6public boolean await(long timeout, TimeUnit unit) throws InterruptedException // 可以设置最长等待时间7
8// 减少计数9public void countDown() // 检查计数,如果已经为0,直接返回,否则减少计数,如果新的计数变为0,则唤醒所有等待的线程
2) 基本示例
前面介绍过门栓的两种应用场景,一种是同时开始,另一种是等待结束,它们都有两类线程,互相需要同步,重写代码如下:
741// 同时开始2public class RacerWithCountDownLatch {3 // 子线程:等待开始4 static class Racer extends Thread {5 CountDownLatch latch; // 倒计时门栓6
7 public Racer(CountDownLatch latch) {8 this.latch = latch; 9 }10
11 12 public void run() {13 try {14 this.latch.await(); // 先等待15 System.out.println(getName() + " start run "+System.currentTimeMillis());16 } catch (InterruptedException e) {17 }18 }19 }20
21 // 主线程:发起开始指令22 public static void main(String[] args) throws InterruptedException {23 int num = 10;24 CountDownLatch latch = new CountDownLatch(1); // 倒计时门栓,计数为125 Thread[] racers = new Thread[num];26 for (int i = 0; i < num; i++) {27 racers[i] = new Racer(latch);28 racers[i].start();29 }30 Thread.sleep(1000);31 latch.countDown(); // 计数减1后变为0,唤醒所有线程,同时开始32 }33}34
35// 等待结束36public class MasterWorkerDemo {37 // 子线程38 static class Worker extends Thread {39 CountDownLatch latch; // 倒计时门栓40
41 public Worker(CountDownLatch latch) {42 this.latch = latch;43 }44
45 46 public void run() {47 try {48 // 业务代码49 Thread.sleep((int) (Math.random() * 1000));50
51 // 模拟异常52 if (Math.random() < 0.02) {53 throw new RuntimeException("bad luck");54 }55 } catch (InterruptedException e) {56 } finally {57 this.latch.countDown(); // 执行完后计数-158 }59 }60 }61
62 // 主线程63 public static void main(String[] args) throws InterruptedException {64 int workerNum = 100;65 CountDownLatch latch = new CountDownLatch(workerNum); // 倒计时门栓,计数为100,即线程数66 Worker[] workers = new Worker[workerNum];67 for (int i = 0; i < workerNum; i++) {68 workers[i] = new Worker(latch);69 workers[i].start();70 }71 latch.await(); // 等待所有线程结束72 System.out.println("collect worker results");73 }74}注意:
countDown的调用应该放到finally语句中,确保在工作线程发生异常的情况下也会被调用,使主线程能够从await调用中返回。
4. 循环栅栏(CyclicBarrier)
1)基本概念
循环栅栏CyclicBarrier类似于一个集合点,只有全部线程都到达后才能进行下一步,它是循环的,可以用作重复的同步,特别适用于并行迭代计算,每个线程负责一部分计算,然后集合点等待其他线程完成,所有线程到齐后,交换数据和计算结果,再进行下一次迭代。
141// 1. 构造方法2// parties-参与的线程个数3// barrierAction-集合点动作:当所有线程到达集合点后,在所有线程执行下一步动作前,运行参数中的动作4//                          这个动作由最后一个到达集合点的线程执行5public CyclicBarrier(int parties-) 6public CyclicBarrier(int parties, Runnable barrierAction) 7
8// 2. 等待其它线程9// 表示自己已经到达,等待其它线程,如果自己是最后一个到达的,就执行集合点动作10// 集合点动作执行后,唤醒所有等待的线程,然后重置内部的同步计数,以循环使用11// await可以被中断或限定最长等待时间,中断或超时后会抛出栅栏破坏异常BrokenBarrierException12public int await() throws InterruptedException, BrokenBarrierException 13public int await(long timeout, TimeUnit unit) throws InterruptedException, BrokenBarrierException, TimeoutException14
注意:
只要有一个线程抛出BrokenBarrierException,就会导致所有在调用await的线程都抛出BrokenBarrierException。
此外,如果栅栏动作(集合点动作)抛出了异常,也会破坏栅栏。
2) 基本示例
611// 多个游客线程分别在集合点A和B同步2public class CyclicBarrierDemo {3 static class Tourist extends Thread {4 CyclicBarrier barrier;5
6 public Tourist(CyclicBarrier barrier) {7 this.barrier = barrier;8 }9
10 11 public void run() {12 try {13 // 模拟先各自独立运行14 Thread.sleep((int) (Math.random() * 1000));15
16 // 集合点A17 barrier.await();18
19 System.out.println(this.getName() + " arrived A "20 + System.currentTimeMillis());21
22 // 集合后模拟再各自独立运行23 Thread.sleep((int) (Math.random() * 1000));24
25 // 集合点B26 barrier.await();27 System.out.println(this.getName() + " arrived B "28 + System.currentTimeMillis());29 } catch (InterruptedException e) {30 } catch (BrokenBarrierException e) {31 }32 }33 }34
35 public static void main(String[] args) {36 int num = 3;37 Tourist[] threads = new Tourist[num];38 CyclicBarrier barrier = new CyclicBarrier(num, new Runnable() {39
40 41 public void run() {42 System.out.println("all arrived " + System.currentTimeMillis()43 + " executed by " + Thread.currentThread().getName());44 }45 });46 for (int i = 0; i < num; i++) {47 threads[i] = new Tourist(barrier);48 threads[i].start();49 }50 }51}52
53// 输出如下,多个线程到达A和B的时间是一样的,使用CyclicBarrier,达到了重复同步的目的54all arrived 1490053578552 executed by Thread-155Thread-1 arrived A 149005357855556Thread-2 arrived A 149005357855557Thread-0 arrived A 149005357855558all arrived 1490053578889 executed by Thread-059Thread-0 arrived B 149005357889060Thread-2 arrived B 149005357889061Thread-1 arrived B 1490053578890
3) 对比CountDownLatch
CyclicBarrier与CountDownLatch可能容易混淆,它们主要有两点区别:
倒计时门栓涉及两个角色,而循环栅栏只涉及一个角色。
倒计时门栓的参与线程分为两类,一类负责倒计时,一类则在等待倒计时变为0,每类线程都可以是多个。
循环栅栏的参与线程都是一类,动作都是在集合点等待最后一个到达的线程,只不过最后一个线程会执行一个额外的动作。
倒计时门栓是一次性的,而循环栅栏是可以重复利用的。
第03章_异步执行服务
第一节 异步任务执行服务
异步任务执行服务是一套框架,将要执行的并发任务与线程的管理相分离。对于使用者,只需关注任务本身,如提交任务、获取结果、取消任务等,而由服务提供者执行任务,如创建线程、任务调度、关闭线程等,大大简化了并发业务的开发。
1. 基本接口
1) Runnable和Callable
Runnable和Callable表示要执行的异步任务,其中Runnable没有返回结果,且不可以抛异常,而Callable有返回结果,也允许抛异常。
2) Executor和ExecutorService
Executor表示最简单的执行服务(执行器),可以执行一个Runnable,没有返回结果。
31public interface Executor {2 void execute(Runnable command);3}注意:
Executor接口并没有规定如何执行任务,它可以创建新的线程,复用线程池中的线程或在调用者线程执行。
ExecutorService扩展了Executor,支持提交Runnable及Callable等多种类型的异步任务,并用Future封装返回结果。
271public interface ExecutorService extends Executor {2 // 1. 提交异步任务 3 <T> Future<T> submit(Callable<T> task); // 提交Callable,返回实际结果4 <T> Future<T> submit(Runnable task, T result); // 提交Runnable,结果为result5 Future<?> submit(Runnable task); // 提交Runnable,结果为null6 7 // 2. 获取执行服务状态8 boolean isTerminated(); // 是否所有任务都已结束(isDone为true)9 boolean isShutdown(); // 执行服务是否被关闭(注意:即使执行服务被关闭,但可能还有任务在继续执行)10 11 // 3. 等待所有任务结束(即等待isTerminated为true)12 boolean awaitTermination(long timeout, TimeUnit unit) throws InterruptedException; // 限定等待的时间,如果在限期内都结束了则返回true,否则返回false13 14 // 4. 关闭执行服务(被调用后isShutdown会返回true)15 // 关闭方法不会阻塞等待,而是直接返回,但返回后可能还有任务再继续执行,只是不继续接收新任务了16 void shutdown(); // 已提交但尚未开始的任务仍会继续执行17 List<Runnable> shutdownNow(); // 已提交但尚未开始的任务会被终止,已执行的任务会尝试中断,返回已提交但尚未开始的任务列表18 19 // 5. 批量提交任务(一):等待所有任务完成,即返回的Future列表,它们的isDone方法都返回true(注意:isDone不代表成功,也可能是抛异常或被取消了)20 <T> List<Future<T>> invokeAll(Collection<? extends Callable<T>> tasks) throws InterruptedException; 21 <T> List<Future<T>> invokeAll(Collection<? extends Callable<T>> tasks, long timeout, TimeUnit unit) throws InterruptedException; // 指定等待时间,如果超时后有的任务没完成,就会被取消22 23 // 6. 批量提交任务(二):等待任意一个“成功”完成,然后返回该任务结果,取消其它任务。24 // 如果所有任务都发生了异常,则抛出ExecutionException。25 <T> T invokeAny(Collection<? extends Callable<T>> tasks) throws InterruptedException, ExecutionException; 26 <T> T invokeAny(Collection<? extends Callable<T>> tasks, long timeout, TimeUnit unit) throws InterruptedException, ExecutionException, TimeoutException; // 限时完成任意一个,否则抛出TimeoutException27}
3) Future
Future表示异步任务的结果,通过Future可以查询异步任务的状态、获取最终结果、取消任务等。
141public interface Future<V> {2 // 1. 查询任务状态3 boolean isDone(); // 是否结束(不管什么原因结束都算,可能是正常结束,抛异常或被取消等)4 boolean isCancelled(); // 是否被取消(只要cancel返回了true,之后的isCancelled都会返回true,即使执行任务的线程还未真正结束)5 6 // 2. 获取任务结果7 V get() throws InterruptedException, ExecutionException; // 无限期等待结果8 V get(long timeout, TimeUnit unit) throws InterruptedException,ExecutionException, TimeoutException; // 超时等待结果,超时则抛出TimeoutException9 10 // 3. 取消任务11 // 如果任务还未开始,则不再运行。但如果任务已经在运行,则不一定能取消。12 // 参数mayInterruptIfRunning表示是否调用interrupt方法中断正在执行的任务,但中断不一定能取消线程13 boolean cancel(boolean mayInterruptIfRunning); // 如果任务已完成、或已经取消、或由于某种原因不能取消,cancel返回false,否则返回true14}关于Futrue的get方法,在调用后有四种可能情形:
任务正常完成:返回其执行结果,如果任务是Runnable且没有提供结果,返回null。
任务抛出异常:会将异常包装为ExecutionException重新抛出,通过异常的getCause方法可以获取原异常。
任务被取消了:会抛出异常CancellationException。
get方法被中断:会抛出InterruptedException。
注意:
Future是一个重要的概念,是实现"任务的提交"与"任务的执行"相分离的关键,是其中的"纽带",使用者和服务提供者通过它隔离各自的关注点,同时进行协作。
2. ExecutorService的使用用法
1) 基本用法
341public class BasicDemo {2 // 1. 有一个Callable任务3 static class Task implements Callable<Integer> {4 5 public Integer call() throws Exception {6 int sleepSeconds = new Random().nextInt(1000);7 Thread.sleep(sleepSeconds);8 return sleepSeconds;9 }10 }11
12 // 2. 通过异步框架执行服务13 public static void main(String[] args) throws InterruptedException {14 // 2.1 通过工厂类Executors创建一个执行服务15 ExecutorService executor = Executors.newSingleThreadExecutor(); // 使用一个线程执行所有服务16 17 // 2.2 提交异步任务18 Future<Integer> future = executor.submit(new Task());19
20 // 2.3 模拟执行其他任务21 Thread.sleep(100);22
23 // 2.4 获取异步任务结果24 try {25 System.out.println(future.get());26 } catch (ExecutionException e) {27 e.printStackTrace();28 }29 30 // 2.5 关闭执行服务31 executor.shutdown();32 }33}34
2) invokeAll示例
521// 使用jsoup同时下载并分析两个URL的标题,输出标题内容2public class InvokeAllDemo {3 // 1. 定义异步任务:传入URL,返回标题内容4 static class UrlTitleParser implements Callable<String> {5 private String url;6
7 public UrlTitleParser(String url) {8 this.url = url;9 }10
11 12 public String call() throws Exception {13 Document doc = Jsoup.connect(url).get();14 Elements elements = doc.select("head title");15 if (elements.size() > 0) {16 return elements.get(0).text();17 }18 return null;19 }20 }21
22 // 2. 执行异步任务23 public static void main(String[] args) {24 // 2.1 创建执行服务25 ExecutorService executor = Executors.newFixedThreadPool(10); // 并发线程池26 27 // 2.2 整理任务列表28 String url1 = "http://www.cnblogs.com/swiftma/p/5396551.html";29 String url2 = "http://www.cnblogs.com/swiftma/p/5399315.html";30 Collection<UrlTitleParser> tasks = Arrays.asList(new UrlTitleParser[] {new UrlTitleParser(url1), new UrlTitleParser(url2) });31 32 try {33 // 2.3 提交执行34 List<Future<String>> results = executor.invokeAll(tasks, 10, TimeUnit.SECONDS); // 限时10s完成,否则取消35 36 // 2.4 打印执行结果37 for (Future<String> result : results) {38 try {39 System.out.println(result.get());40 } catch (ExecutionException e) {41 e.printStackTrace();42 }43 }44 } catch (InterruptedException e) {45 e.printStackTrace();46 }47
48 // 3. 关闭执行服务49 executor.shutdown();50 }51}52
3. ExecutorService的实现原理
ExecutorService的主要实现类是ThreadPoolExecutor,它是基于线程池实现的,关于线程池我们下节再介绍。ExecutorService有一个抽象实现类AbstractExecutorService,本节,我们简要分析其原理,并基于它实现一个简单的ExecutorService。
1) AbstractExecutorService
ExecutorService最基本的方法是submit,它的实现代码如下:
61public <T> Future<T> submit(Callable<T> task) {2 if (task == null) throw new NullPointerException();3 RunnableFuture<T> ftask = newTaskFor(task); // 1. 生成了一个RunnableFuture4 execute(ftask); // 2. 传递给execute方法进行执行5 return ftask;6}其中RunnableFuture是一个接口,既扩展了Runnable,又扩展了Future。作为Runnable,它表示要执行的任务,传递给execute方法进行执行;作为Future,它又表示任务执行的异步结果。
2) FutureTask
FutureTask是RunnableFuture的实现类,它有如下一些变量:
51private Callable<V> callable; // 待执行的任务2private volatile int state; // 任务状态,取值为1~6,分别表示NEW(初始状态或正在运行)、COMPLETING(临时状态,即将结束在设置结果)、NORMAL(正常结束)、EXCEPTIONAL(异常结束)、CANCELLED(被取消)、INTERRUPTING(中断中)、INTERRUPTED(被中断)3private Object outcome; // 最终的执行结果或异常4private volatile Thread runner; // 运行任务的线程5private volatile WaitNode waiters; // 等待任务执行结果的线程,是一个单向链表在构造时,初始化待执行任务callable和任务状态state:
41public FutureTask(Runnable runnable, V result) {2 this.callable = Executors.callable(runnable, result); // 将Runnable参数转化为Callable3 this.state = NEW; 4}任务执行服务会使用一个线程执行FutureTask的run方法,run()代码为:
311public void run() {2 if (state != NEW || !UNSAFE.compareAndSwapObject(this, runnerOffset, null, Thread.currentThread()))3 return;4 5 try {6 Callable<V> c = callable;7 if (c != null && state == NEW) {8 V result;9 boolean ran;10 // 1. 调用callable的call方法,并捕获任何异常11 try {12 result = c.call(); 13 ran = true; 14 } catch (Throwable ex) {15 // 3. 如果执行过程发生异常,调用setException设置异常,异常也是保存到outcome,但状态不一样16 // set和setException除了设置结果,修改状态外,还会调用finishCompletion,它会唤醒所有等待结果的线程17 result = null;18 ran = false;19 setException(ex);20 }21 22 // 2. 如果正常执行完成,调用set设置结果,保存到outcome23 if (ran) set(result);24 }25 } finally {26 runner = null;27 int s = state;28 if (s >= INTERRUPTING)29 handlePossibleCancellationInterrupt(s);30 }31}对于任务提交者,它通过FutureTask的get方法获取结果,限时等待的get方法代码如下:
121public V get(long timeout, TimeUnit unit)2 throws InterruptedException, ExecutionException, TimeoutException {3 if (unit == null) throw new NullPointerException();4 5 // 1. 如果任务还未执行完毕,就等待6 int s = state;7 if (s <= COMPLETING && (s = awaitDone(true, unit.toNanos(timeout))) <= COMPLETING)8 throw new TimeoutException();9 10 // 2. 调用report报告结果11 return report(s);12}其中report根据状态返回结果或抛出异常:
121private V report(int s) throws ExecutionException {2 Object x = outcome;3 4 // 任务正常结束,返回结果5 if (s == NORMAL) return (V)x;6 7 // 任务被取消或被中断8 if (s >= CANCELLED) throw new CancellationException();9 10 // 任务执行异常11 throw new ExecutionException((Throwable)x);12}FutureTask的cancel方法可以取消任务,代码如下:
241public boolean cancel(boolean mayInterruptIfRunning) {2 // 1. 如果任务已结束或取消,返回false3 if (state != NEW) return false;4 5 // 2. 如果mayInterruptIfRunning为true,调用interrupt中断线程,设置状态为INTERRUPTED6 if (mayInterruptIfRunning) {7 if (!UNSAFE.compareAndSwapInt(this, stateOffset, NEW, INTERRUPTING))8 return false;9 Thread t = runner;10 if (t != null)11 t.interrupt();12 UNSAFE.putOrderedInt(this, stateOffset, INTERRUPTED); // final state13 }14 15 // 3. 如果mayInterruptIfRunning为false,设置状态为CANCELLED16 else if (!UNSAFE.compareAndSwapInt(this, stateOffset, NEW, CANCELLED))17 return false;18 19 // 4. 调用finishCompletion唤醒所有等待结果的线程20 finishCompletion();21 22 // 5. 取消成功23 return true;24}
3) invokeAll和invokeAny
AbstractExecutorService的invokeAll,实现逻辑很简单,对每个任务,创建一个FutureTask,并调用execute执行,然后等待所有任务结束。
invokeAny的实现稍微复杂些,它利用了ExecutorCompletionService,关于这个类及invokeAny的实现,我们后续章节再介绍。
第二节 线程池服务
线程池是实现资源共享的一种方式,主要由任务队列和工作线程两个概念组成,它可以重用线程,减少线程创建的开销。
1. 线程池的基本使用
1) 创建线程池
Java中的线程池实现类为ThreadPoolExecutor->AbstractExecutorService->ExecutorService->Executor,构造方法如下:
91public ThreadPoolExecutor(int corePoolSize, // 核心线程个数(当前线程数小于该值时,有新任务则直接创建线程)2 int maximumPoolSize, // 最大线程个数3 long keepAliveTime, // 空闲线程存活时间(0表示无限长),释放“空闲的非核心线程”占用的资源4 TimeUnit unit, // 时间单位5 BlockingQueue<Runnable> workQueue) // 任务队列6public ThreadPoolExecutor(int corePoolSize, int maximumPoolSize, long keepAliveTime, TimeUnit unit,7 BlockingQueue<Runnable> workQueue,8 ThreadFactory threadFactory, // 线程工厂(自定义线程属性)9 RejectedExecutionHandler handler) // 任务拒绝策略
2) 获取线程池信息
71// 1. 获取线程个数信息2public int getPoolSize() // 返回当前线程个数3public int getLargestPoolSize() // 返回线程池曾经达到过的最大线程个数4
5// 2. 获取任务个数信息6public long getCompletedTaskCount() // 返回线程池自创建以来所有已完成的任务数7public long getTaskCount() // 返回所有任务数,包括所有已完成的加上所有排队待执行的
3) 配置线程池大小
除了在创建时配置线程池大小外,还可以通过getter/setter方法获取和设置线程池大小。
91// 1. 获取核心线程数、最大线程数、空闲线程存活时间2public int getCorePoolSize()3public int getMaximumPoolSize()4public long getKeepAliveTime(TimeUnit unit)5
6// 2. 设置核心线程数、最大线程数、空闲线程存活时间7public void setCorePoolSize(int corePoolSize) 8public void setMaximumPoolSize(int maximumPoolSize) 9public void setKeepAliveTime(long time, TimeUnit unit)
4) 选择任务队列
ThreadPoolExecutor要求的队列类型必须是阻塞队列BlockingQueue,可以是:
LinkedBlockingQueue:基于链表的阻塞队列,可以指定最大长度,但默认是无界的。
ArrayBlockingQueue:基于数组的有界阻塞队列。
PriorityBlockingQueue:基于堆的无界阻塞优先级队列。
SynchronousQueue:没有实际存储空间的同步阻塞队列(如果没有空闲线程,则总会创建新线程,直到达到maximumPoolSize)。
注意:
如果使用无界队列,则线程个数最大只能达到corePoolSize,设置maximumPoolSize参数将无意义。
5) 配置任务拒绝策略
线程池一般使用有界队列且maximumPoolSize是有限的,当两者都达到上限时,就会拒绝任务的提交(execute/submit/invokeAll),可以通过构造方法或setter方法设置拒绝策略。
71// 拒绝策略接口2public interface RejectedExecutionHandler {3    void rejectedExecution(Runnable r, ThreadPoolExecutor executor);4}5
6// 设置拒绝策略7public void setRejectedExecutionHandler(RejectedExecutionHandler handler)
ThreadPoolExecutor内部实现了四种拒绝策略可供选择:
AbortPolicy:默认方式,抛出RejectedExecutionException异常。DiscardPolicy:静默处理,忽略新任务,不抛异常,也不执行。DiscardOldestPolicy:将等待时间最长的任务扔掉,然后自己排队。CallerRunsPolicy:在任务提交者线程中执行任务,而不是交给线程池中的线程执行。
注意:
拒绝策略只有在队列有界,且最大线程数有限的情况下才会触发,让拒绝策略有机会执行对保证系统稳定非常重要。
在任务量非常大的场景中,如果队列无界,可能会导致请求处理队列积压过多任务,消费非常大的内存;如果队列有界但不限制最大线程数,可能会创建过多的线程,占满CPU和内存。
6) 自定义线程工厂
线程工厂可以对创建的线程进行一些配置,它的接口如下:
31public interface ThreadFactory {2 Thread newThread(Runnable r); // 根据Runnable创建一个Thread3}默认实现类为Executors类中的静态内部类DefaultThreadFactory,它主要就是创建一个线程,给线程设置一个名称( pool-<线程池编号>-thread-<线程编号>),设置daemon属性为false,设置线程优先级为标准默认优先级等。
7) 线程池的其他配置
51// 1. 关于核心线程的配置2public int prestartAllCoreThreads() // 预先创建所有的核心线程3public boolean prestartCoreThread() // 创建一个核心线程,如果所有核心线程都已创建,返回false4public void allowCoreThreadTimeOut(boolean value) // 如果参数为true,则keepAliveTime参数也适用于核心线程5
2. 线程池工厂类
线程池工厂类Executors提供了一些静态工厂方法,可以方便的创建一些预配置的线程池,主要方法有:
111// 1. 单线程线程池:适用于需要确保所有任务被顺序执行的场合2// 只使用一个线程,使用无界队列LinkedBlockingQueue(可能会消耗非常大的内存),线程创建后不会超时终止,该线程顺序执行所有任务3public static ExecutorService newSingleThreadExecutor()4    5// 2. 固定数目线程池:适用于在系统负载很高的情形6// 使用固定数目的n个线程,使用无界队列LinkedBlockingQueue(可能会消耗非常大的内存),线程创建后不会超时终止7public static ExecutorService newFixedThreadPool(int nThreads)8
9// 3. 缓存线程池:适用于系统负载不太高,单个任务的执行时间也比较短的情形10// 核心线程数为0,最大线程数无限制(可能占满CPU和内存),空闲线程会缓存60s11public static ExecutorService newCachedThreadPool()
在系统负载可能极高的情况下,newFixedThreadPool的问题是队列过长,而newCachedThreadPool的问题是线程过多,这时,应根据具体情况自定义ThreadPoolExecutor,传递合适的参数。
3. 线程池的死锁
如果提交的任务之间存在依赖,在线程池打满时,可能会出现死锁。
471public class ThreadPoolDeadLockDemo {2 // 1. 创建固定数目线程池,只有5个线程3 private static final int THREAD_NUM = 5; 4 static ExecutorService executor = Executors.newFixedThreadPool(THREAD_NUM); 5
6 // 2. 任务A7 static class TaskA implements Runnable {8 9 public void run() {10 try {11 Thread.sleep(100);12 } catch (InterruptedException e) {13 e.printStackTrace();14 }15 16 // 在任务A中提交任务B17 Future<?> future = executor.submit(new TaskB());18 try {19 future.get();20 } catch (Exception e) {21 e.printStackTrace();22 }23 24 System.out.println("finished task A");25 }26 }27
28 // 3. 任务B29 static class TaskB implements Runnable {30 31 public void run() {32 System.out.println("finished task B");33 }34 }35
36 // 4. 验证线程池死锁37 public static void main(String[] args) throws InterruptedException {38 // 4.1 先提交5个任务A39 for (int i = 0; i < 5; i++) {40 executor.execute(new TaskA());41 }42 43 // 4.2 进行等待发现死锁了,因为任务A在等待任务B的结果,而任务B在等待任务A结束获得执行机会44 Thread.sleep(2000);45 executor.shutdown();46 }47}上述问题可以将线程池类型替换为newCachedThreadPool来解决,让创建的线程不再受限。
另外,创建线程池时使用SynchronousQueue队列也可解决上述问题:
11executor = new ThreadPoolExecutor(THREAD_NUM, THREAD_NUM, 0, TimeUnit.SECONDS, new SynchronousQueue<Runnable>());对于普通队列,入队只是把任务放到了队列中,而对于SynchronousQueue来说,入队成功就意味着已有线程接受处理,如果入队失败,可以创建更多线程直到maximumPoolSize,如果达到了maximumPoolSize,会触发拒绝机制,不管怎么样,都不会死锁。
第三节 CompletionService
CompletionService适用于提交多个异步任务,然后按完成顺序逐个处理任务结果的场景,不同于invokeAll,它无需等待所有异步任务全部完成才开始处理。
1. 基本用法
1) 接口
101public interface CompletionService<V> {2 // 1.提交异步任务3 Future<V> submit(Callable<V> task);4 Future<V> submit(Runnable task, V result);5 6 // 2. 获取下一个完成任务的结果7 Future<V> take() throws InterruptedException; // 堵塞等待8 Future<V> poll(); // 立即返回,如果没有已完成的任务,则返回null9 Future<V> poll(long timeout, TimeUnit unit) throws InterruptedException; // 最多等待指定时间10}
2) 实现类
主要实现类为ExecutorCompletionService,它对Executor进行了装饰,并额外添加了一个阻塞队列来负责结果的排队和处理。
51// executor-被装饰的执行器2public ExecutorCompletionService(Executor executor) 3
4// completionQueue-处理队列,默认为LinkedBlockingQueue5public ExecutorCompletionService(Executor executor, BlockingQueue<Future<V>> completionQueue)
3) 基本示例
前面通过ExecutorService的invokeAll方法实现并发下载并分析URL标题的示例中,必须等到所有任务都完成才开始处理结果,而使用CompletionServiceDemo可以在第一个任务完成后就开始处理结果。
561public class CompletionServiceDemo {2
3 // 1. URL标题解析任务4 static class UrlTitleParser implements Callable<String> {5 private String url;6
7 public UrlTitleParser(String url) {8 this.url = url;9 }10
11 12 public String call() throws Exception {13 Document doc = Jsoup.connect(url).get();14 Elements elements = doc.select("head title");15 if (elements.size() > 0) {16 return url + ": " + elements.get(0).text();17 }18 return null;19 }20 }21
22 // 2. 并发解析,解析完立即处理结果23 public static void main(String[] args) throws InterruptedException {24 List<String> urls = Arrays.asList(new String[] {25 "http://www.cnblogs.com/swiftma/p/5396551.html",26 "http://www.cnblogs.com/swiftma/p/5399315.html",27 "http://www.cnblogs.com/swiftma/p/5405417.html",28 "http://www.cnblogs.com/swiftma/p/5409424.html" });29 30 // 2.1 创建执行服务31 ExecutorService executor = Executors.newFixedThreadPool(10);32 try {33 // 2.2 创建ExecutorCompletionService34 CompletionService<String> completionService = new ExecutorCompletionService<>(executor);35 36 // 2.3 提交异步任务37 for (String url : urls) {38 completionService.submit(new UrlTitleParser(url));39 }40 41 // 2.4 逐个处理异步结果(先完成先处理)42 for (int i = 0; i < urls.size(); i++) {43 Future<String> result = completionService.take();44 try {45 System.out.println(result.get());46 } catch (ExecutionException e) {47 e.printStackTrace();48 }49 }50 51 } finally {52 executor.shutdown();53 }54 }55}56
2. 实现原理
ExecutorCompletionService是如何实现结果实时按序处理的呢?它主要依赖内部的一个阻塞队列以及重写了FutureTask的done()方法。
121// 1. 在提交任务时,提交的是一个特殊的FutureTask(RunnableFuture的子类):QueueingFuture2public Future<V> submit(Callable<V> task) {3    if (task == null) throw new NullPointerException();4    RunnableFuture<V> f = newTaskFor(task);5    executor.execute(new QueueingFuture(f)); // QueueingFuture6    return f;7}8
9// 2. QueueingFuture重写了FutureTask接口的done方法,而done方法将会在异步任务结束时被调用10protected void done() { 11 completionQueue.add(task); // 在任务结束时将task加入队列中12}ExecutorCompletionService的take/poll方法就可以从该队列中获取已结束任务的结果,如下所示:
31public Future<V> take() throws InterruptedException {2 return completionQueue.take();3}
3. 实现invokeAny
通过ExecutorCompletionService,可以实现invokeAny方法,基本思路是:在提交任务后,通过take方法获取结果,获取到第一个有效结果后,取消所有其他任务。
631// 示例:从多个搜索引擎查询一个关键词,但只要任意一个的结果就可以2public class InvokeAnyDemo {3 // 1. 搜索任务4 static class SearchTask implements Callable<String> {5 private String engine;6 private String keyword;7
8 public SearchTask(String engine, String keyword) {9 this.engine = engine;10 this.keyword = keyword;11 }12
13 14 public String call() throws Exception {15 // 模拟从给定引擎搜索结果16 Thread.sleep(engine.hashCode() % 1000);17 return "<result for> " + keyword;18 }19 }20
21 // 2. 并发搜索22 public static String search(List<String> engines, String keyword) throws InterruptedException {23 // 2.1 创建ExecutorCompletionService24 ExecutorService executor = Executors.newFixedThreadPool(10);25 CompletionService<String> cs = new ExecutorCompletionService<>(executor);26 27 28 List<Future<String>> futures = new ArrayList<Future<String>>(engines.size()); // 所有的任务29 String result = null;30 try {31 // 2.2 提交搜索任务32 for (String engine : engines) {33 futures.add(cs.submit(new SearchTask(engine, keyword)));34 }35 36 // 2.3 获取第一个完成的任务结果37 for (int i = 0; i < engines.size(); i++) {38 try {39 result = cs.take().get();40 if (result != null) {41 break;42 }43 } catch (ExecutionException ignore) {44 // 出现异常,结果无效,继续45 }46 }47 } finally {48 // 2.4 取消所有任务(对于已完成的任务,取消没有什么效果)49 for (Future<String> f : futures)50 f.cancel(true);51 52 executor.shutdown();53 }54 55 return result;56 }57
58 // 3. 测试59 public static void main(String[] args) throws InterruptedException {60 List<String> engines = Arrays.asList(new String[] { "www.baidu.com", "www.sogou.com", "www.so.com", "www.google.com" });61 System.out.println(search(engines, "老马说编程"));62 }63}
第四节 定时任务
1. 应用场景
定时任务的应用场景是非常多的,比如:
闹钟程序或任务提醒:指定时间叫起床,或在指定日期提醒还信用卡。
监控系统:每隔一段时间采集下系统数据,对异常事件报警。
统计系统:一般凌晨一定时间统计昨日的各种数据指标。
在Java中,可以使用java.util包中的Timer和TimerTask实现,也可以使用并发包中的ScheduledExecutorService实现。
注意:
上述两者都不能胜任复杂的定时任务调度,如每周一和周三晚上18:00到22:00,每半小时执行一次。 对于类似这种需求,可以使用更为强大的第三方类库,比如Quartz(http://www.quartz-scheduler.org/)。
2. Timer和TimerTask
1) 基本用法
TimerTask表示一个定时任务,它是一个抽象类,实现了Runnable接口,具体的定时任务需要继承该类,实现run方法。
Timer表示一个定时器,负责定时任务的调度和执行,它有如下主要方法:
171// 1. 指定时间执行2public void schedule(TimerTask task, Date time) // 在time时执行3
4// 2. 延时执行5public void schedule(TimerTask task, long delay) // 延迟delay毫秒后执行6
7// 3. 固定延时重复执行:基于上一个任务的开始时间,延迟period毫秒再次执行8public void schedule(TimerTask task, Date firstTime, long period) // firstTime-第一次执行时间,如果小于当前时间,则会立即执行9public void schedule(TimerTask task, long delay, long period) // 第一次执行时间为当前时间延时delay毫秒10
11// 5. 固定频率重复执行:基于初次计划开始时间,每间隔period毫秒执行一次12public void scheduleAtFixedRate(TimerTask task, Date firstTime, long period) // firstTime-如果小于当前时间,则会立即执行,而且可能连续执行多次(因为firstTime+period后还可能仍是一个过去时间)13public void scheduleAtFixedRate(TimerTask task, long delay, long period) // 第一次执行时间为当前时间延时delay毫秒14
15// 6. 取消所有定时任务16public void cancel()17
2) 基本原理
Timer内部主要由任务队列和Timer线程两部分组成。
任务队列是一个基于堆实现的优先级队列,按照下次执行的时间排优先级。
Timer线程负责执行所有的定时任务,需要强调的是,一个Timer对象只有一个Timer线程,所以,对于下面的例子,任务才会被延迟。
Timer线程主体是一个循环,从队列中拿任务,如果队列中有任务且计划执行时间小于等于当前时间,就执行它,如果队列中没有任务或第一个任务延时还没到,就睡眠。如果睡眠过程中队列上添加了新任务且新任务是第一个任务,Timer线程会被唤醒,重新进行检查。
在执行任务之前,Timer线程判断任务是否为周期任务,如果是,就设置下次执行的时间并添加到优先级队列中,对于固定延时的任务,下次执行时间为当前时间加上period,对于固定频率的任务,下次执行时间为上次计划执行时间加上period。
需要强调是,下次任务的计划是在执行当前任务之前就做出了的,对于固定延时的任务,延时相对的是任务执行前的当前时间,而不是任务执行后,这与后面讲到的ScheduledExecutorService的固定延时计算方法是不同的,后者的计算方法更合乎一般的期望。
另一方面,对于固定频率的任务,它总是基于最先的计划计划的,所以,很有可能会出现前面例子中一下子执行很多次任务的情况。
3) 基本示例
641// 示例1:延时执行2public class BasicTimer {3 static class DelayTask extends TimerTask {4 5 6 public void run() {7 System.out.println("delayed task");8 }9 }10 11 public static void main(String[] args) throws InterruptedException {12 Timer timer = new Timer();13 timer.schedule(new DelayTask(), 1000); // 延时执行14 Thread.sleep(2000);15 timer.cancel(); // 取消所有定时任务16 }17}18
19// 示例2:固定延时重复执行 vs 固定频率重复执行20public class TimerFixedDelay {21
22 // 1. 一个耗时5秒的延时任务23 static class LongRunningTask extends TimerTask {24 25 public void run() {26 try {27 Thread.sleep(5000);28 } catch (InterruptedException e) {29 }30 System.out.println("long running finished");31 }32 }33
34 // 2. 延时任务:打印当前时间35 static class FixedDelayTask extends TimerTask {36 37 public void run() {38 System.out.println(System.currentTimeMillis());39 }40 }41
42 // 3. 固定延时43 public static void main(String[] args) throws InterruptedException {44 Timer timer = new Timer();45
46 // 3.1 延时10ms后执行,耗时5s47 timer.schedule(new LongRunningTask(), 10); 48 49 // 3.2 延时100ms后执行,但是执行线程正忙,一直被延迟到5s后才开始执行,后续任务都将被推迟5s50 timer.schedule(new FixedDelayTask(), 100, 1000); 51 }52 53 // 4. 固定频率54 public static void main(String[] args) throws InterruptedException {55 Timer timer = new Timer();56
57 // 4.1 延时10ms后执行,耗时5s58 timer.schedule(new LongRunningTask(), 10); 59 60 // 4.2 延时100ms后执行,每隔1s执行一次,但是执行线程正忙,一直被延迟到5s后才开始执行61 // 但是会在之后尽量补够延迟期间的执行次数,即可能会在5s后连续打印5次相同的时间!62 timer.scheduleAtFixedRate(new FixedRateTask(), 100, 1000); 63 }64}
4) 注意事项
一个Timer对象只有一个Timer线程,这意味着,定时任务不能耗时太长,更不能是无限循环,看个例子:
321public class EndlessLoopTimer {2 // 1. 一个循环任务3 static class LoopTask extends TimerTask {4
5 6 public void run() {7 while (true) {8 try {9 // ... 执行任务10 Thread.sleep(1000);11 } catch (InterruptedException e) {12 e.printStackTrace();13 }14 }15 }16 }17
18 // 2. 另一个任务19 static class ExampleTask extends TimerTask {20 21 public void run() {22 System.out.println("hello");23 }24 }25
26 public static void main(String[] args) throws InterruptedException {27 Timer timer = new Timer();28 timer.schedule(new LoopTask(), 10); // 一直在循环29 timer.schedule(new ExampleTask(), 100); // 永远也没有机会执行30 }31}32
Timer线程在执行任何一个任务的run方法时,一旦run抛出异常,Timer线程就会退出,从而所有定时任务都会被取消。
291public class TimerException {2
3 // 1. 定时任务A4 static class TaskA extends TimerTask {5 6 7 public void run() {8 System.out.println("task A");9 }10 }11 12 // 2. 定时任务B(会抛异常)13 static class TaskB extends TimerTask {14 15 16 public void run() {17 System.out.println("task B");18 throw new RuntimeException();19 }20 }21
22 // 3. 测试23 public static void main(String[] args) throws InterruptedException {24 Timer timer = new Timer();25 timer.schedule(new TaskA(), 1, 1000); // 任务A抛了异常,定时器终止26 timer.schedule(new TaskB(), 2000, 1000); // 任务B不再执行27 }28}29
所以,如果希望各个定时任务不互相干扰,一定要在run方法内捕获所有异常。
2. ScheduledExecutorService
1) 接口
由于Timer/TimerTask的一些问题,Java并发包引入了ScheduledExecutorService,它是一个接口:
131public interface ScheduledExecutorService extends ExecutorService {2 // 1. 单次延时执行3 public ScheduledFuture<?> schedule(Runnable command, long delay, TimeUnit unit); // Runnable任务4 public <V> ScheduledFuture<V> schedule(Callable<V> callable, long delay, TimeUnit unit); // Callable任务5 6 // 2. 固定延时重复执行7 // 注意:不同于Timer的固定延时方法,它是从上一个任务结束后才开始计算延时的8 public ScheduledFuture<?> scheduleWithFixedDelay(Runnable command, long initialDelay, long delay, TimeUnit unit);9 10 // 3. 固定频率重复执行11 // 第一次执行时间为initialDelay后,第二次为initialDelay+period,第三次initialDelay+2*period,依次类推12 public ScheduledFuture<?> scheduleAtFixedRate(Runnable command, long initialDelay, long period, TimeUnit unit);13}返回类型都是ScheduledFuture,它也是一个接口,实现了Future和Delayed,没有定义额外方法。
注意:
与Timer不同,ScheduledExecutorService不支持以绝对时间作为首次运行的时间。
2) 实现类
主要实现类为ScheduledThreadPoolExecutor,它是线程池ThreadPoolExecutor的子类,是基于线程池实现的,构造方法如下:
51public ScheduledThreadPoolExecutor(int corePoolSize) 2public ScheduledThreadPoolExecutor(int corePoolSize, RejectedExecutionHandler handler)3public ScheduledThreadPoolExecutor(int corePoolSize, ThreadFactory threadFactory) 4public ScheduledThreadPoolExecutor(int corePoolSize, ThreadFactory threadFactory, RejectedExecutionHandler handler)5 参数含义与ThreadPoolExecutor一样,我们就不赘述了。
工厂类Executors也提供了一些方便的方法,以方便创建ScheduledThreadPoolExecutor,如下所示:
71// 1. 单线程的定时任务执行服务2public static ScheduledExecutorService newSingleThreadScheduledExecutor()3public static ScheduledExecutorService newSingleThreadScheduledExecutor(ThreadFactory threadFactory)4
5// 2. 多线程的定时任务执行服务6public static ScheduledExecutorService newScheduledThreadPool(int corePoolSize)7public static ScheduledExecutorService newScheduledThreadPool(int corePoolSize, ThreadFactory threadFactory)
注意:
它的任务队列是一个无界的优先级队列,所以最大线程数对它没有作用,即使corePoolSize设为0,它也会至少运行一个线程。
3) 基本示例
由于可以有多个线程执行定时任务,一般任务就不会被某个长时间运行的任务所延迟了,比如,对于前面的TimerFixedDelay,如果改为:
261public class ScheduledFixedDelay {2 static class LongRunningTask implements Runnable {3 4 public void run() {5 try {6 Thread.sleep(5000);7 } catch (InterruptedException e) {8 }9 System.out.println("long running finished");10 }11 }12
13 static class FixedDelayTask implements Runnable {14 15 public void run() {16 System.out.println(System.currentTimeMillis());17 }18 }19
20 public static void main(String[] args) throws InterruptedException {21 ScheduledExecutorService timer = Executors.newScheduledThreadPool(10);22 timer.schedule(new LongRunningTask(), 10, TimeUnit.MILLISECONDS);23 timer.scheduleWithFixedDelay(new FixedDelayTask(), 100, 1000,24 TimeUnit.MILLISECONDS);25 }26}再次执行,第二个任务就不会被第一个任务延迟了。
另外,与Timer不同,单个定时任务的异常不会再导致整个定时任务被取消了,即使背后只有一个线程执行任务,我们看个例子:
261public class ScheduledException {2
3 static class TaskA implements Runnable {4
5 6 public void run() {7 System.out.println("task A");8 }9 }10
11 static class TaskB implements Runnable {12
13 14 public void run() {15 System.out.println("task B");16 throw new RuntimeException();17 }18 }19
20 public static void main(String[] args) throws InterruptedException {21 ScheduledExecutorService timer = Executors22 .newSingleThreadScheduledExecutor();23 timer.scheduleWithFixedDelay(new TaskA(), 0, 1, TimeUnit.SECONDS);24 timer.scheduleWithFixedDelay(new TaskB(), 2, 1, TimeUnit.SECONDS);25 }26}TaskA和TaskB都是每秒执行一次,TaskB两秒后执行,但一执行就抛出异常,屏幕的输出类似如下:
61task A2task A3task B4task A5task A6...
这说明,定时任务TaskB被取消了,但TaskA不受影响,即使它们是由同一个线程执行的。不过,需要强调的是,与Timer不同,没有异常被抛出来,TaskB的异常没有在任何地方体现。所以,与Timer中的任务类似,应该捕获所有异常。
3) 对比Timer/TimerTask
ScheduledThreadPoolExecutor的实现思路与Timer基本是类似的,都有一个基于堆的优先级队列,保存待执行的定时任务,主要不同有:
它的背后是线程池,可以有多个线程执行任务。
它在任务执行后再设置下次执行的时间,对于固定延时的任务更为合理。
任务执行线程会捕获任务执行过程中的所有异常,一个定时任务的异常不会影响其他定时任务。但发生异常的任务也不再被重新调度,即使它是一个重复任务。
第五节 组合式异步编程
组合式异步编程,可以方便地将多个有一定依赖关系的异步任务以流水线的方式组合在一起,大大简化了多异步任务的开发。
在Java中的实现类为CompletableFuture,它是Future接口的扩展和增强,表示一个可主动完成的异步任务结果,同时实现了CompletionStage接口,表示某个完成阶段,支持直接对多个任务进行链式和组合处理。
每个完成阶段都有一个执行任务,它可能需要等待其它一个或多个阶段完成才能开始,在完成后也可能会触发其他阶段开始运行。
1. 基本使用
1) 创建和执行
151// 1. 直接获取一个“未完成”状态的CompletableFuture2// 注意:如果CompletableFuture未完成,获取结果时将会阻塞3public CompletableFuture() 4
5// 2. 直接获取一个“已完成”状态的CompletableFuture6public static <U> CompletableFuture<U> completedFuture(U value)7
8// 3. 异步执行Runnable,获取一个无返回值的CompletableFuture9public static CompletableFuture<Void> runAsync(Runnable runnable)10public static CompletableFuture<Void> runAsync(Runnable runnable, Executor executor)11
12// 4. 异步执行Supplier,获取一个有返回值的CompletableFuture13public static <U> CompletableFuture<U> supplyAsync(Supplier<U> supplier)14public static <U> CompletableFuture<U> supplyAsync(Supplier<U> supplier, Executor executor)15
下面是一些简单示例:
351public static void 创建和执行() {2 // 1. 直接获取一个“未完成”状态的CompletableFuture3 CompletableFuture<String> unCompletedFuture = new CompletableFuture<>();4 unCompletedFuture.complete("666"); // 使其完成,否则后续join将阻塞5 System.out.println("future01 = " + unCompletedFuture.join());6
7 // 2. 直接获取一个“已完成”状态的CompletableFuture8 CompletableFuture<String> completedFuture = CompletableFuture.completedFuture("777");9 System.out.println("completedFuture = " + completedFuture.join());10
11 // 3. 异步执行Runnable,获取一个无返回值的CompletableFuture12 CompletableFuture<Void> voidCompletableFuture = CompletableFuture.runAsync(new Runnable() {13 14 public void run() {15 try {16 Thread.sleep(1000);17 } catch (InterruptedException e) {18 e.printStackTrace();19 }20 System.out.println("CompletableFuture.runAsync....");21 }22 });23 // 阻塞等待Runnable执行完成24 System.out.println("voidCompletableFuture = " + voidCompletableFuture.join()); // voidCompletableFuture = null25
26 // 4. 异步执行Supplier,获取一个有返回值的CompletableFuture27 CompletableFuture<String> stringCompletableFuture = CompletableFuture.supplyAsync(new Supplier<String>() {28
29 30 public String get() {31 return "888";32 }33 });34 System.out.println("stringCompletableFuture = " + stringCompletableFuture.join()); // stringCompletableFuture = 88835}注意:
带Async后缀的函数表示该任务会被单独提交到线程池中,从而相对前置任务来说是异步运行的,下同。
executor参数表示执行该任务的线程池,如果省略,将使用ThreadPerTaskExecutor(单核cpu)或ForkJoinPool.commonPool()执行。
2) 完成和取消任务
101// 1. 主动完成任务2// 如果任务已经完成,则无任何效果,直接返回false3// 如果是由于该方法导致任务提前完成,则方法返回true,且使用value作为任务结果4public boolean complete(T value) // 任务正常完成5public boolean completeExceptionally(Throwable ex) // 任务异常完成6
7// 2. 主动取消任务8// 如果任务已经完成,则取消无任何效果,直接返回false9// 如果是由于该方法导致任务提前取消,则方法返回true,且在获取结果时抛出CancellationException10public boolean cancel(boolean mayInterruptIfRunning)
3) 获取任务状态
81// 1. 任务是否被取消(调用了cancel方法)2public boolean isCancelled()3
4// 2. 任务是否完成(包括正常完成、主动完成、抛出异常,不包括任务被取消)5public boolean isDone()6    7// 3. 任务是否为异常完成8public boolean isCompletedExceptionally()
4) 获取任务结果
71// 1. 阻塞获取结果2public T get() throws InterruptedException, ExecutionException 3public V get(long timeout, TimeUnit unit) throws InterruptedException, ExecutionException, TimeoutException 4public T join() // 类似get,但是不会抛出受检异常,而是包装为CompletionException或CancellationException等运行时异常5 6// 2. 立即返回结果7public T getNow(T valueIfAbsent) // 实际任务结果尚未计算出来时,不等待,直接返回valueIfAbsent作为结果
5) 任务完成回调
任务完成回调方法可以接收前一个任务正常结束时的结果值,或前面链路中的任务异常结束时的异常(抛出异常后,链路中的后续任务将不会继续执行),无返回值,不会改变原结果或覆盖原异常。
331// 1. 任务完成后进行回调2public CompletableFuture<T> whenComplete(BiConsumer<? super T,? super Throwable> action)3public CompletableFuture<T> whenCompleteAsync(BiConsumer<? super T,? super Throwable> action)4public CompletableFuture<T> whenCompleteAsync(BiConsumer<? super T,? super Throwable> action, Executor executor)5
6// 示例1:7// 有一个异步任务,可能正常,也可能抛出异常8CompletableFuture<String> future = CompletableFuture.supplyAsync(new Supplier<String>() {9
10 11 public String get() {12 if (System.currentTimeMillis() % 2 == 0) {13 return "hello";14 }15
16 throw new RuntimeException("当前不是2的倍数");17 }18});19// 为该任务注册完成时的回调20CompletableFuture<String> future_whenComplete = future.whenComplete(new BiConsumer<String, Throwable>() {21 22 public void accept(String result, Throwable throwable) {23 if (result != null) {24 System.out.println("result = " + result); // hello25 }26
27 if (throwable != null) {28 System.out.println("exception = " + throwable); // java.util.concurrent.CompletionException: java.lang.RuntimeException: 当前不是2的倍数29 }30 }31});32System.out.println("future_whenComplete = " + future_whenComplete.join()); // hello 或 任务运行错误33
注意:
同步处理函数(不带Async)被注册后,如果任务线程未结束,将会使用任务线程执行,如果已结束,将会由当前注册线程执行。
注册的异常处理逻辑对前面链路中的任务都生效,可参考下方“顺序任务流”案例。
6)结果或异常处理
结果或异常处理方法也可以接收正常结束时的结果值,或异常结束时的异常,但可以修改任务结果,且会覆盖原异常。
351// 1. 处理结果或异常2public <U> CompletableFuture<U> handle(BiFunction<? super T,Throwable,? extends U> fn)3public <U> CompletableFuture<U> handleAsync(BiFunction<? super T,Throwable,? extends U> fn)4public <U> CompletableFuture<U> handleAsync(BiFunction<? super T,Throwable,? extends U> fn, Executor executor)5
6// 2. 仅处理异常,同时可修改任务结果7public CompletableFuture<T>  exceptionally(Function<Throwable,? extends T> fn)8    9// 示例1:handle10CompletableFuture<String> future_handle = future.handle((result, exception) -> {11    if (result != null) {12        System.out.println("result = " + result); // hello13        return result;14    }15
16    if (exception != null) {17        System.out.println("exception = " + exception); // java.util.concurrent.CompletionException: java.lang.RuntimeException: 当前不是2的倍数18        return "任务运行错误";19    }20
21    return "Other"; // 一般不会出现该情形22});23System.out.println("future_handle = " + future_handle.join()); // hello 或 任务运行错误24
25// 示例2:exceptionally26CompletableFuture<String> future_handle = future.exceptionally((exception) -> {27    if (exception != null) {28        System.out.println("exception = " + exception); // java.util.concurrent.CompletionException: java.lang.RuntimeException: 当前不是2的倍数29        return "任务运行错误";30    }31
32    return "Other"; // 一般不会出现该情形33});34System.out.println("future_handle = " + future_handle.join()); // hello 或 任务运行错误35
2.构建任务流
1) 依赖前一阶段正常完成
下面一些方法可以用来构建依赖单一阶段的任务流,当前一个阶段正常完成时,自动触发所有依赖该阶段的下一阶段任务,如果前一个阶段发生了异常,所有后续阶段都不会执行,结果会被设为相同的异常,调用join会抛出运行时异常CompletionException。
221// 1. 后接一个基于Runnable构建的阶段2public CompletableFuture<Void> thenRun(Runnable action)3public CompletableFuture<Void> thenRunAsync(Runnable action)4public CompletableFuture<Void> thenRunAsync(Runnable action, Executor executor)5        6// 2. 后接一个基于Consumer构建的阶段,支持接收前一个任务的参数7public CompletableFuture<Void> thenAccept(Consumer<? super T> action)8public CompletableFuture<Void> thenAcceptAsync(Consumer<? super T> action)9public CompletableFuture<Void> thenAcceptAsync(Consumer<? super T> action, Executor executor)10
11// 3. 后接一个基于Function构建的阶段,支持接收前一个任务的参数,以及返回自定义类型的结果12public <U> CompletableFuture<U> thenApply(Function<? super T,? extends U> fn)13public <U> CompletableFuture<U> thenApplyAsync(Function<? super T,? extends U> fn)14public <U> CompletableFuture<U> thenApplyAsync(Function<? super T,? extends U> fn, Executor executor)15
16// 4.  后接一个返回的CompletionStage,支持接收前一个任务的参数,以及返回CompletionStage类型的结果17// 注意:该方法自动将返回的CompletionStage作为下一阶段,而不会再构建嵌套的阶段,主要用于组合另一个CompletionStage18// 如果使用thenApply组合另一个CompletionStage话,那么将会返回嵌套的CompletableFuture<CompletableFuture<U>>类型,要使用join().join()才能获取结果19public <U> CompletableFuture<U> thenCompose(Function<? super T, ? extends CompletionStage<U>> fn)20public <U> CompletableFuture<U> thenComposeAsync(Function<? super T, ? extends CompletionStage<U>> fn)21public <U> CompletableFuture<U> thenComposeAsync(Function<? super T, ? extends CompletionStage<U>> fn, Executor executor)22
简单示例如下:
601// 示例1:thenRun/thenAccept/thenApply2public static void 顺序任务流() {3 CompletableFuture<String> future = CompletableFuture4 .runAsync(() -> System.out.println("Step A1"))5 .thenRun(() -> System.out.println("Step A2"))6 .thenAccept(perResult -> {7 System.out.println("thenAccept.perResult = " + perResult);8 System.out.println("Step A3");9 //throw new RuntimeException("演示错误情形");10 })11 .thenApply(perResult -> {12 System.out.println("thenApply.perResult = " + perResult);13 System.out.println("Step A4");14 return "thenApply...";15 }).handle(new BiFunction<String, Throwable, String>() {16 17 public String apply(String s, Throwable throwable) {18 if (s != null) {19 return "任务完成,结果为[" + s + "]";20 }21
22 if (throwable != null) {23 return "出现了[" + throwable.getMessage() + "]异常,但是被我处理了";24 }25
26 return "未知情形";27 }28 });29 System.out.println("future = " + future.join()); // thenApply...30}31
32// 示例2:thenCompose33public static void 顺序任务流2() {34 CompletableFuture<Void> completableFuture = CompletableFuture35 .supplyAsync(new Supplier<String>() {36 37 public String get() {38 return "hello";39 }40 })41 // 组合另一个CompletionStage<String>42 .thenCompose(new Function<String, CompletionStage<String>>() {43 44 public CompletionStage<String> apply(String s) {45 return CompletableFuture.supplyAsync(new Supplier<String>() {46 47 public String get() {48 return s.toUpperCase();49 }50 });51 }52 })53 .thenAccept(new Consumer<String>() {54 55 public void accept(String s) {56 System.out.println("hello");57 }58 });59 System.out.println("completableFuture = " + completableFuture.join());60}注意:
以run、accept、apply开头的方法,参数类型一般为Runnable、Consumer、Function类型。
2) 依赖前两阶段都正常完成
当一个阶段正常完成,且指定的另一个阶段也正常完成时,才触发下一阶段。注意,这两个阶段可以并行执行,并且没有依赖关系。
271// 1. 后接一个基于Runnable构建的阶段,在other也正常完成时执行2public CompletableFuture<Void> runAfterBoth(CompletionStage<?> other, Runnable action)3public CompletableFuture<Void> runAfterBothAsync(CompletionStage<?> other, Runnable action)4public CompletableFuture<Void> runAfterBothAsync(CompletionStage<?> other, Runnable action, Executor executor)5
6// 2. 接受前两个阶段的结果作为参数,但不返回结果7public <U> CompletableFuture<Void> thenAcceptBoth(CompletionStage<? extends U> other, BiConsumer<? super T, ? super U> action)8public <U> CompletableFuture<Void> thenAcceptBothAsync(CompletionStage<? extends U> other, BiConsumer<? super T, ? super U> action)9public <U> CompletableFuture<Void> thenAcceptBothAsync(CompletionStage<? extends U> other, BiConsumer<? super T, ? super U> action, Executor executor)10
11// 3. 接受前两个阶段的结果作为参数,返回一个结果12public <U,V> CompletableFuture<V> thenCombine(CompletionStage<? extends U> other, BiFunction<? super T,? super U,? extends V> fn)13public <U,V> CompletableFuture<V> thenCombineAsync(CompletionStage<? extends U> other, BiFunction<? super T,? super U,? extends V> fn)14public <U,V> CompletableFuture<V> thenCombineAsync(CompletionStage<? extends U> other, BiFunction<? super T,? super U,? extends V> fn, Executor executor)15
16// 示例1:17public static void 两个都正常完成才执行() {18    Supplier<String> taskA = () -> "taskA";19    CompletableFuture<String> taskB = CompletableFuture.supplyAsync(() -> "taskB");20    BiFunction<String, String, String> taskC = (a, b) -> a + "," + b;21
22    CompletableFuture<String> completableFuture = CompletableFuture23        .supplyAsync(taskA)24        .thenCombineAsync(taskB, taskC); // 当前任务A和任务B都正常完成才执行任务C25    System.out.println(completableFuture.join()); // taskA,taskB26}27
3) 依赖前两阶段之一正常完成
当前阶段和指定的另一个阶段,只要其中一个正常完成,就会启动下一阶段任务。
361// 1. Runnable2public CompletableFuture<Void> runAfterEither(CompletionStage<?> other, Runnable action)3public CompletableFuture<Void> runAfterEitherAsync(CompletionStage<?> other, Runnable action)               4public CompletableFuture<Void> runAfterEitherAsync(CompletionStage<?> other, Runnable action, Executor executor)5
6// 2. Consumer7public CompletableFuture<Void> acceptEither(CompletionStage<? extends T> other, Consumer<? super T> action)8public CompletableFuture<Void> acceptEitherAsync(CompletionStage<? extends T> other, Consumer<? super T> action)9public CompletableFuture<Void> acceptEitherAsync(CompletionStage<? extends T> other, Consumer<? super T> action, Executor executor)10
11// 3. Function12public <U> CompletableFuture<U> applyToEither(CompletionStage<? extends T> other, Function<? super T, U> fn)13public <U> CompletableFuture<U> applyToEitherAsync(CompletionStage<? extends T> other, Function<? super T, U> fn)14public <U> CompletableFuture<U> applyToEitherAsync(CompletionStage<? extends T> other, Function<? super T, U> fn, Executor executor)15
16// 示例1:17public static void 两者之一正常完成就执行() {18    CompletableFuture<Void> otherCompletableFuture = CompletableFuture.runAsync(() -> {19        try {20            Thread.sleep(5000);21        } catch (InterruptedException e) {22            e.printStackTrace();23        }24    });25
26    CompletableFuture<Void> completableFuture = CompletableFuture.runAsync(() -> {27        try {28            Thread.sleep(500);29        } catch (InterruptedException e) {30            e.printStackTrace();31        }32    }).runAfterEither(otherCompletableFuture, () -> System.out.println("ok")); // 500ms后打印ok33
34    System.out.println(completableFuture.join()); // 500ms后输出null35}36
4) 构建依赖多个阶段的任务流
如果依赖的阶段不止两个,可以使用如下静态方法,基于多个CompletableFuture构建了一个新的CompletableFuture。
511// 1. 当所有子阶段都完成时,它才完成,如果某个阶段异常,则它的结果也是异常2// 某个子阶段异常时并不会导致其它子阶段提前结束,如果多个阶段出现异常,则只会保留最新的那个3// 注意:它只会持有异常结果,并不会保存正常结束的结果,如果需要,可以从每个阶段中获取4public static CompletableFuture<Void> allOf(CompletableFuture<?>... cfs) // 获取所有完成结果;如果最快完成的任务出现了异常,也会先返回异常,如果害怕出错可以加个exceptionally() 去处理一下可能发生的异常并设定默认返回值5
6// 2. 当第一个子阶段完成或异常结束时,它相应地完成或异常结束,结果与第一个结束的子阶段一样7public static CompletableFuture<Object> anyOf(CompletableFuture<?>... cfs)8
9// 示例1:allOf10public static void 依赖所有子阶段完成() {11    CompletableFuture<String> taskA = CompletableFuture.supplyAsync(() -> {12        try {13            Thread.sleep(500);14        } catch (InterruptedException e) {15            e.printStackTrace();16        }17        return "helloA";18    });19
20    CompletableFuture<Void> taskB = CompletableFuture.runAsync(() -> {21        try {22            Thread.sleep(200);23        } catch (InterruptedException e) {24            e.printStackTrace();25        }26    });27
28    CompletableFuture<Void> taskC = CompletableFuture.runAsync(() -> {29        try {30            Thread.sleep(1000);31        } catch (InterruptedException e) {32            e.printStackTrace();33        }34        throw new RuntimeException("task C exception");35    });36
37    // 只有在taskA, taskB, taskC都完成后才完成38    CompletableFuture<Void> completableFuture = CompletableFuture.allOf(taskA, taskB, taskC).whenComplete((result, throwable) -> {39        // 最新的异常40        if (throwable != null) {41            System.out.println(throwable.getMessage()); // java.lang.RuntimeException: task C exception42        }43
44        // 获取子阶段A的结果45        if (!taskA.isCompletedExceptionally()) {46            System.out.println("task A " + taskA.join()); // task A helloA47        }48    });49    System.out.println("completableFuture = " + completableFuture.join()); // CompletionException: java.lang.RuntimeException: task C exception50}51
3. 其它方法
41public CompletableFuture<T> toCompletableFuture()2public int getNumberOfDependents()3public void obtrudeException(Throwable ex)4public void obtrudeValue(T value)
第六节 Fork/Join框架
1. Fork/Join框架简介
Fork/Join框架是一个并行任务执行框架,它把大任务分割成若干个小任务,最终汇总每个小任务结果后得到大任务结果,适用于多核环境的可分割计算再合并结果的计算密集型任务。
Fork:递归地将任务分解为较小的独立子任务,直到它们足够简单以便异步执行。
Join:将所有子任务的结果递归合并成单个结果,或者在任务无返回值的情况下,等待每个子任务执行完毕。
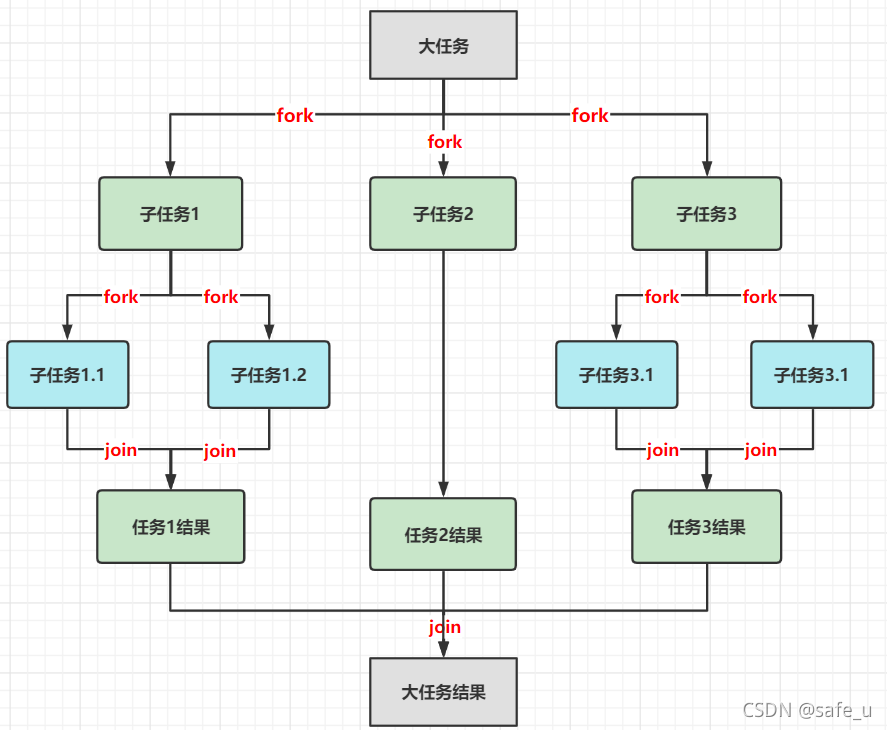
注意:
ForkJoinPool不是为了替代ExecutorService,而是它的补充,在某些应用场景下(计算密集型任务)性能比ExecutorService更好。
ForkJoinPool主要用于实现分而治之的算法,特别是分治之后递归调用的函数,例如QuickSort等;
ForkJoinPool的宗旨是使用少量的线程来处理大量的任务,多个线程获取到多个处理器的时间分片,并行的执行子任务。
2. Fork/Join框架原理
Fork/Join框架其实就是指由ForkJoinPool作为线程池、ForkJoinTask作为异步任务、ForkJoinWorkerThread作为执行任务的线程这三者构成的任务调度机制。
1) ForkJoinPool
ForkJoinPool是ExecutorService的一个实现,用于管理工作线程,以及提供获取线程池状态和性能信息的相关方法。
61// 1. 获取公共ForkJoinPool线程池2// 使用预定义的公共池可以减少资源消耗,因为它会避免每个任务创建一个单独的线程池3ForkJoinPool forkJoinPool = ForkJoinPool.commonPool();4
5// 2. 提交任务给线程池6public <T> ForkJoinTask<T> submit(ForkJoinTask<T> task)ForkJoinPool中的每个工作线程都有自己的双端队列(WorkQueue)用于存储任务(ForkJoinTask),并且使用了一种名为工作窃取(work-stealing)算法来平衡线程的工作负载。
注意:
工作窃取(work-stealing)算法指空闲的线程试图从繁忙线程的队列中(队首)窃取任务。
2) ForkJoinWorkerThread
ForkJoinWorkerThread直接继承了Thread,是被ForkJoinPool管理的工作线程,由它来执行ForkJoinTask。
3) ForkJoinTask<V>
ForkJoinTask抽象类表示一个可分割计算再合并结果的异步任务,常用方法如下:
111// 1. 推入工作线程的工作队列异步执行2public final ForkJoinTask<V> fork()3
4// 2. 等待任务执行结果5public final V join()6
7// 3. 立即执行任务,并等待返回结果8public final V invoke()9
10// 4. 批量执行任务,并等待它们执行结束11public static void invokeAll(ForkJoinTask<?>... tasks)它有两个子抽象类RecursiveAction和RecursiveTask,分别表示无返回结果和有返回结果的异步任务,我们一般使用它们。
3. Fork/Join的使用
711// 示例1:使用Fork/Join框架拆分计算1+2+...+100002public class RecursiveTaskDemo extends RecursiveTask<Integer> {3 private int from; // 计算区间开始值4 private int to; // 计算区间结束值5
6 private static final int THRESHOLD = 1000; // 停止拆分阈值7
8 public RecursiveTaskDemo(int from, int to) {9 super();10 this.from = from;11 this.to = to;12 }13
14 15 protected Integer compute() {16 // 是否需要继续拆分17 if ((to - from) < THRESHOLD) {18 // 否,进行计算19 return IntStream.range(from, to + 1).reduce((a, b) -> a + b).getAsInt(); // 汇总from~to+120
21 } else {22 // 是,继续拆分23 int forkNumber = (from + to) / 2;24 System.out.println(String.format("拆分%d - %d ==> %d ~ %d, %d~%d", 25 from, to, from, forkNumber, forkNumber + 1, to));26 RecursiveTaskDemo left = new RecursiveTaskDemo(from, forkNumber);27 RecursiveTaskDemo right = new RecursiveTaskDemo(forkNumber + 1, to);28
29 // 将子任务放入队列,并安排异步执行30 left.fork();31 right.fork();32 // invokeAll(left, right); 也可以使用invokeAll,保证执行顺序33
34 // 分别拿到两个子任务的值,并进行合并35 return left.join() + right.join(); //阻塞当前线程并等待获取结果36 }37 }38
39 public static void main(String[] args) throws ExecutionException, InterruptedException {40 // 获取ForkJoinPool的公共线程池41 ForkJoinPool forkJoinPool = ForkJoinPool.commonPool();42
43 // 提交可拆分合并的计算密集型任务:RecursiveTaskDemo44 ForkJoinTask<Integer> result = forkJoinPool.submit(new RecursiveTaskDemo(1, 10000));45
46 // 获取任务结果47 System.out.println("计算结果为" + result.get());48
49 // 关闭线程池50 forkJoinPool.shutdown();51 }52}53
54/*55拆分1 - 10000 ==> 1 ~ 5000, 5001~1000056拆分1 - 5000 ==> 1 ~ 2500, 2501~500057拆分5001 - 10000 ==> 5001 ~ 7500, 7501~1000058拆分1 - 2500 ==> 1 ~ 1250, 1251~250059拆分7501 - 10000 ==> 7501 ~ 8750, 8751~1000060拆分5001 - 7500 ==> 5001 ~ 6250, 6251~750061拆分1 - 1250 ==> 1 ~ 625, 626~125062拆分5001 - 6250 ==> 5001 ~ 5625, 5626~625063拆分1251 - 2500 ==> 1251 ~ 1875, 1876~250064拆分7501 - 8750 ==> 7501 ~ 8125, 8126~875065拆分2501 - 5000 ==> 2501 ~ 3750, 3751~500066拆分6251 - 7500 ==> 6251 ~ 6875, 6876~750067拆分8751 - 10000 ==> 8751 ~ 9375, 9376~1000068拆分2501 - 3750 ==> 2501 ~ 3125, 3126~375069拆分3751 - 5000 ==> 3751 ~ 4375, 4376~500070计算结果为5000500071 */注意:
如果拆分逻辑比计算逻辑还要复杂时,ForkJoinPool并不会带来性能的提升,反而可能会起到负面作用。
第七节 并发篇总结
多线程开发有两个核心问题,一个是竞争,另一个是协作。
1. 线程安全的机制
线程表示一条单独的执行流,每个线程有自己的执行计数器,有自己的栈,不过可以共享内存,共享内存是实现线程协作的基础,但共享内存有两个问题,竞态条件和内存可见性,之前章节探讨了如下一些解决这些问题的思路。
1) synchronized
它是一个关键字,简单易用,大部分情况下,直接加在方法的声明上即可,既可以解决竞态条件问题,也可以解决内存可见性问题。
需要理解的是,它保护的是对象,而不是代码,只有对同一个对象的synchronized方法调用,才能保证它们被顺序调用。对于实例方法,这个对象是this,对于静态方法,这个对象是类对象,对于代码块,需要指定哪个对象。
另外,需要注意,它不能尝试获取锁,也不响应中断,还可能会死锁。不过,相比显式锁,synchronized简单易用,JVM也可以不断优化它的实现,应该被优先使用。
2) 显式锁
显式锁是相对于synchronized隐式锁而言的,它可以实现synchronzied同样的功能,但需要程序员自己创建锁,调用锁相关的接口,主要接口是Lock,主要实现类是ReentrantLock。
相比synchronized,它支持以非阻塞方式获取锁、可以响应中断、可以限时、可以指定公平性、可以解决死锁问题,这使得它灵活的多。
在读多写少且读操作可以完全并行的场景中,可以使用读写锁(ReadWriteLock/ReentrantReadWriteLock)以提高并发度。
3) volatile
synchronized和显式锁都是锁,使用锁可以实现安全,但使用锁是有成本的,获取不到锁的线程还需要等待,会有线程的上下文切换开销等。保证安全不一定需要锁。如果共享的对象只有一个,操作也只是进行最简单的get/set操作,set也不依赖于之前的值,那就不存在竞态条件问题,而只有内存可见性问题,这时,在变量的声明上加上volatile就可以了。
3) 原子变量和CAS
使用volatile,set的新值不能依赖于旧值,但很多时候,set的新值与原来的值有关,这时,也不一定需要锁,如果需要同步的代码比较简单,可以考虑原子变量,它们包含了一些以原子方式实现组合操作的方法,适用于并发环境中的计数、产生序列号等需求。
原子变量的基础是CAS,比较并设置,一般的计算机系统都在硬件层次上直接支持CAS指令。通过循环CAS的方式实现原子更新是一种重要的思维,相比synchronized,它是乐观的,而synchronized是悲观的,它是非阻塞式的,而synchronized是阻塞式的。CAS是Java并发包的基础,基于它可以实现高效的、乐观、非阻塞式数据结构和算法,它也是并发包中锁、同步工具和各种容器的基础。
4) 写时复制
之所以会有线程安全的问题,是因为多个线程并发读写同一个对象,如果每个线程读写的对象都是不同的,或者,如果共享访问的对象是只读的,不能修改,那也就不存在线程安全问题了。
我们在介绍容器类CopyOnWriteArrayList和CopyOnWriteArraySet时介绍了写时复制技术,写时复制就是将共享访问的对象变为只读的,写的时候,再使用锁,保证只有一个线程写,写的线程不是直接修改原对象,而是新创建一个对象,对该对象修改完毕后,再原子性地修改共享访问的变量,让它指向新的对象。
5) ThreadLocal
ThreadLocal让每个线程对同一个变量都有自己的独有拷贝,每个线程实际访问的对象都是自己的,自然也就不存在线程安全问题了。
2. 线程的协作机制
多线程之间的核心问题,除了竞争,就是协作。
1) wait/notify
wait/notify与synchronized配合一起使用,是线程的基本协作机制,每个对象都有一把锁和两个等待队列,一个是锁等待队列,放的是等待获取锁的线程,另一个是条件等待队列,放的是等待条件的线程,wait将自己加入条件等待队列,notify从条件等待队列上移除一个线程并唤醒,notifyAll移除所有线程并唤醒。
需要注意的是,wait/notify方法只能在synchronized代码块内被调用,调用wait时,线程会释放对象锁,被notify/notifyAll唤醒后,要重新竞争对象锁,获取到锁后才会从wait调用中返回,返回后,不代表其等待的条件就一定成立了,需要重新检查其等待的条件。
wait/notify方法看上去很简单,但往往难以理解wait等的到底是什么,而notify通知的又是什么,只能有一个条件等待队列,这也是wait/notify机制的局限性,这使得对于等待条件的分析变得复杂。
2) 显式条件
显式条件与显式锁配合使用,与wait/notify相比,可以支持多个条件队列,代码更为易读,效率更高,使用时注意不要将signal/signalAll误写为notify/notifyAll。
3) 线程的中断
Java中取消/关闭一个线程的方式是中断,中断并不是强迫终止一个线程,它是一种协作机制,是给线程传递一个取消信号,但是由线程来决定如何以及何时退出,线程在不同状态和IO操作时对中断有不同的反应,作为线程的实现者,应该提供明确的取消/关闭方法,并用文档清楚描述其行为,作为线程的调用者,应该使用其取消/关闭方法,而不是贸然调用interrupt。
4) 协作工具类
除了基本的显式锁和条件,针对常见的协作场景,Java并发包提供了多个用于协作的工具类。
信号量类Semaphore用于限制对资源的并发访问数。
倒计时门栓CountDownLatch主要用于不同角色线程间的同步,比如在"裁判"-"运动员"模式中,"裁判"线程让多个"运动员"线程同时开始,也可以用于协调主从线程,让主线程等待多个从线程的结果。
循环栅栏CyclicBarrier用于同一角色线程间的协调一致,所有线程在到达栅栏后都需要等待其他线程,等所有线程都到达后再一起通过,它是循环的,可以用作重复的同步。
5) 阻塞队列
阻塞队列有普通的先进先出队列,包括基于数组的ArrayBlockingQueue和基于链表的LinkedBlockingQueue/LinkedBlockingDeque,也有基于堆的优先级阻塞队列PriorityBlockingQueue,还有可用于定时任务的延时阻塞队列DelayQueue,以及用于特殊场景的阻塞队列SynchronousQueue和LinkedTransferQueue。
对于最常见的生产者/消费者协作模式,可以使用阻塞队列,阻塞队列封装了锁和条件,生产者线程和消费者线程只需要调用队列的入队/出队方法就可以了,不需要考虑同步和协作问题。
6) Future/FutureTask
在常见的主从协作模式中,主线程往往是让子线程异步执行一项任务,获取其结果,手工创建子线程的写法往往比较麻烦,常见的模式是使用异步任务执行服务,不再手工创建线程,而只是提交任务,提交后马上得到一个结果,但这个结果不是最终结果,而是一个Future,Future是一个接口,主要实现类是FutureTask。
Future封装了主线程和执行线程关于执行状态和结果的同步,对于主线程而言,它只需要通过Future就可以查询异步任务的状态、获取最终结果、取消任务等,不需要再考虑同步和协作问题。
3. 容器类
线程安全的容器有两类,一类是同步容器,另一类是并发容器。
1) 同步容器
Collections类中有一些静态方法,可以基于普通容器返回线程安全的同步容器,比如:
31public static <T> Collection<T> synchronizedCollection(Collection<T> c)2public static <T> List<T> synchronizedList(List<T> list)3public static <K,V> Map<K,V> synchronizedMap(Map<K,V> m)它们是给所有容器方法都加上synchronized来实现安全的。同步容器的性能比较低,另外,还需要注意一些问题,比如复合操作和迭代,需要调用方手工使用synchronized同步,并注意不要同步错对象。
而并发容器是专为并发而设计的,线程安全、并发度更高、性能更高、迭代不会抛出ConcurrentModificationException、很多容器以原子方式支持一些复合操作。
2) 写时拷贝的List和Set
CopyOnWriteArrayList基于数组实现了List接口,CopyOnWriteArraySet基于CopyOnWriteArrayList实现了Set接口,它们采用了写时拷贝,适用于读远多于写,集合不太大的场合。不适用于数组很大,且修改频繁的场景。它们是以优化读操作为目标的,读不需要同步,性能很高,但在优化读的同时就牺牲了写的性能。
3) ConcurrentHashMap
HashMap不是线程安全的,在并发更新的情况下,HashMap的链表结构可能形成环,出现死循环,占满CPU。ConcurrentHashMap是并发版的HashMap,通过分段锁和其他技术实现了高并发,读操作完全并行,写操作支持一定程度的并行,以原子方式支持一些复合操作,迭代不用加锁,不会抛出ConcurrentModificationException。
4) 基于SkipList的Map和Set
ConcurrentHashMap不能排序,容器类中可以排序的Map和Set是TreeMap和TreeSet,但它们不是线程安全的。Java并发包中与TreeMap/TreeSet对应的并发版本是ConcurrentSkipListMap和ConcurrentSkipListSet。
ConcurrentSkipListMap是基于SkipList实现的,SkipList称为跳跃表或跳表,是一种数据结构,主要操作复杂度为O(log(N)),并发版本采用跳表而不是树,是因为跳表更易于实现高效并发算法。
ConcurrentSkipListMap没有使用锁,所有操作都是无阻塞的,所有操作都可以并行,包括写。与ConcurrentHashMap类似,迭代器不会抛出ConcurrentModificationException,是弱一致的,也直接支持一些原子复合操作。
5) 并发队列
各种阻塞队列主要用于协作,非阻塞队列适用于多个线程并发使用一个队列的场合,有两个非阻塞队列,ConcurrentLinkedQueue和ConcurrentLinkedDeque,ConcurrentLinkedQueue实现了Queue接口,表示一个先进先出的队列,ConcurrentLinkedDeque实现了Deque接口,表示一个双端队列。它们都是基于链表实现的,都没有限制大小,是无界的,这两个类最基础的实现原理是循环CAS,没有使用锁。
4. 任务执行服务
1) 基本概念
任务执行服务大大简化了执行异步任务所需的开发,它引入了一个"执行服务"的概念,将"任务的提交"和"任务的执行"相分离,"执行服务"封装了任务执行的细节,对于任务提交者而言,它可以关注于任务本身,如提交任务、获取结果、取消任务,而不需要关注任务执行的细节,如线程创建、任务调度、线程关闭等。
任务执行服务主要涉及以下接口:
Runnable和Callable:表示要执行的异步任务
Executor和ExecutorService:表示执行服务
Future:表示异步任务的结果
使用者只需要通过ExecutorService提交任务,通过Future操作任务和结果即可,不需要关注线程创建和协调的细节。
2) 主要实现方式 - 线程池
任务执行服务的主要实现机制是线程池,实现类是ThreadPoolExecutor,线程池主要由两个概念组成,一个是任务队列,另一个是工作者线程。任务队列是一个阻塞队列,保存待执行的任务。工作者线程主体就是一个循环,循环从队列中接受任务并执行。
ThreadPoolExecutor实现了生产者/消费者模式,工作者线程就是消费者,任务提交者就是生产者,线程池自己维护任务队列。当我们碰到类似生产者/消费者问题时,应该优先考虑直接使用线程池,而非重新发明轮子,自己管理和维护消费者线程及任务队列。
3) CompletionService
在异步任务程序中,一种场景是,主线程提交多个异步任务,然后希望有任务完成就处理结果,并且按任务完成顺序逐个处理,对于这种场景,Java并发包提供了一个方便的方法,使用CompletionService,这是一个接口,它的实现类是ExecutorCompletionService,它通过一个额外的结果队列,方便了对于多个异步任务结果的处理。
4) 定时任务
异步任务中,常见的任务是定时任务。在Java中,有两种方式实现定时任务:
使用java.util包中的Timer和TimerTask。
使用Java并发包中的ScheduledExecutorService。
Timer有一些需要特别注意的事项:
一个Timer对象背后只有一个Timer线程,这意味着,定时任务不能耗时太长,更不能是无限循环。
在执行任何一个任务的run方法时,一旦run抛出异常,Timer线程就会退出,从而所有定时任务都会被取消,
ScheduledExecutorService的主要实现类是ScheduledThreadPoolExecutor,它没有Timer的问题:
它的背后是线程池,可以有多个线程执行任务。
任务执行线程会捕获任务执行过程中的所有异常,一个定时任务的异常不会影响其他定时任务
所以,实践中建议使用ScheduledExecutorService。